The bolt will be normal mild steel so shouldn't be an issue to drill with a quality hss drill bit, being welded in will actually help, the trick is to be dead center of the bolt shaft


You are using an out of date browser. It may not display this or other websites correctly.
You should upgrade or use an alternative browser.
You should upgrade or use an alternative browser.
Technical Horrendously stuck bolt in sump, been working on it for 3 days, any ideas?
- Thread starter spleenharvester
- Start date
Currently reading:
Technical Horrendously stuck bolt in sump, been working on it for 3 days, any ideas?
Cobalt drill bit will work 


I would start of with quite a small drill so as you can get as near to the centre as possible! then go up in sizes to what you need if you start of big you only have one chance to get it right!
There's a real risk of breaking a smaller drill in the hole.I'd start smaller, and work up.
Last edited:
Ever since I was shown how to weld a nut to the end of a broken bolt/stud I have to say that this method has been my preference. The extreme heat imparted to the stud/bolt has a very great beneficial effect on loosening it. Mind you, I'm very fortunate in that I have a MIG/MAG welder and was shown by someone experienced with this technique. This works exceptionally well where ally casings are concerned as you won't weld to the casing if you get a bit clumsy with the welding and the differential in expansion between the steel of the stud and the ally is so great it breaks the hold between them. Even with cast iron casings, the weld won't "stick" to the casting with any great enthusiasm. You do need to be a bit more careful when the component is steel though.
As is being said above, if you're going to drill then it's very important to find the exact centre of the bolt/stud and centre pop it so the drill won't wander. If you're looking at a protruding bolt/stud it's easy to find it's centre, however if you're looking at a bolt/stud which is flush with the casting surface then the apparent centre of the fixing will be offset. Why? because of the depth of the thread - so the effect is worse with a course deep thread than a fine and shallow thread. With a flush fixing you will be seeing the tip of the thread on one side and the root of it on the other. So you have to bias the centre mark slightly towards the root side to get the true centre.
A cobalt drill does work well but one of my local wee garage friends absolutely swears by carbide drills for this sort of work. I always start with a smaller diameter, but not too small or, as said above, it'll be very likely to snap. I don't like to use anything below about 3 or 4 mm. then go up to larger sizes. Drilling with a smaller diameter to start with - must be nice and sharp which helps it not to snap as it will cut without having to apply a lot of linear force - lets it penetrate quicker but also helps the bigger drills following it to cut more easily. In this particular situation, if it all goes totally pear shaped, There should be enough "meat" in the casting to simply drill the hole out to take the next bigger size and retap to suit.
Just a wee final comment. If you're going to consider using a screw extractor - often referred to as an easy out because one well known brand is "EZ-out" - be very careful indeed. These tools are made from very hard and brittle metal. Generally speaking, the cheaper they are the more brittle the'll be as the cheap ones are made from high carbon steel but the more expensive ones are "tool steel". If you break one off in the hole, well, you'll really really wish you hadn't! There are situations where they work well but I would argue that you need to have "the feel" for using them - they feel just slightly "springy" a moment before they snap and getting "the feel" for this is a great skill.
Last edited:
agree with all above very comprehensive reply im sure the OP is grateful for!Ever since I was shown how to weld a nut to the end of a broken bolt/stud I have to say that this method has been my preference. The extreme heat imparted to the stud/bolt has a very great beneficial effect on loosening it. Mind you, I'm very fortunate in that I have a MIG/MAG welder and was shown by someone experienced with this technique. This works exceptionally well where ally casings are concerned as you won't weld to the casing if you get a bit clumsy with the welding and the differential in expansion between the steel of the stud and the ally is so great it breaks the hold between them. Even with cast iron casings, the weld won't "stick" to the casting with any great enthusiasm. You do need to be a bit more careful when the component is steel though.
As is being said above, if you're going to drill then it's very important to find the exact centre of the bolt/stud and centre pop it so the drill won't wander. If you're looking at a protruding bolt/stud it's easy to find it's centre, however if you're looking at a bolt/stud which is flush with the casting surface then the apparent centre of the fixing will be offset. Why? because of the depth of the thread - so the effect is worse with a course deep thread than a fine and shallow thread. With a flush fixing you will be seeing the tip of the thread on one side and the root of it on the other. So you have to bias the centre mark slightly towards the root side to get the true centre.
A cobalt drill does work well but one of my local wee garage friends absolutely swears by carbide drills for this sort of work. I always start with a smaller diameter, but not too small or, as said above, it'll be very likely to snap. I don't like to use anything below about 3 or 4 mm. then go up to larger sizes. Drilling with a smaller diameter to start with - must be nice and sharp which helps it not to snap as it will cut without having to apply a lot of linear force - lets it penetrate quicker but also helps the bigger drills following it to cut more easily. In this particular situation, if it all goes totally pear shaped, There should be enough "meat" in the casting to simply drill the hole out to take the next bigger size and retap to suit.
Just a wee final comment. If you're going to consider using a screw extractor - often referred to as an easy out because one well known brand is "EZ-out" - be very careful indeed. These tools are made from very hard and brittle metal. Generally speaking, the cheaper they are the more brittle the'll be as the cheap ones are made from high carbon steel but the more expensive ones are "tool steel". If you break one off in the hole, well, you'll really really wish you hadn't! There are situations where they work well but I would argue that you need to have "the feel" for using them - they feel just slightly "springy" a moment before they snap and getting "the feel" for this is a great skill.
Thanks. Remembering what it was like when I was young and didn't know "diddly squat" I like to always give as much info as I can. Sorry to all you older and more experienced guys, if I do seem to "go on" a bit at times?agree with all above very comprehensive reply im sure the OP is grateful for!
Much rather have to much information than not enough!IThanks. Remembering what it was like when I was young and didn't know "diddly squat" I like to always give as much info as I can. Sorry to all you older and more experienced guys, if I do seem to "go on" a bit at times?
") am of the same school why use a sentence when a paragraph will do!!
am of the same school why use a sentence when a paragraph will do!!

spleenharvester
Member
Thank you for your replies everyone, going to have a crack at it today, will keep you updated!
spleenharvester
Member
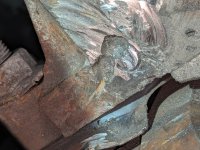
Okay so I've been able to remove the final bit of the head with a better dremel disc (those speedclic things are rubbish!). I can finally see the thread now, though some of it has been destroyed - see attached. The problem I'm having now is that I can't drill a pilot hole. I'm using DeWalt HSS bits as it's all I've got in til payday, could this be the issue? I can't maneuver a drill into a 90 degree angle because the axle is in the way. I've tried inserting one of those DeWalt 4mm bits into a Dremel extension to get round this but I just can't get into it at all. Centre punch can't seem to get a dent into it either. Any ideas?
Also - what's the best way to repair the mating surface once I've recovered the threads - should I maybe bring it back smooth with JB Weld? Or just put extra RTV on? It looks like the inside edge of the mating surface is clean fortunately so I'm hoping it isn't too much of a problem
Also - what's the best way to repair the mating surface once I've recovered the threads - should I maybe bring it back smooth with JB Weld? Or just put extra RTV on? It looks like the inside edge of the mating surface is clean fortunately so I'm hoping it isn't too much of a problem
Attachments
think you ought to wait till payday and invest in a carbide drill Puggit auld jock suggested! youve come this far so dont want to screw it up for the sake of a few quid! assuming you get it out and re-threaded so a new stud fits correctly! i would use some sort of chemical metal to level out the matting surface! J b weld is very good but takes at least 24 hours to set properly and i have found it tends to flow or drip so not the best in this location need something that mixes up thick and stays in place! sand back with emery on a block to keep surface flush and flat mask any exposed parts to keep the dust out !, check the fit by offering up the sump until your happy its flat and will seal properly if done correctly no extra rtv need be used which is good as you dont want any excess squeezed out into the sump with the potential of blocking the oil pick up!
Last edited:
spleenharvester
Member
I agree, think I'll just have to wait til payday, seems like I only get one shot at this. Thank you!
A better punch and bigger hammer to mark it.
Move the axle stand, if you cant go in straight then there's no point.
Drilling harder metal needs a slower speed to let the tip cut. With more force (not so much that the drill goes bendy!)
You'll probably need a tap too, to either cut a new threads or clean the old.
Move the axle stand, if you cant go in straight then there's no point.
Drilling harder metal needs a slower speed to let the tip cut. With more force (not so much that the drill goes bendy!)
You'll probably need a tap too, to either cut a new threads or clean the old.
You've got a dremel, so you could even make your own tap from a spare bolt of the same size and thread - but first, double check it is the same by screwing it into one of the undamaged bolt holes in the block.You'll probably need a tap too, to either cut a new threads or clean the old
There are plenty of videos on the 'net showing you how to do this.
A dremil would cut a slot in the bolt and an impact driver with a screwdriver bit (the type you hit with a hammer) would undo that. I have one, it's ancient but got me out of trouble before.
Apparently it had full Hex Head, but wouldn't budge, and chewed that head to nothing (along with mentions of "weld")A dremil would cut a slot in the bolt and an impact driver with a screwdriver bit (the type you hit with a hammer) would undo that. I have one, it's ancient but got me out of trouble before.
So I can it see an improvised Slot actually driving the thing

spleenharvester
Member
I'll give it a try - I have some cobalt bits coming later too! Cheers
Aye Jack, there's some "strange" deposits, I noticed them too. However the block is cast iron and the sump is steel so very unlikely you'd get a good weld between the two? Just thoughts bouncing around in this old head of mine.Zooming in on photo
To me it looks like there are blobs of weld left .......perhaps the last sump was welded to the block where bolt had snapped.
Similar threads
- Replies
- 33
- Views
- 2K