Technical 1978 124 Project

Currently reading:
Technical 1978 124 Project

@smahaley

I just remembered something else :-

When removing the engine and transmission as one unit, the centre track rod (i.e. the rod between the steering box pitman arm and the idler box arm) needs to be disconnected as it's in front of the clutch bellhousing so it's in the way. This info is in the Haynes Workshop Manual, of which I believe you have a copy?

This centre track rod doesn't have to be disconnected if the engine is being removed on it's own leaving the transmission in the car - my preferred option, which is probably why I forgot to mention this step.

If you don't have a suitable ball joint separator, (most joint separators are designed to fit over the end of a steering arm and may not fit onto the arm when approaching from one side, which is the case here) you could go 'old school' - loosen the ball joint nuts, leave them on by a few threads to protect the threads, place a lever/prybar at an angle between the pitman arm and the centre track rod and while trying to lever them apart, strike the side of the arm sharply with a hammer, adjacent to the ball joint pin to be separated (I don't like doing it this way as there is a risk of damaging the dust boot on the joint). So careful does it... Then separate the other joint. Make a note/sketch of which way around the centre track rod is fitted, most have a slight double offset for clearance reasons.
 
Last edited:
Thoughts on this dash? I'm wondering what to do to maybe repair the splits? Thanks in advance!
View attachment 460651
@smahaley
I've seen these being repaired by filling and usually spraying afterwards. It's a good idea to stabilize the foam in the crack before applying a filler, afaik, an epoxy resin can be used for this.


If it was my dash panel, I'd use some epoxy resin or similar (maybe just some wood varnish?) to stabilise the foam in the crack, use a heat gun to press the cracked edges down level, then use some black silicone sealant (or a rubber product if I could find something suitable), ensuring the 'filler' was flush with the surrounding panel, no higher so I wouldn't have to sand/shave back the excesss. When thoroughly cured, I'd consider trying to duplicate the imprinted surface in the now filled area - maybe by heating the silicone or rubber sealer and pressing a piece of perhaps? emery cloth or similar into the softened surface (I used to repair scuffed, non-painted car bumper corners by this method before repair kits/tools became available).

There are also 'generic graining pads' now available that you can heat and press into the repaired area to duplicate the required pattern.
Here's a copy of an article in a recent British car magazine that deals with restoring classic cars, see Step 14 for the graining pad being used:-

Scan_20250228.png


P.s. There may be more suitable fillers etc., than what I've suggested above, available in Auto Supply stores in the U.S. (idk as I'm in Ireland).

P.s.s. For those not in the U.K., a 'Numpty' is someone who does something silly/stupid, i.e. don't make this mistake unless you want to be a Numpty.
 
Last edited:
Short answer is yes, but I wouldn't do it this way!
2 likely problems - the 3 bolts can be difficult to remove because the rubber doughnut coupling is putting them under pressure (especially if has swollen due to oil contamination), often a strong strap wrench, large C clamp or very large adjustable pliers needs to be used to remove the bolts.
Also, there is a small extension on the driveshaft spider (that fits over a guide ring fitted on the end of the transmission output shaft) that extends forward inside the rubber coupling that might not clear the rubber coupling when the 3 bolts have been removed, it can be slid back on it's splines but you might still not have enough clearance.

Whenever I go to remove something, I always try to think also of refitting it, i.e. is this way of removing something that seems easy then going to give me aggravation when I try to refit it? Sometimes it's better to remove a little more if it will make it easier to refit.

So, my approach would be to disconnect the driveshaft (4 bolts/nuts at the rear axle), the safety strap (2 nuts) and the centre driveshaft mounting (2 nuts)(I don't separate the centre mounting from it's mounting bracket). Then before removing the driveshaft from the spider in the centre of the rubber coupling, I'd clean the area and find the alignment marks iirc they're > aligning with < (one mark is on the front of the driveshaft, pointing forwards, just behind the splines, the other is on the spider, pointing rearwards, just before the pressed metal sleeve. It doesn't really matter if you can't find these marks on the car, you'll be able to find them with the driveshaft off the car. Then, pull back the little rubber dust boot and pull the driveshaft from the splined coupling.
The Haynes 'shop manual has see-through diagrams of the front of the driveshaft that may make things a little clearer.
Just to clarify, I leave the rubber coupling bolts alone, I disconnect the driveshaft and pull it out of it's splined coupling that is inside the rubber coupling.

With the driveshaft removed from the car, I can then check the 'U' joints and the centre bearing and it's rubber mounting - this centre bearing rubber mounting is a known failure point on these cars - it's one of the things I wouldn't take any chances with (I explained why in a previous post).

Don't forget to disconnect the speedometer drive cable (it's easier when you've removed the trans. rear mounting crossmember), the clutch cable and the engine ground cable if it's attached to the bottom of the trans. bellhousing.

P.s. you might re-read my post #58 above, you acknowledged it while I was editing it to add some further info.
Thank you!
@smahaley

I just remembered something else :-

When removing the engine and transmission as one unit, the centre track rod (i.e. the rod between the steering box pitman arm and the idler box arm) needs to be disconnected as it's in front of the clutch bellhousing so it's in the way. This info is in the Haynes Workshop Manual, of which I believe you have a copy?

This centre track rod doesn't have to be disconnected if the engine is being removed on it's own leaving the transmission in the car - my preferred option, which is probably why I forgot to mention this step.

If you don't have a suitable ball joint separator, (most joint separators are designed to fit over the end of a steering arm and may not fit onto the arm when approaching from one side, which is the case here) you could go 'old school' - loosen the ball joint nuts, leave them on by a few threads to protect the threads, place a lever/prybar at an angle between the pitman arm and the centre track rod and while trying to lever them apart, strike the side of the arm sharply with a hammer, adjacent to the ball joint pin to be separated (I don't like doing it this way as there is a risk of damaging the dust boot on the joint). So careful does it... Then separate the other joint. Make a note/sketch of which way around the centre track rod is fitted, most have a slight double offset for clearance reasons.
yes thanks again: I spent some time yesterday with a cup of coffee and the Haynes and noted that the steering arm will need to be addressed. This may be a case for the joint separator loan from the local supply shop…
 
---------------------This may be a case for the joint separator loan from the local supply shop…
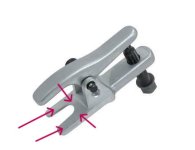
There are different styles of ball-joint separators available, the type I'd suggest (note the areas arrowed that need to be flat) is:-

Balljoint separator-Screenshot_28-2-2025_213644_.jpeg


The following won't work as they won't fit the flat in the centre of the arm: -

Screenshot_28-2-2025_211613_www.vidaxl.ie.jpeg


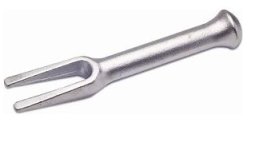
This type will work but will *destroy the rubber dust boot and it's securing ring :-

Screenshot_28-2-2025_211820_www.bing.com.jpeg
* I try to never ever destroy a part when removing it, even when I fully intend to replace it with a new one. Think about this - what happens if that new part is not available (never mind if it was when you last checked on the 'net, what matters is if it's still available when you try to order it.) or what happens if the new part supplied doesn't fit and can't be modified to use it, you're then in trouble...

Also, I tend not to throw away, what to others would be regarded as 'scrap', parts for a long time - they might not be re-useable but could serve as a sample for others to help search for the same part, or to measure up if having a new part machined, or for use in a mock-up situation or simply to demonstrate the differences between what may appear to be identical parts.
 
Last edited:
There are different styles of ball-joint separators available, the type I'd suggest (note the areas arrowed that need to be flat) is:-

View attachment 461942


The following won't work as they won't fit the flat in the centre of the arm: -

View attachment 461943


This type will work but will *destroy the rubber dust boot and it's securing ring :-

View attachment 461945
* I try to never ever destroy a part when removing it, even when I fully intend to replace it with a new one. Think about this - what happens if that new part is not available (never mind if it was when you last checked on the 'net, what matters is if it's still available when you try to order it.) or what happens if the new part supplied doesn't fit and can't be modified to use it, you're then in trouble...

Also, I tend not to throw away, what to others would be regarded as 'scrap', parts for a long time - they might not be re-useable but could serve as a sample for others to help search for the same part, or to measure up if having a new part machined, or for use in a mock-up situation or simply to demonstrate the differences between what may appear to be identical parts.
Very helpful as always! I'll keep these images handy when i go source the tool. Tomorrow I'm going to try to complete the disconnections: the clutch cable end broke off when I tried to loosen it , so there's that. I've been pretty good so far about not breaking anything and haven't thrown much away, hoping to just refurbish things as I can.
 
Update: I did find a flat sided joint separator for loan from a local store, and despite my forgetting to detach the power supply to the starter, managed to extract the motor and trans. In retrospect the only thing I’d do differently would be to remove the bottom half of the shifter arm (that’s why the angle of extraction is so acute).
IMG_7842.jpeg

Pushed the body back outside and then lowered the trans end onto a table, disconnected that, and then brought up my brand new engine stand and voilà. Now I can work on the fun parts on rainy days and the body on the sunny days.
IMG_7850.jpeg
 
Just 2 cents worth, I check ebay every given day for vintage fiat parts and in regards to your dash you just might find the replacement panels in decent shape cheaper than repairing your old ones, for example there's a decent instrument panel currently listed for $35...you just might find the 3 dash pieces for not too much over $100...I get restoring the old original ones to the car, and the end result of restoring them, and the satisfaction of doing the work yourself, but in a way time is money on a major project also , in addition to material cost which might equal purchasing replacements and the desired end result...not in any way trying to tell you what to do, just a thought..:)
 
Last edited:
Just 2 cents worth, I check ebay every given day for vintage fiat parts and in regards to your dash you just might find the replacement panels in decent shape cheaper than repairing your old ones, for example there's a decent instrument panel currently listed for $35...you just might find the 3 dash pieces for not too much over $100...I get restoring the old original ones to the car, and the end result of restoring them and the satisfaction of doing the work yourself, but in a way time is money also in addition to material cost and the desired end result...not in any way trying to tell you what to do, just a thought..:)
Thanks, Slotman -
I'll consider that - I do have some affinity for the woodworking aspect, and see it as a way of adding my personal touch to the vehicle. We'll see - that particular project is on the back burner at the moment.
 
Thanks, Slotman -
I'll consider that - I do have some affinity for the woodworking aspect, and see it as a way of adding my personal touch to the vehicle. We'll see - that particular project is on the back burner at the moment.
Understood! And your making great progress! Above all, have fun!
 
Just a couple of discoveries:
IMG_7854.jpeg

Rear seal from the engine. Busted…

IMG_7806.jpeg

The distributor. Yeesh. The rotor metal came out in pieces.

Just ordered a set of engine seals and gasket kit for the motor as I get into it. I wonder if the distributor can be saved?
 
View attachment 460164
I’ve got another thread on floor panel rust going, but thought I’d start another on other technical issues - this one is about disassembly and reassembly.

Since I started last month, I’ve removed all of the interior, including the dash. Taking the doors off helped with that, and as the car came with a roll bar (installed in 1978 when it was sold), I had to spend some quality time with sockets, wrenches, penetrating oil and yes eventually a cutoff wheel.

My process has been to bag the salvageable hardware (bolts, nuts washers, clips etc ) and label them by part. In a few cases I’ve been reinserting the bolts into their homes on the body to avoid the bag / label process.

Today I am taking a break from removing the bumpers and am washing removed parts (as possible) with a soap solution, clean water and rags. With radio on and coffee at hand, it is a great way to escape.

And I don’t want to refit dirty parts.

Starting with: hasn’t run in 2 years; engine issues
Goal: driveable car with minimal upgrades.
If you are doing a big resto I would get an ultrasonic cleaner, 3 lit size is sub £100 and you can fit a 40 IDF carb in. I have used mine for loads of things. Originally bought for a carb overhaul.
 
Thanks, Slotman - I did do a first stage POR 15 treatment of the fuel tank today to remove rust. Not sure how effective that will be. It does have baffles, so that confounds the view and treatment some. I actually think it's in pretty good shape on the inside. I did get a talkin-to from a mechanic who happened to be in the parts store at the same time as me - told me I should do new everything or at a minimum reline the tank, etc. etc. I'll give it a look again tomorrow. Thanks for the advice on the respirator: I actually have a 2 can mask that I used years ago; I will look for replacement cartridges.
Another tip to remove rust from metal parts is to use molasses! Its cheap, non toxic and easily available. You dilute it with water, light scale takes 1-2weeks, heavier scale longer. I cleaned some heavily corroded irin chains and that took a couple of months. You wash with water, dry and its ready for paint!
 
Another tip to remove rust from metal parts is to use molasses! Its cheap, non toxic and easily available. You dilute it with water, light scale takes 1-2weeks, heavier scale longer. I cleaned some heavily corroded irin chains and that took a couple of months. You wash with water, dry and its ready for paint!
Wow - never knew that. Might give it a whirl!
 
If you are doing a big resto I would get an ultrasonic cleaner, 3 lit size is sub £100 and you can fit a 40 IDF carb in. I have used mine for loads of things. Originally bought for a carb overhaul.
Thanks, @Twink80 - I’ve thought about getting one. Will see how far I get with my bucket of ChemDip…
 
IMG_7855.jpeg

Status: due to the raggedy center mount / carrier and the broken grease fitting on one u-joint, I’ve taken the shaft apart and have ordered a kit. One piece at a time….

This is significant for me in this project as this is the first substantial repair I am doing to the car’s systems.
 
View attachment 462635
Status: due to the raggedy center mount / carrier and the broken grease fitting on one u-joint, I’ve taken the shaft apart and have ordered a kit. One piece at a time….

This is significant for me in this project as this is the first substantial repair I am doing to the car’s systems.
Hi I don’t know if you marked up the parts before you disassembled the propshafts and UJ’s but they are a balanced assembly so orientation is important. You may have to get it rebalanced when you have reassembled it.
The centre bearing and yoke also have a specific orientation (check your manual)
I have just serviced my propshaft so went through all this
Gold star! Yes, and gold spot (painted on the rear shaft) is matched to a mark you can't see on the shorter forward shaft. Thanks to the wisdom of folks here (and some reading of the manuals) I think I'm in good shape to reassemble with balance.
 
Update: new discoveries.
I got the driveshaft together and, trying to take it easy on my back, looked for a next thing to disassemble and went to the exhaust side of the engine.

exhaust manifold: missing 2 of the 5 nuts to hold it on. Looks cracked through in the middle where it mates with the head, and like a hairline crack just underneath where the pipes join up. I would value others’ assessment:
IMG_7876.jpeg

IMG_7877.jpeg

I was already considering a new header / exhaust treatment.

Side question: this car had a cat converter on it. Any strong opinions against NOT refitting or replacing that?
 
Back
Top