Best to prime the bare steel before you apply the seam sealer Progress with this sort of work is usually pretty slow I find, but always worth it when it is all done and you know there is no more rotten metal anywhere!
You are using an out of date browser. It may not display this or other websites correctly.
You should upgrade or use an alternative browser.
You should upgrade or use an alternative browser.
General Rescued Panda!
- Thread starter pooroldcodger
- Start date
Currently reading:
General Rescued Panda!
Thanks for that. I will do. Yes it is pretty slow but I am in no rush and learning as I go!Best to prime the bare steel before you apply the seam sealerProgress with this sort of work is usually pretty slow I find, but always worth it when it is all done and you know there is no more rotten metal anywhere!
Best to prime the bare steel before you apply the seam sealerProgress with this sort of work is usually pretty slow I find, but always worth it when it is all done and you know there is no more rotten metal anywhere!
As everybody says, it is the preparation of the site and of the replacement metal that takes the longest.
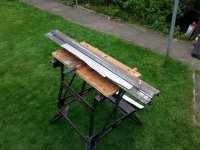
Realising that I would have to bend quite a few pieces of steel I made my "prototype" metal bender.
It works, but since the picture was taken I have added two further bolts to clamp the metal down as I found the 1m length was too much for 2 M6 bolts.
I won't be able to use steel wider than about 40cm if I use the extra 2 bolts but that may not matter on thinner steel. I am not happy though with my handle though, it is not strong enough. At the moment it is a bolt screwed in to a welded on nut, but it bent under the pressure of bending a fold. Any ideas to improve on this? I would like to have the handle removable to save space, if possible.
any comments gratefully received (keep them polite!)
Attachments
Ok so my L-shaped repair piece is almost ready. It will sit on the repaired flat floor section and sit on the chassis leg. The upright part of the L-shape will repair the inner wing. As discussed above I will plug weld the flat section but I now have to finish cutting the shape for the inner wing section. I am not sure whether to cut the shape required to fit the gap exactly and estimate how much to allow for the changes due to heat (I don't want to end up trying to fill a gap with weld), or on the other hand as it is never going to be a concourse car just seam weld it and put up with the join line in the boot? I am a new welder so I am unlikely to achieve a super smooth butt weld over what is quite a big patch anyway.
All advice gratefully received!
All advice gratefully received!
A lap weld will be the easiest option as you say, should be possible to make it looks quite neat with good welding and some careful application of seam sealer.
Be careful of warping the metal when welding, if you weld about an inch at a time you can leave to cool for a minute or two inbetween which should help reduce any warping, not so cruicial on an inner arch but vital when doing exterior panels as you can easily make a mess which is hard to put right!
Expansion of the metal is not really an issue when doing a butt weld aslong as you tack weld every inch or 2 between fully welding
The folder looks good by the way. A larger diameter rod might help for the handle? Or what about one on either end which should spread the load?
Thanks for the advice on the welding. I have decided to lap weld it now for sure. I feel sure that I will end up with a better and neater join due to my limited skills than if I attempted a long butt weld.
On the subject of the steel folder / bender, I was awake at 4am this morning (I've got a bad cough) and suddenly thought, you idiot why didn't you put two handles on???
The cough has also delayed my welding a bit....not keen even with a mask to be spraying the zinc primer around with my chest. ..might finish me off!
I am gradually working my way around my little Panda friend and repairing holes as I go. After being in one place for working on and not even started up since about February, I charged the battery yesterday and fired her up today. First turn of the key after 3 months!! 
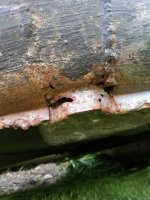
I have now come to the point of tackling the driver's side sill. Since I have a new complete sill in my shed it would seem daft not to put it on. See attached pics of the existing sill. I am sure that once the old sill is off I will find more welding practise behind it!
My question is very straightforward - how do I get the old sill off? It has a couple of patches on it which you can see through the under seal on one of the pics.
I want to get the sill off as neatly as I can obviously.
As usual, any comments gratefully received.
Attachments
Ideally you need to find the spot welds and drill them out, then where the new sill joins on the wings cut about 15mm below this with a cutting disc. The 15mm is there to allow you to put a step in (joddle) the bodywork, then the new sill will sit flush against this.
Ok thanks Vern. Will do..
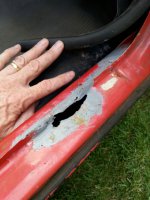
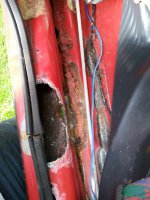
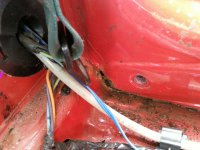
I thought I would have a look at the passenger side to to see what's on the agenda........
Quite a lot is the answer!
The inner sill is completely shot so I have to find a way to create a new inner sill and attach it to the floor section which has previously been repaired so at least that part is solid.
I am not sure how to tackle this section.
Quite a lot is the answer!
The inner sill is completely shot so I have to find a way to create a new inner sill and attach it to the floor section which has previously been repaired so at least that part is solid.
I am not sure how to tackle this section.
D'oh! Hope it attaches this time.
That's the last time I try to be clever and post from my phone!D'oh! Hope it attaches this time.
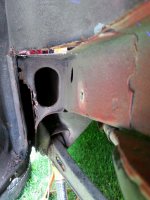
Here are the pictures.
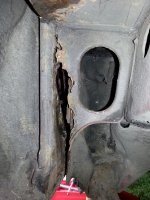
I am not sure how to tackle the under the wheel arch problem. I am not sure that cutting the sill off in front of it will allow me access to that piece that needs repairing.
Here we go, at last.That's the last time I try to be clever and post from my phone!
Here are the pictures.
I am not sure how to tackle the under the wheel arch problem. I am not sure that cutting the sill off in front of it will allow me access to that piece that needs repairing.
Attachments
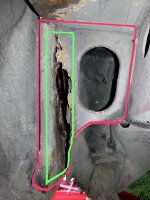
Does anybody have a picture of what this structure should look like ?Here we go, at last.
Is the outer sill / quarter spot welded to the left had side of this mounting?
Thanks.
Attachments
Bartpanda
Established member
yeah that will work.
i would have cut out the rust in a square then welded the patch in level with the cut.
thing is with patches, water gets behind the old rusty bit and the new patch.. give it 2 or 3 years and the rust is back again.. the pain is, you have to cut twice as much rust out and contend with old welds.
this part is only spot welded in too. so you could get away with seam welding on the bit with the 0 in it, then just spot welding it to the side of the inner arch.
when i was taking the rear leaf suspension off bex.. that whole thing came along with the rear axle. all the welds had rusted through.
Thanks. I haven't cut any out yet so the hole may well be much bigger by the time I start repairing! Useful to know about the spot welds, thanks.
The inner sill behind the strengthener looks like it needs repairing also as you can see into the sill cavity. The best way to do it is cut the outer sill off and get access from the outside. I think welding a patch over that will not really achieve much and will not be that easy due to lack of room.
Similar threads
- Replies
- 0
- Views
- 42


