General Rescued Panda!

Currently reading:
General Rescued Panda!

Nope, they would hardly rust at all if they were.

They don't hardly rust in comparison to the mk1 which isn't galvanised.

They only rot in certain areas which attract damp normally tbh, and the doors go more often as they're not galvanised.

I'm sure I've seen confirmation in print also that the shells are galvanised on the mk2.
 
Pandas were to cheap to bother and galvanise them, it is expensive and adds weight to the car , I thing first heavily galvanised cars were croma {about 45% mostly panels}and tipo{70% panels and some others}, but not the floor.
 
Last edited:
So, I have found a hole in the inner wing and I have cut out the rotten bit, leaving me with a hole about 10cm long and 2.5cm wide. Can this be repaired by welding a "patch" over it and seam weld it, or is it better to cut an exact size patch that will fit inside the hole and then seam weld it?
 
I have a question guys.
There is a length of plastic tubing which runs from the air vent at the base of the windscreen pillar and vaguely drains on to the inner wheel arch in the engine bay. On mine that has resulted in water draining down in to the little nook and cranny below the head lamp and sitting there, and then going rusty.I mean if you follow the line of the inner arch until it meets the front panel.
Is this the standard design? I was looking at perhaps extending this tubing and securing it down by the bottom of the radiator so that it drains properly on to the ground below rather than just willy nilly on to the inner arch.
Any thoughts on that or better suggestions?

It is a standard design. Extending the pipe shouldn't cause any issues.
 
Had to do this on my sisley, the proper way to do it is too cut the inner arch away to enable access to the edge of the boot floor, repair that as necessary, then make a new section of inner arch and weld it in. The chassis rail is thicker so that should be OK, all 3 sections should be plug welded together
Well after many months of my time ebing taken up with other things I staretd having a look at Belladonna the Panda today. Not too seriously as the weather wasn't great, but I started to have a closer look at the inside of the boot problem.
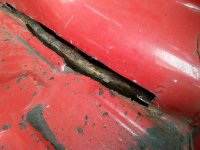
I cuts a slice out of the boot floor / inner wheel arch just to survey the damage.
Obviously there is more to cut out yet but reain stopped play.
I must say the chassis leg looks a bit crustier than I was hoping.
To those of you who have seen plenty of these, is it best to try to save the chassis leg or is it best cut out?
 

Attachments

  • Boot floor driver's side exploratory.jpg
    Boot floor driver's side exploratory.jpg
    606.5 KB · Views: 32
The chassis leg is thicker than the rest, so you will probably find that it is ok once you have removed the remains of the other layers and any other surface rust. If it is rotten it will only be the flange so not difficult to sort, it should not mean replacing large sections of the rail.

So, I plan to cut back the boot floor to solid metal then butt weld a piece that replaces the hole in the boot floor and sits flat on to the chassis leg flange. Then put in a new piece of steel to recreate the side wall of the boot and fold that at 90 degrees so that it sits on top of the chassis leg and boot floor and plug weld those 3 layers together.
Does that sound right?
 
Yes, that sounds spot on, if you are going to do a butt weld, you need to make sure that your repair piece fits perfectly and you are right back to solid metal with no thin slightly corroded bits otherwise you will just end up blowing through. You also need to have your welder set up correctly so you get full penetration and be careful when grinding the weld down as you can easily thin the surrounding metal.


It would be alot easier to do a lap joint and a joggler would be the best thing for the job. When I did my Sisley I used the joggler to do the boot floor repair peice, although I butt welded the inner wing as it can be seen from both sides.
Right -the joggler will be the best bet for the join in the boot floor.
I have cleaned the chassis leg up.You were right of course - it was the remains of the flange that were a bit crusty but the leg itself is fine.
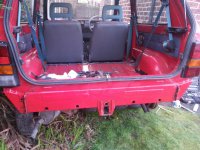
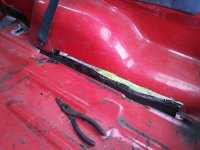
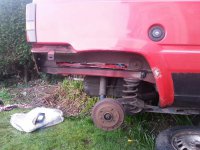
I have cut out all the rotten bits and beyond. The only part I am not sure how to tackle is below the rear seat belt mounting. It is solid but you only have to go about 2cm away to where it isn't. I was wondering whether I should cut it out completely?
You can probably see what I mean from the pics.
 

Attachments

  • rear bumper removed.jpg
    rear bumper removed.jpg
    624.6 KB · Views: 49
  • Boot floor 2.jpg
    Boot floor 2.jpg
    607.5 KB · Views: 57
  • bumper off boot floor from under wheel arch.jpg
    bumper off boot floor from under wheel arch.jpg
    621 KB · Views: 60
Make sure you clean the chassis leg flange to good shiny metal before you try to weld to it. Looks like you still have some bits of the boot floor attached to it also. I would run the grinder with a flexible sanding disc over it to get it really clean.

You have two options with the seat belt mounting point. Either cut just below the reinforcing plate and make a smaller right angled piece to weld back in, or drill out the spot welds on the reinforcing plate and remove it completely, do the repairs and then plug weld it back into place.
 
Well since my last report I have made a pilgrimage down to Vmanc's empire . It was great to meet Vern and see his projects first-hand, plus I picked up some new sills and some much-needed advice from the man himself. And not forgetting as well as being an ace Panda fettler he makes a fine cup of tea!
Thanks again Vernon.
I am now getting in to the stage of cutting and shaping pieces of steel to fill the holes, so I have become slightly diverted in to building a steel bending brake. I visited a steel stockholders this afternoon and bought various pieces of angle iron etc. It was like a throw back to 1975 with smoking allowed in the office and pictures of young ladies in various states of undress in their canteen! Still I managed to buy for £15 what would have cost me about £50 in Wickes.
I will keep you posted...
 
I have now constructed my steel bending contraption. It needs a bit of fine tuning to make it easier to use (it is a prototype after all!) but it does work, and the steel I used, plus some bits and pieces cost me around £15 all in. I will post a picture when I've finished it properly.
I know that several of our finest brains are down at the NEC today, but I am sure there are a few left twiddling their thumbs to answer this:
On the boot floor there is a rubbery sound -deadening type of finish which is about 2 or 3mm thisck which I have had to chop and scrape away in order to fix the boot floor / side wall . Is there something I can apply to my new piece of steel before I paint it to replicate this rubbery stuff?
 
As far as I am aware, you can only easily get stuff that you put on over the paint, it probably is possible to get the original overpaintable type but I imagine it will be more expensive and harder to get hold of.

I don't have much experience with sound deadening but I think Dynamat is the thing to go for.
 
That sounds good thanks. I will need to complete the repair then put some seam sealer in, then some of this sound deadening stuff, then paint it. I am glad to be finally making some progress !
I will try to get some more done over the Easter weekend.
 
Back
Top