Are all the vehicles on your drive green?
You are using an out of date browser. It may not display this or other websites correctly.
You should upgrade or use an alternative browser.
You should upgrade or use an alternative browser.
General Seat Panda Terra
- Thread starter Alixcompo
- Start date
Currently reading:
General Seat Panda Terra
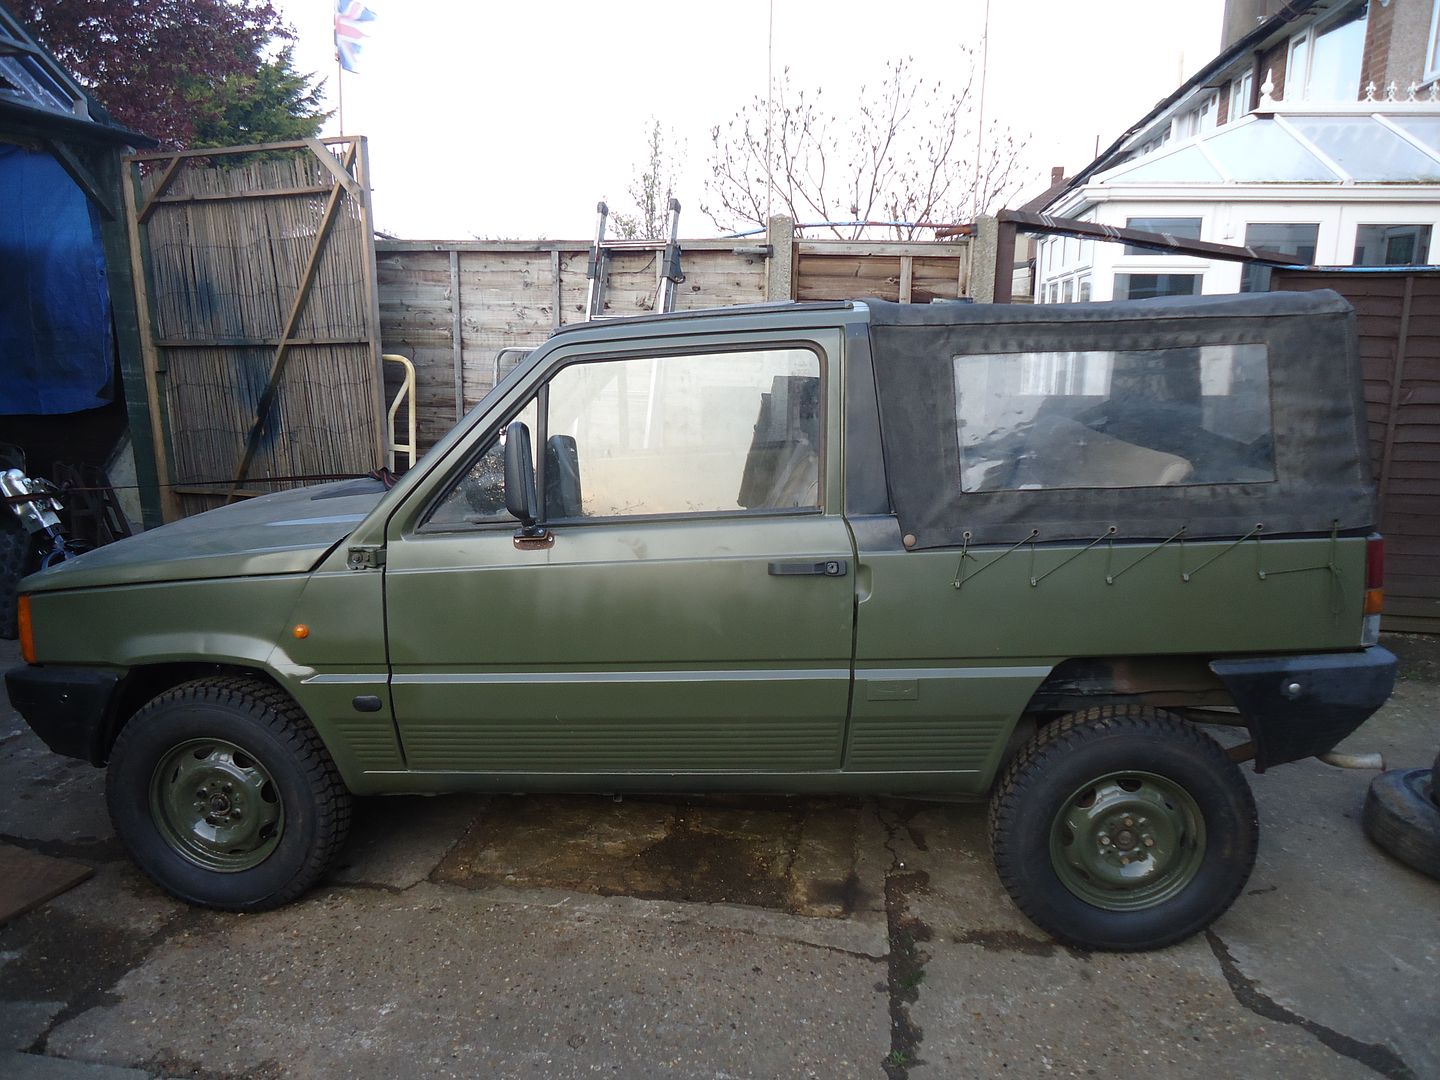
Yes and my neighbour liked the colour so his little Rascal truck is green too.
Or was it cos it was a windy day when I was spraying. Come to think of it, his conservatory is green as well..
Or was it cos it was a windy day when I was spraying. Come to think of it, his conservatory is green as well..
does look good with those nice large wheels... hmm. very nice indeed.
I've been able to spend some time on the 'Green Negleted One' recently, which is always a bonus.
In replacing the 900 engine with the 'Fire' engine and making everything 4x4 it was always going to be hit or miss if it all lined up perfectly.
Generally all seems well but I couldn't fail to notice that a lively take off in reverse resulted in a staccato rapping on the floorpan curtesy of the front of the rear propshaft.
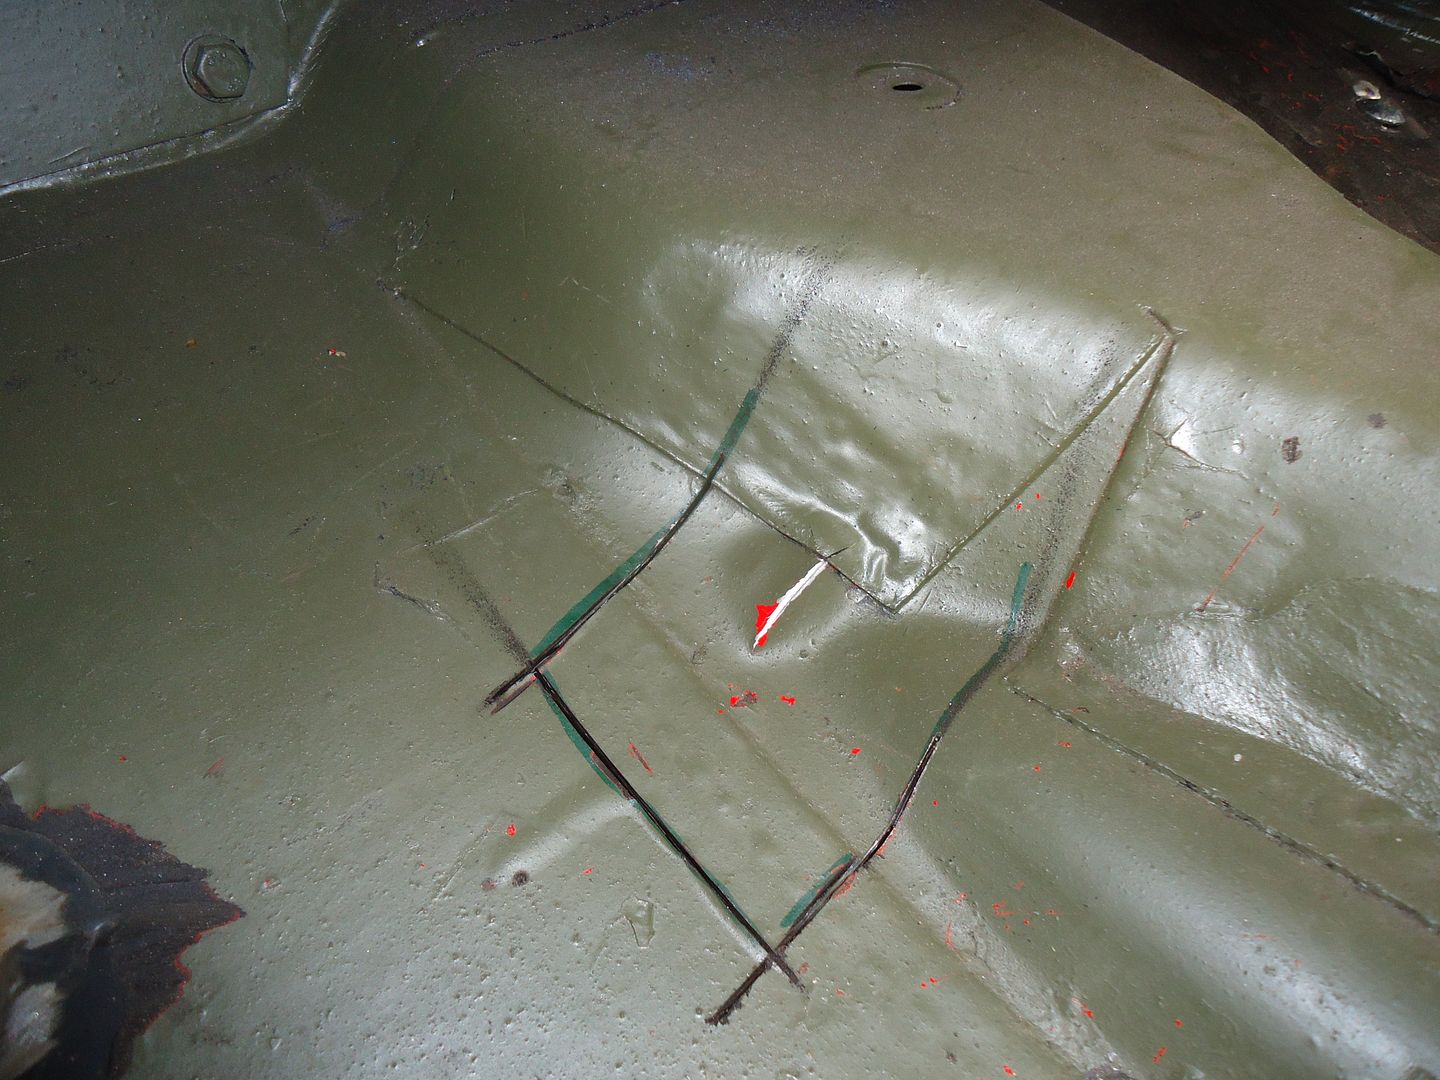
That silver line is the outline left by said joint.
I did think about laying underneath with a bit of wood and a lump hammer but this option appealed more.
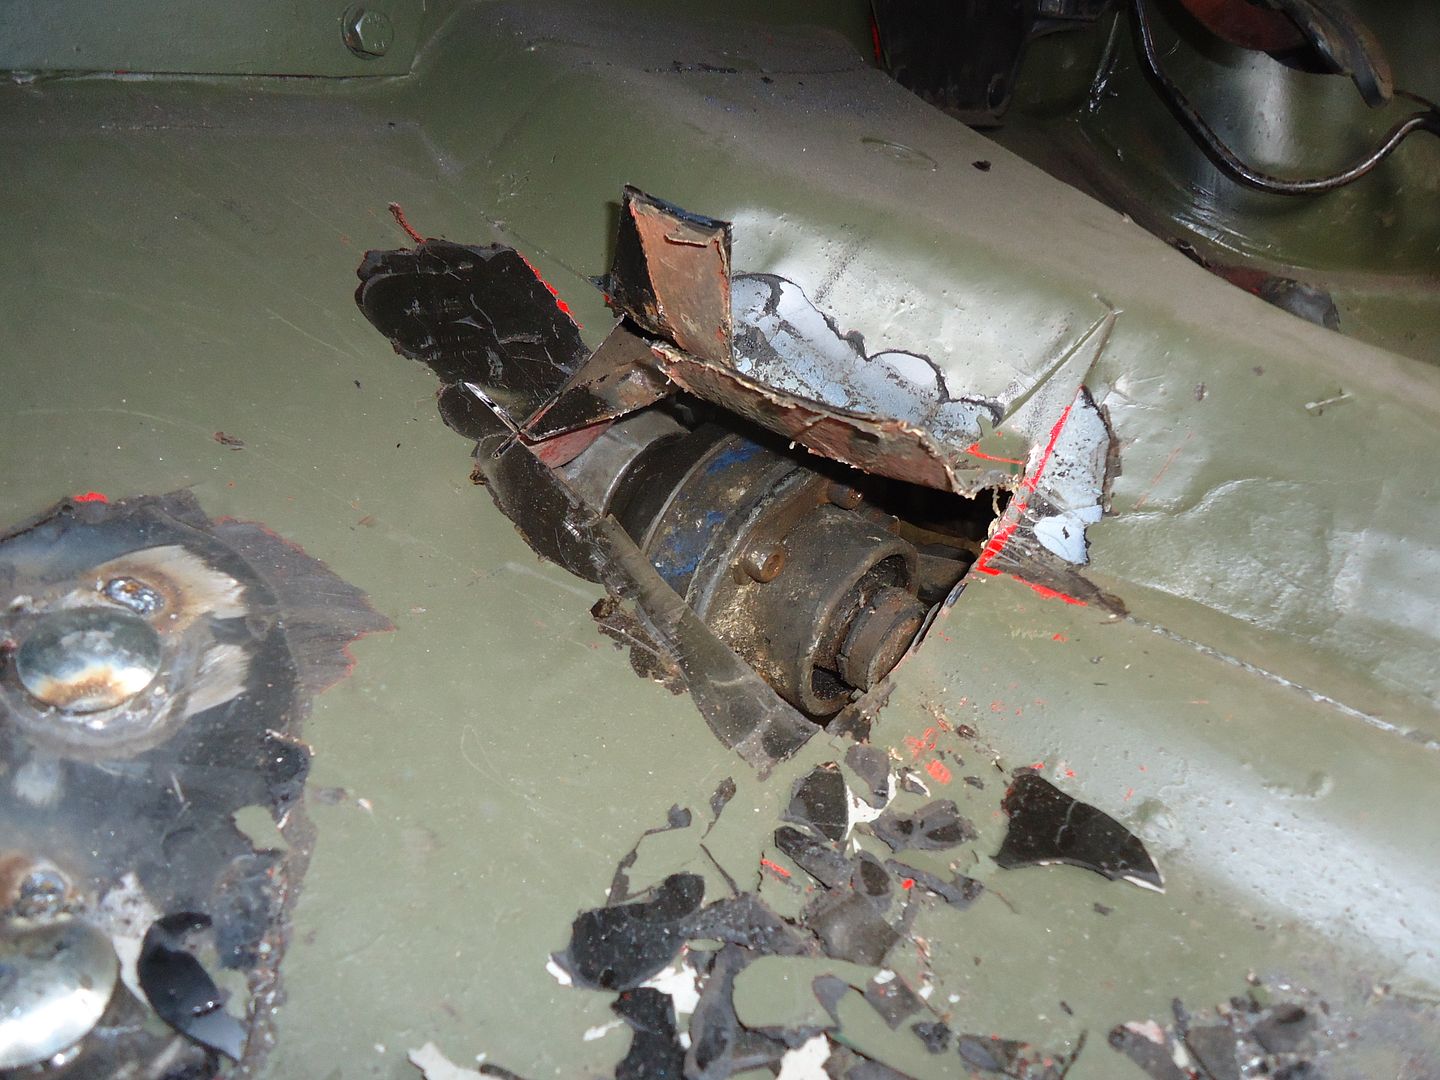
Mr Grinder met Mr floor. The following pics are rubbish but what they are attempting to explain is that I created a bulge around the prop joint.
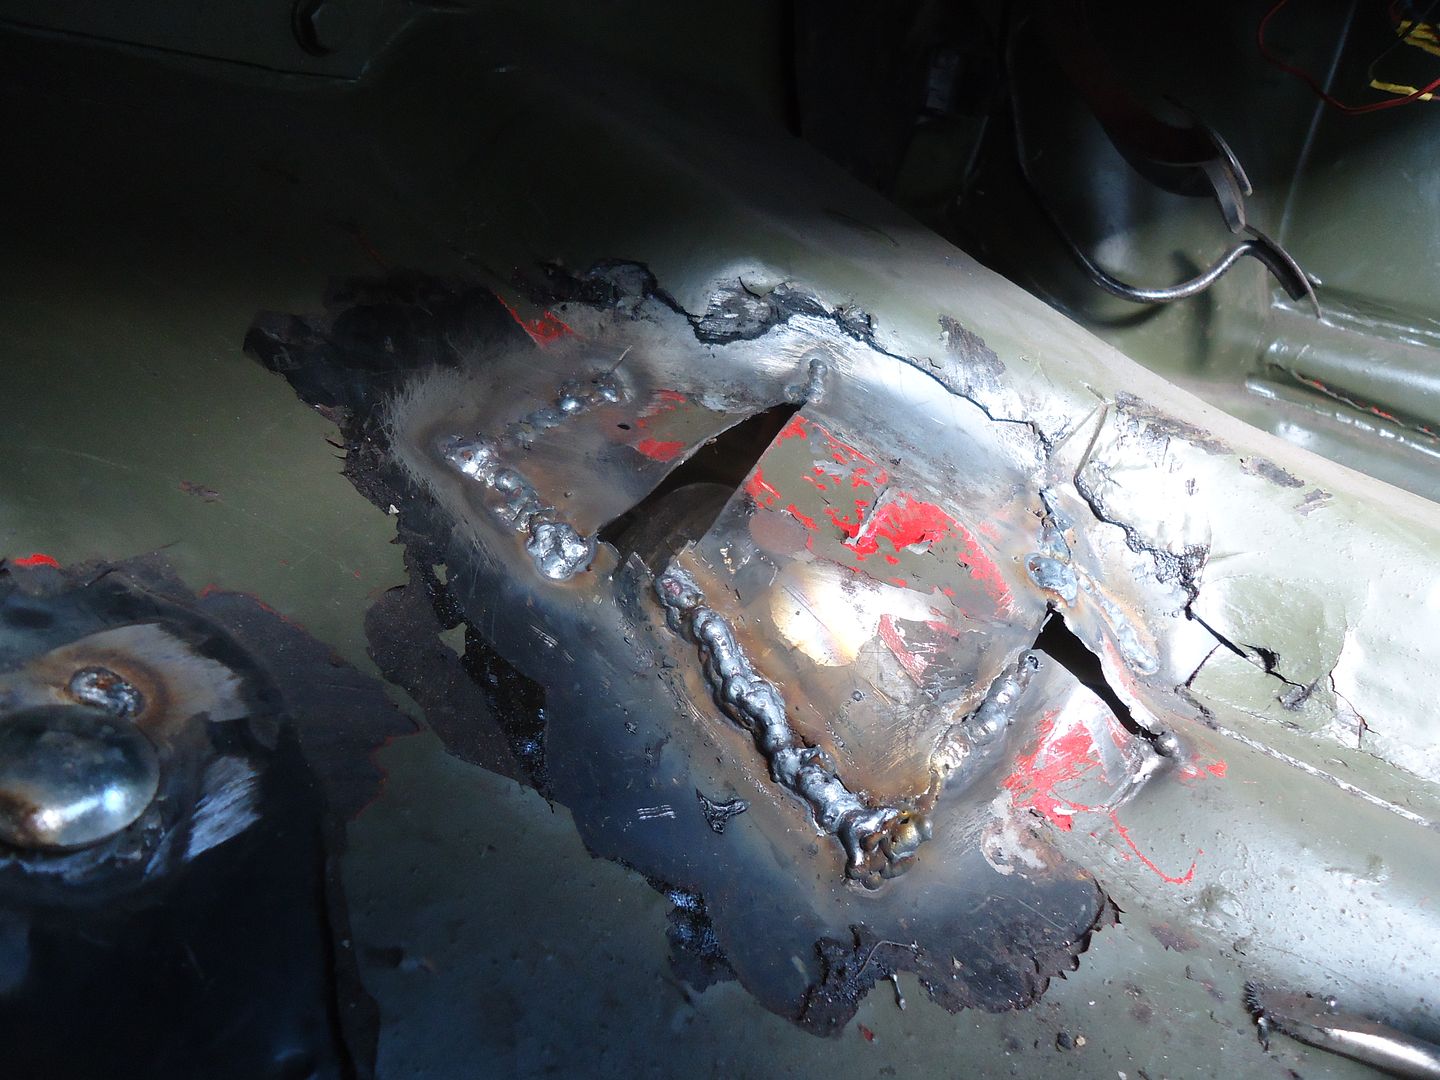
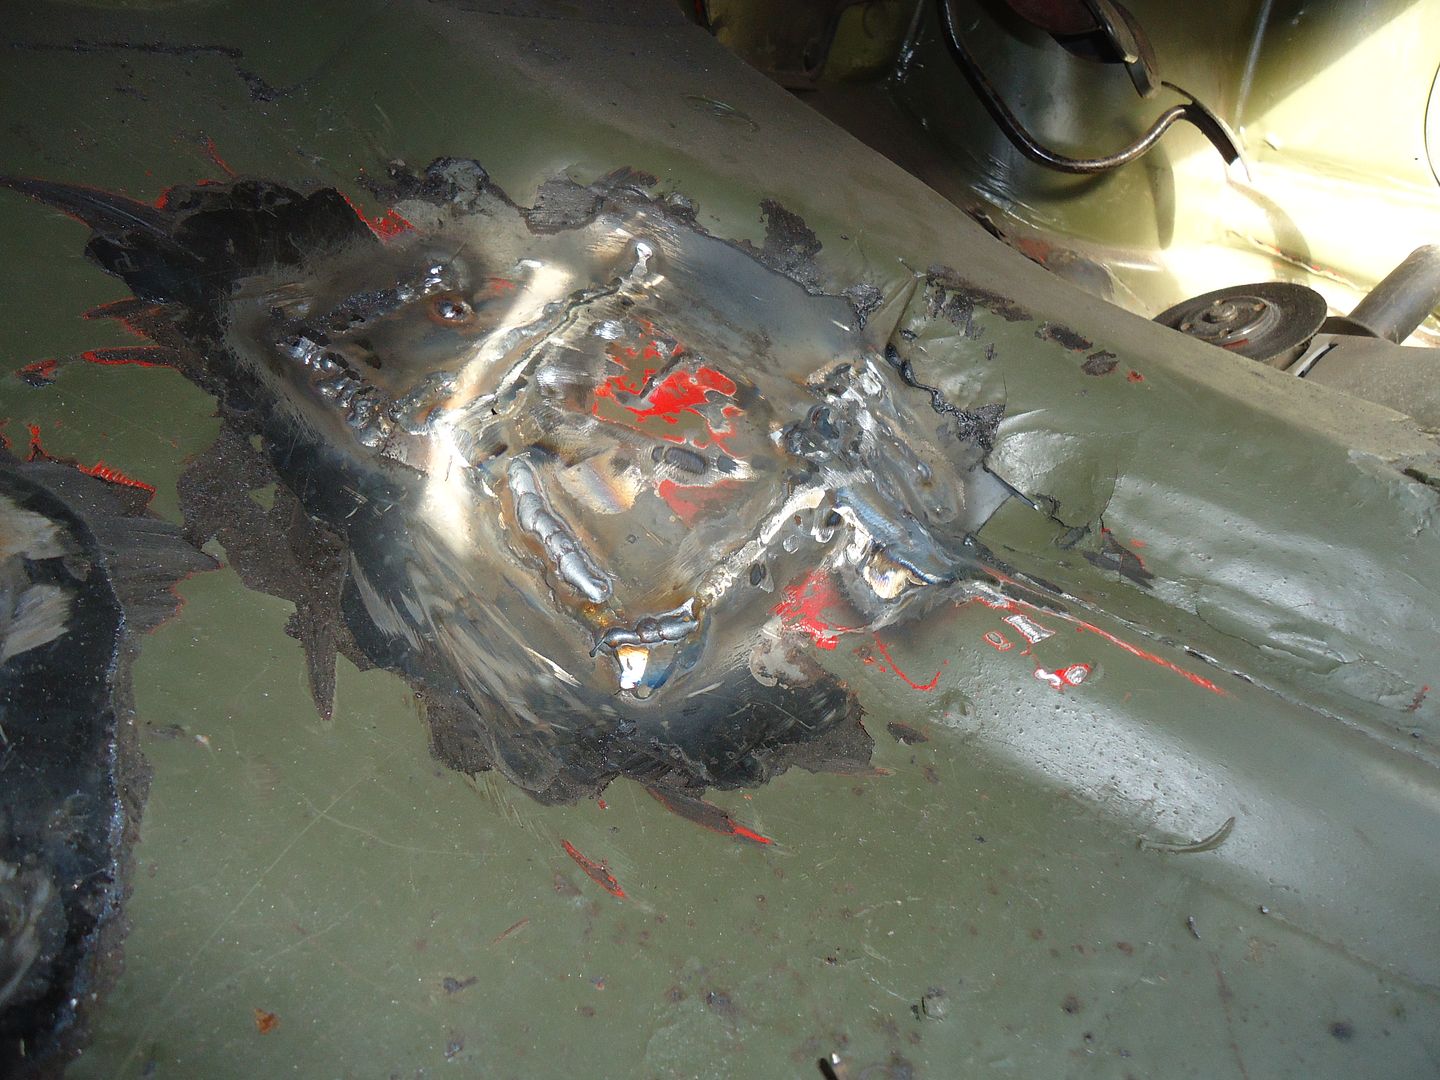
I'm not recomending you try this at home but is you do it is best to get the hang of MiG welding with one hand and feeding in filler rod with the other in order to fill the bigger gaps.
By that I mean up to 1/4". Larger than that then I cut a piece of steel.
For filler rod I use anything from the pukka article to tent pegs, wire coat hangers and bolts. I just have no shame.
If you want your welding to look loads better than it really is then (as I do) knock back the lumpy bits with a 36 grit flexible disc in the grinder and then run continuous welds down the ragged edges.
If the grinder breaks through the weld then that is good because you can feed in some more metal. (coat hanger)
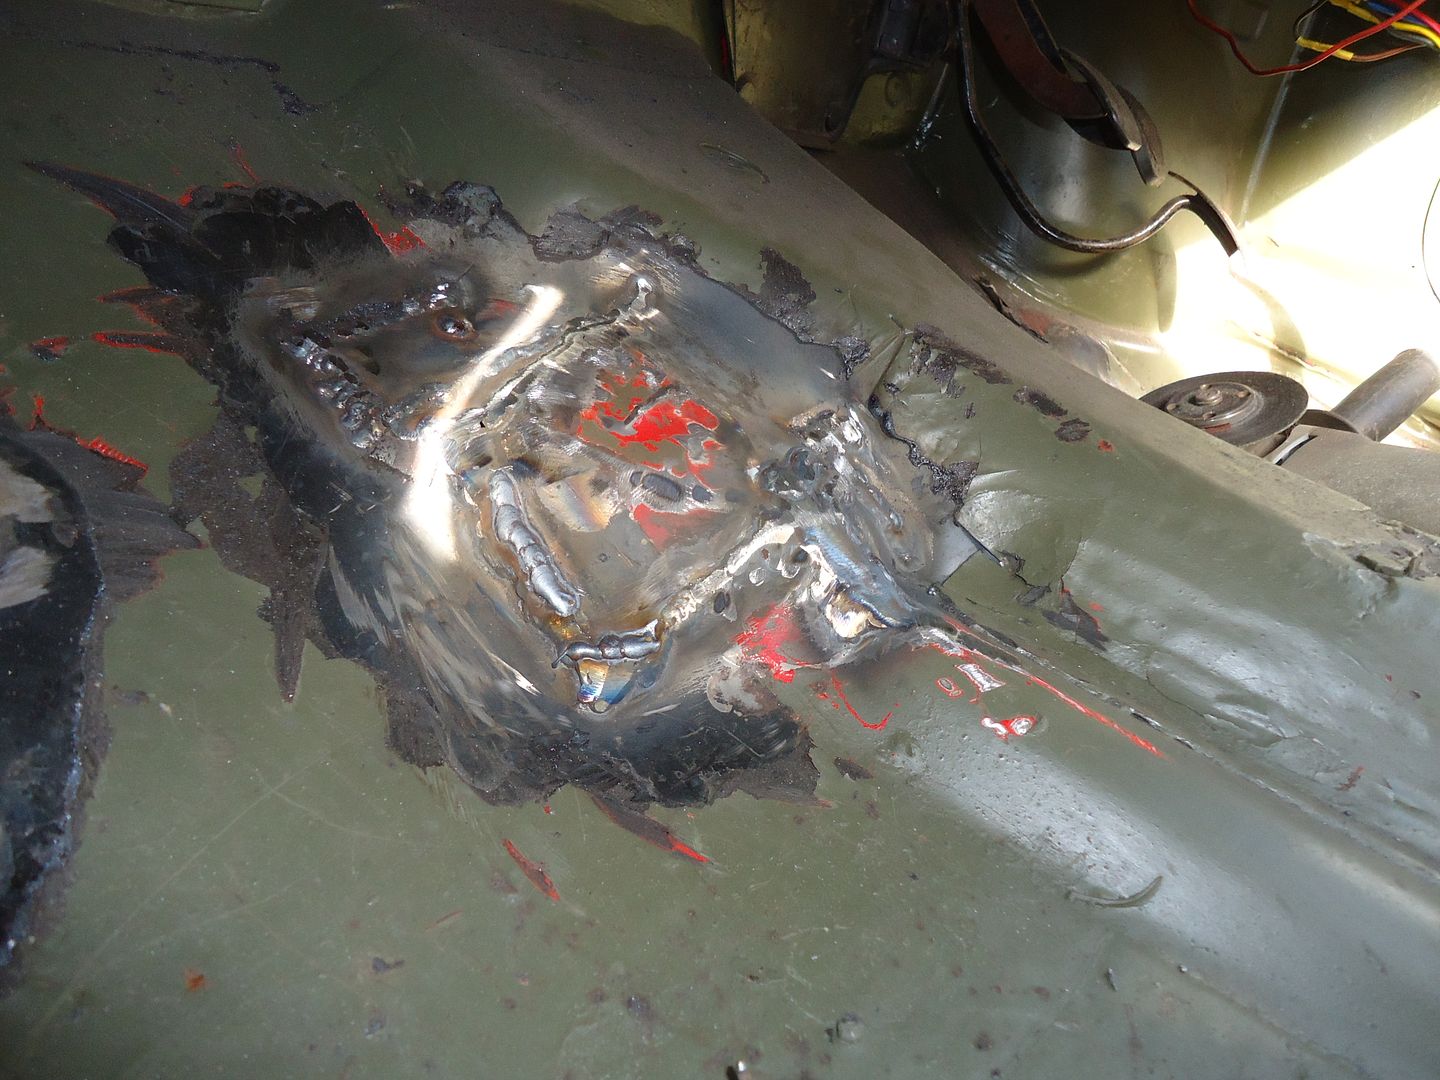
I usually have diesels which aren't too fussed about being welded. Of course with petrol vehicles you have to think about a few precautions.
When you are cutting through floors think about where fuel, brakes and electrical lines might run.
In this instance the under seal was a right pain in the ar*e on account that every single tack meant the sealer ignited and burned happily.
I tend not to blow it out as once it has flamed off a bit it falls off where-as if you put it out everytime then it will re-ignite everytime.
Oh the fun we have
In replacing the 900 engine with the 'Fire' engine and making everything 4x4 it was always going to be hit or miss if it all lined up perfectly.
Generally all seems well but I couldn't fail to notice that a lively take off in reverse resulted in a staccato rapping on the floorpan curtesy of the front of the rear propshaft.

That silver line is the outline left by said joint.
I did think about laying underneath with a bit of wood and a lump hammer but this option appealed more.

Mr Grinder met Mr floor. The following pics are rubbish but what they are attempting to explain is that I created a bulge around the prop joint.


I'm not recomending you try this at home but is you do it is best to get the hang of MiG welding with one hand and feeding in filler rod with the other in order to fill the bigger gaps.
By that I mean up to 1/4". Larger than that then I cut a piece of steel.
For filler rod I use anything from the pukka article to tent pegs, wire coat hangers and bolts. I just have no shame.
If you want your welding to look loads better than it really is then (as I do) knock back the lumpy bits with a 36 grit flexible disc in the grinder and then run continuous welds down the ragged edges.
If the grinder breaks through the weld then that is good because you can feed in some more metal. (coat hanger)

I usually have diesels which aren't too fussed about being welded. Of course with petrol vehicles you have to think about a few precautions.
When you are cutting through floors think about where fuel, brakes and electrical lines might run.
In this instance the under seal was a right pain in the ar*e on account that every single tack meant the sealer ignited and burned happily.
I tend not to blow it out as once it has flamed off a bit it falls off where-as if you put it out everytime then it will re-ignite everytime.
Oh the fun we have
Last edited:
I actually turned down going to the pub t'other night because I was in the middle of changing tyres.
I've been putting it off cos I had eight of them to do. i.e. swop the big tyres off the 2wd rims and put them onto the nice 4x4 ones that are painted. Then of course the tyres that were on the 4x4 rims went on to the others.
No I don't have an automatic tyre machine. And I forgot to take a pic. I shall do that tomorrow.
However: possibly someone notice on the Terra Van thread that I was knocking up a few brackets.
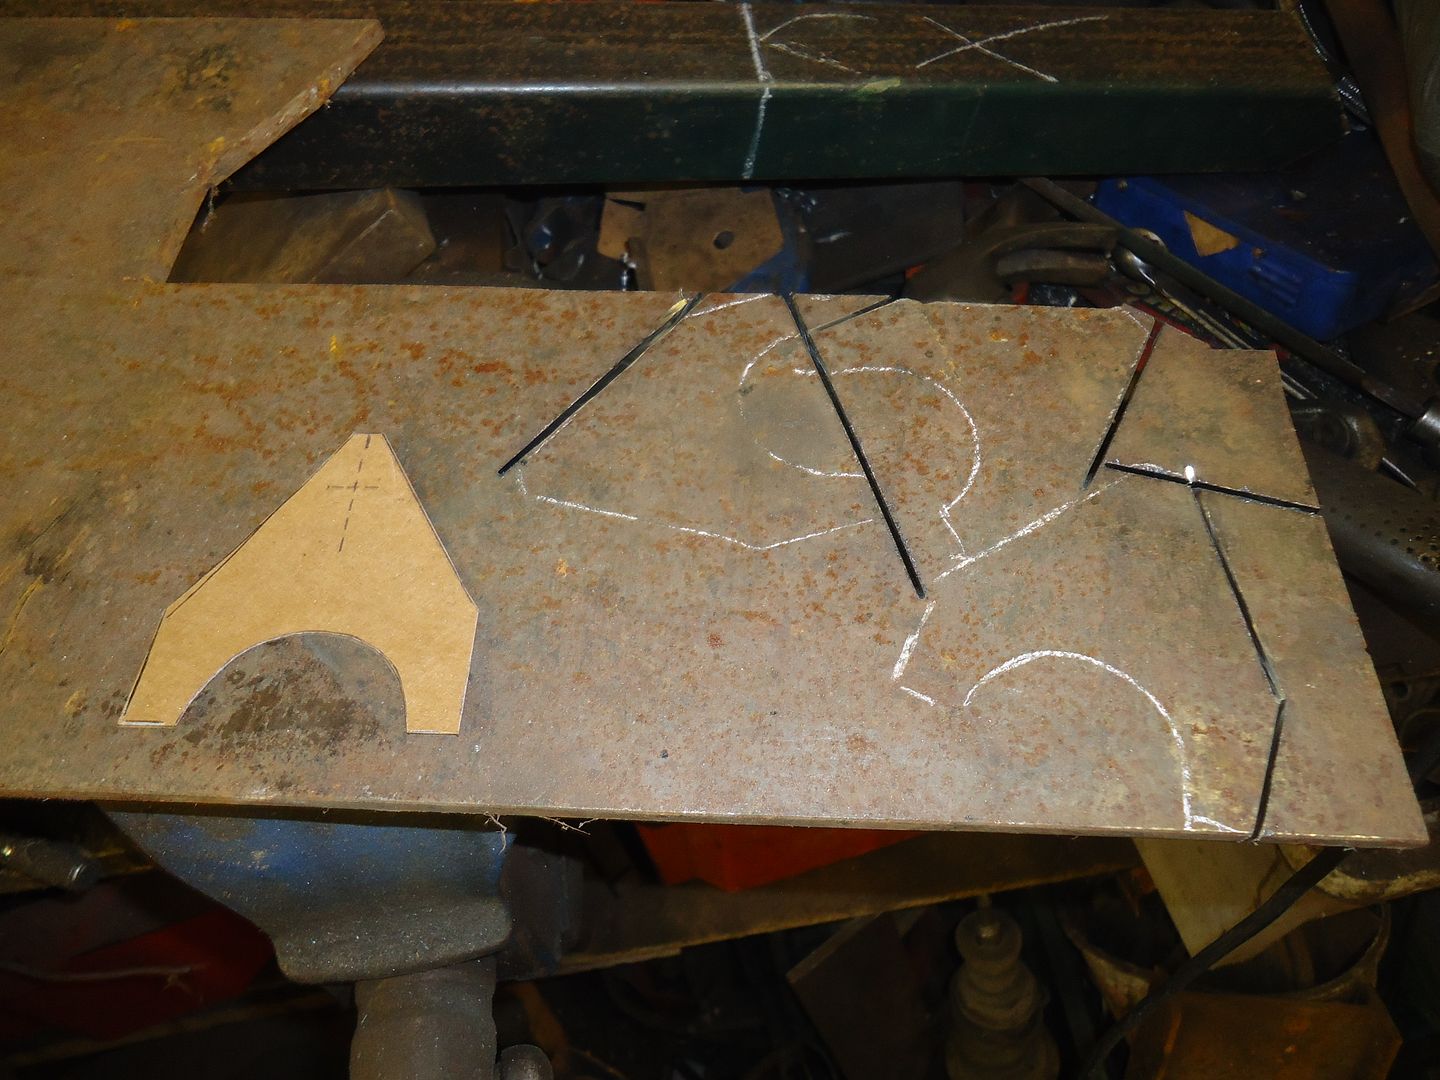
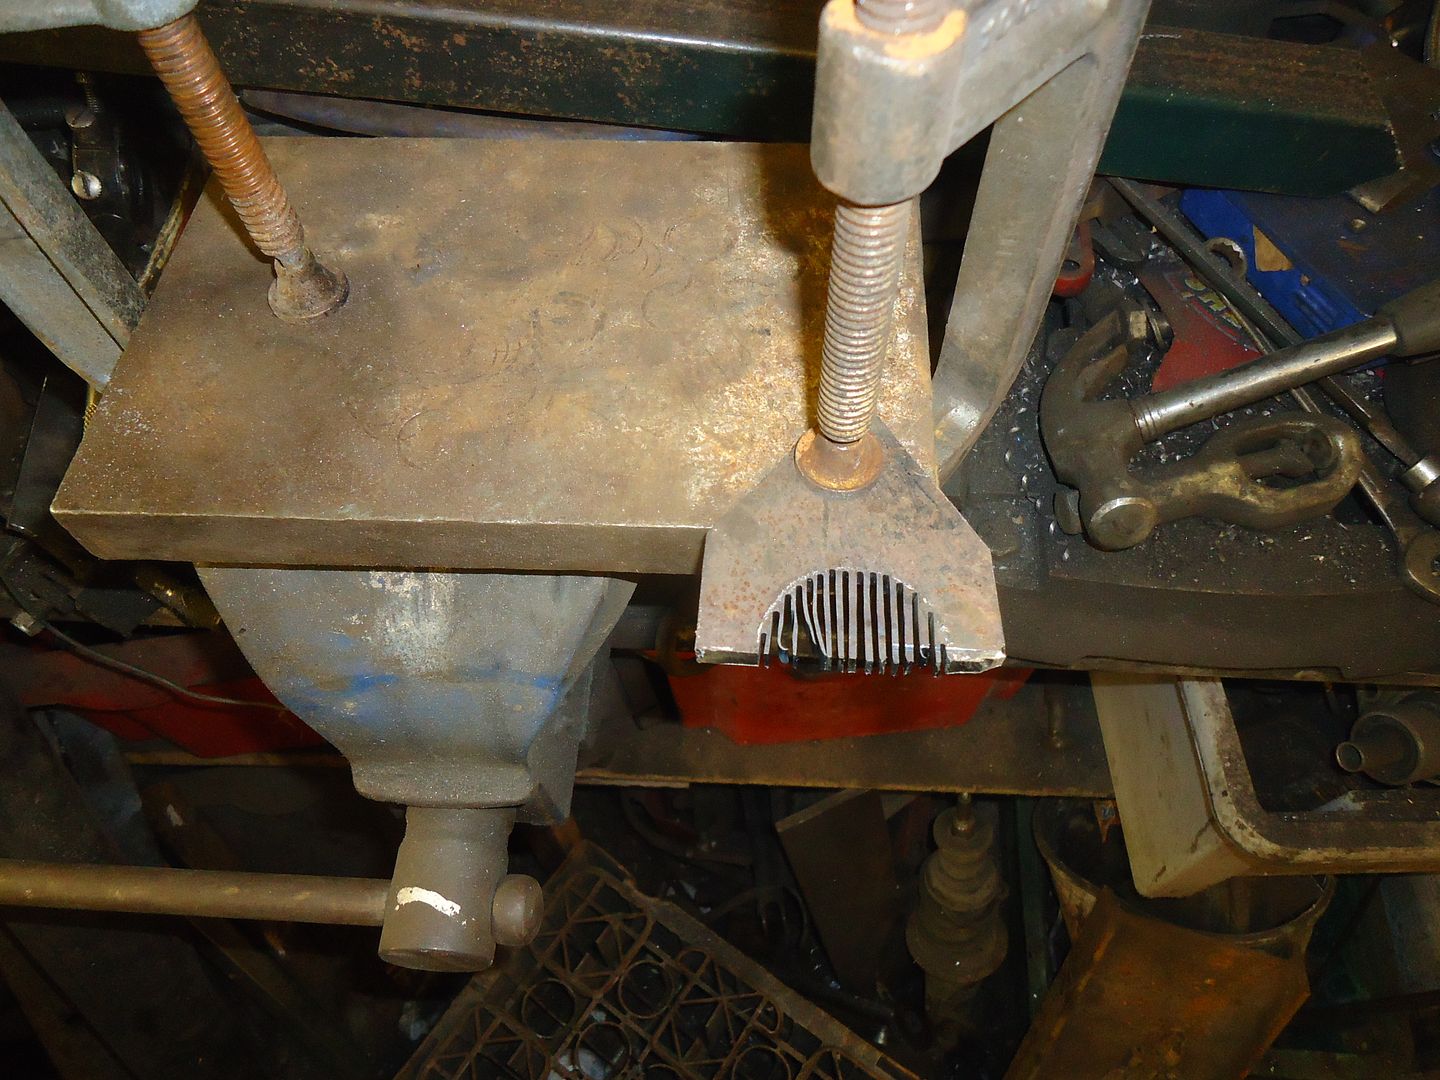
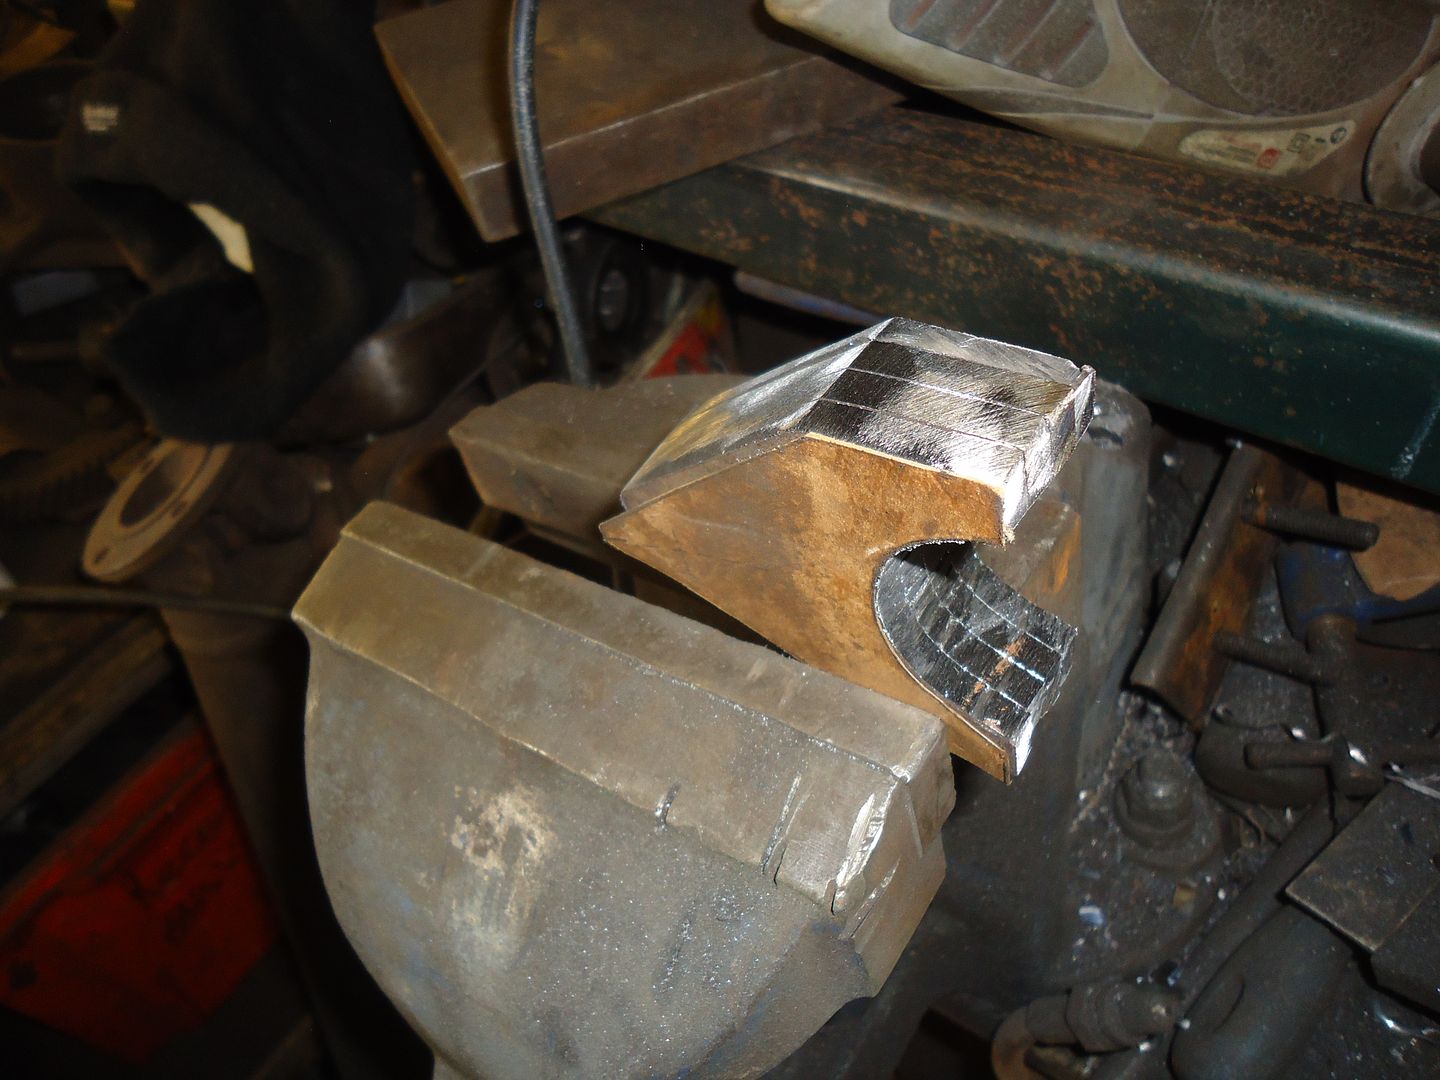
Well there was a reason for that.
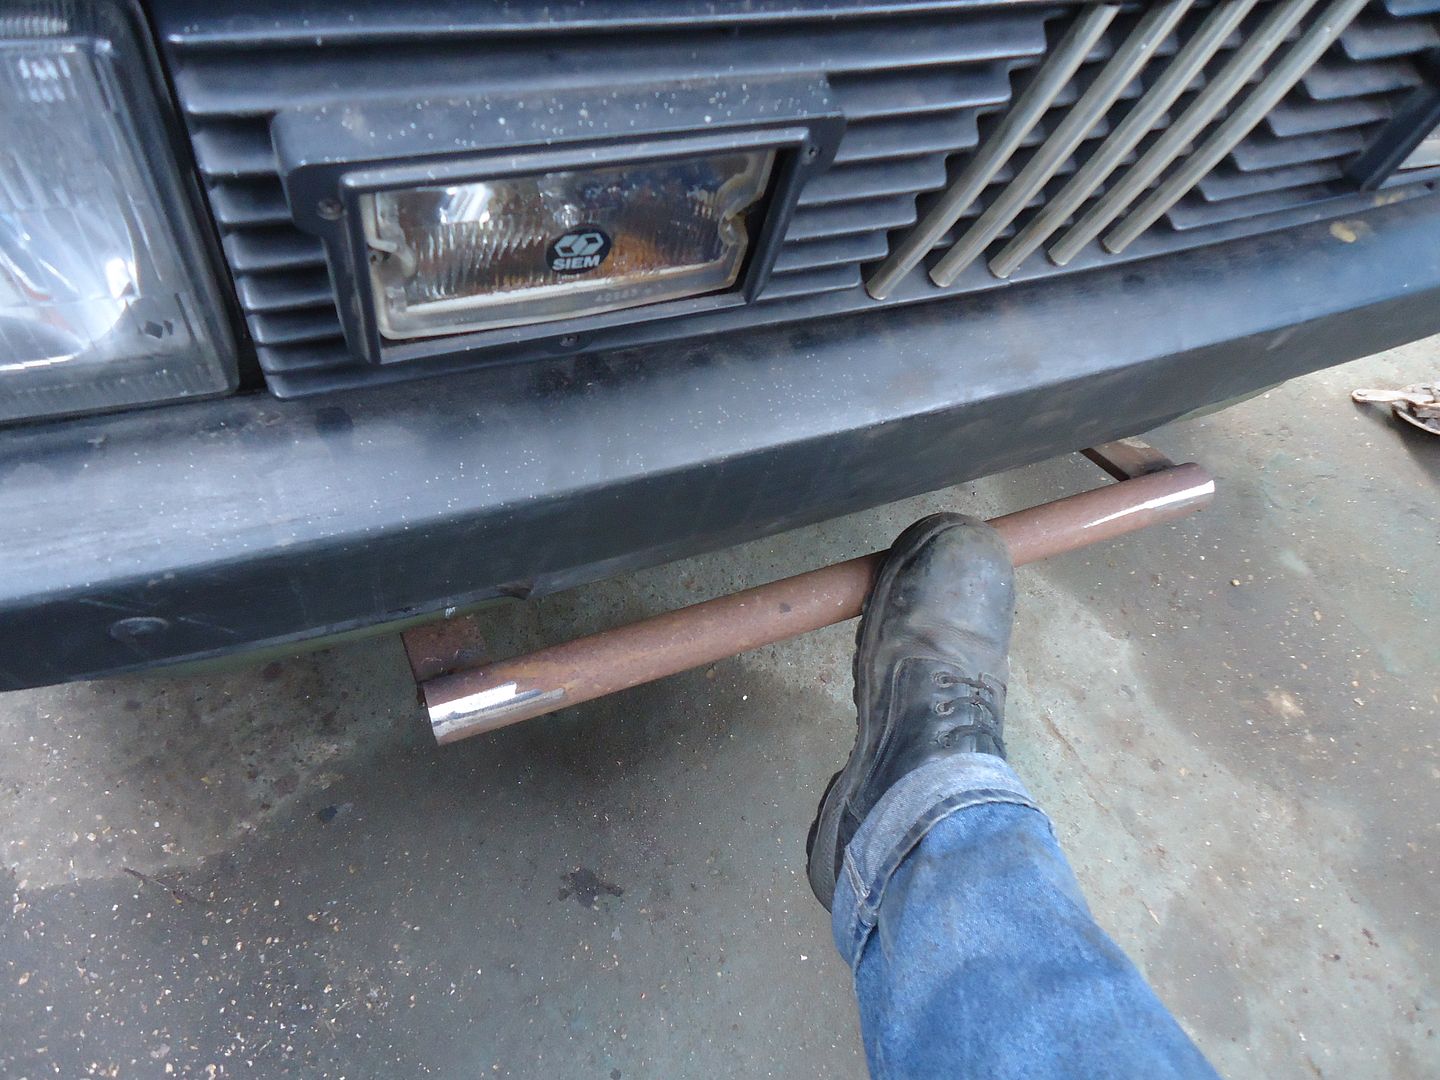
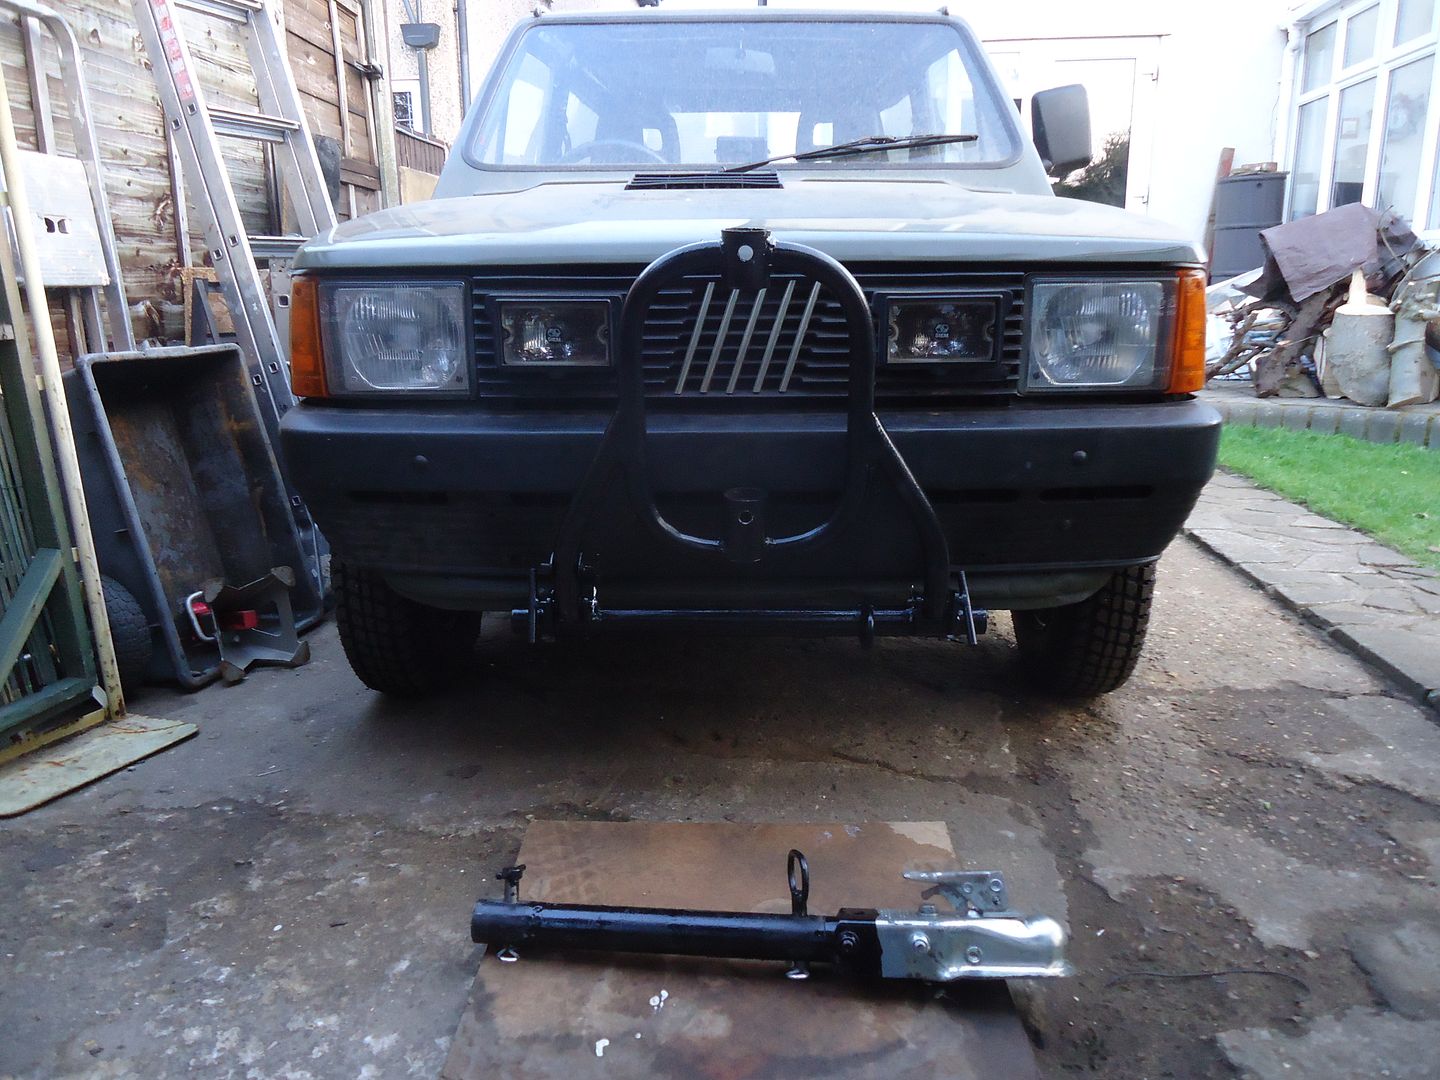
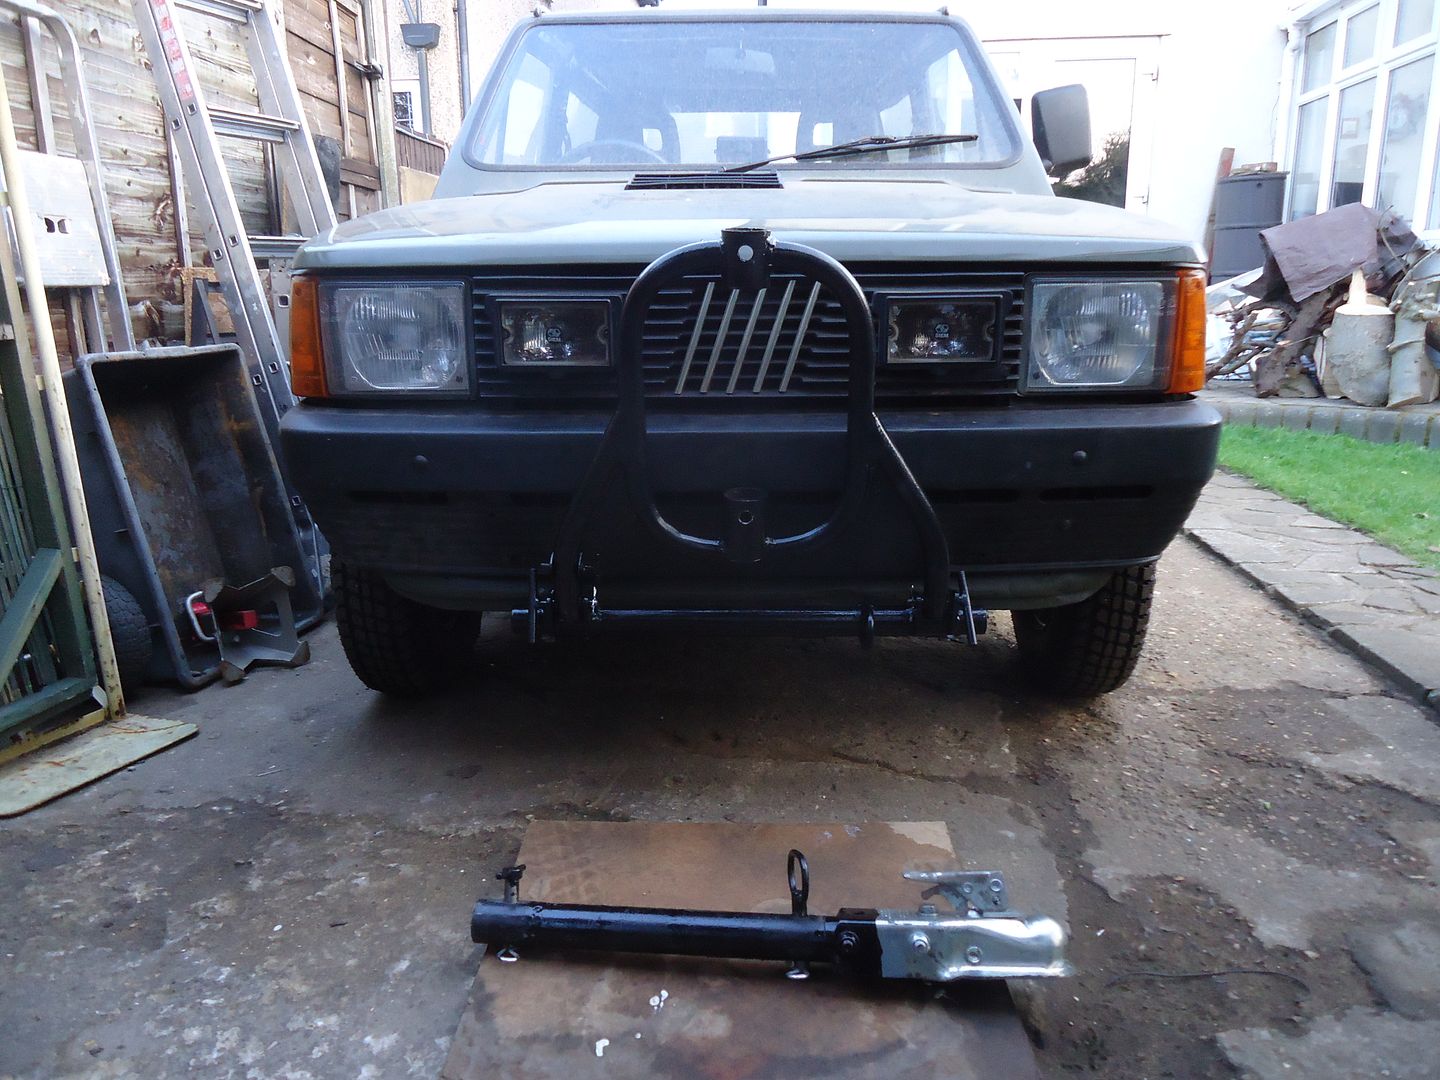
I have fitted a jolly nice tubed bar on the front which mounts, as a bull bar would, onto the tie rod to body mounts which I modified.
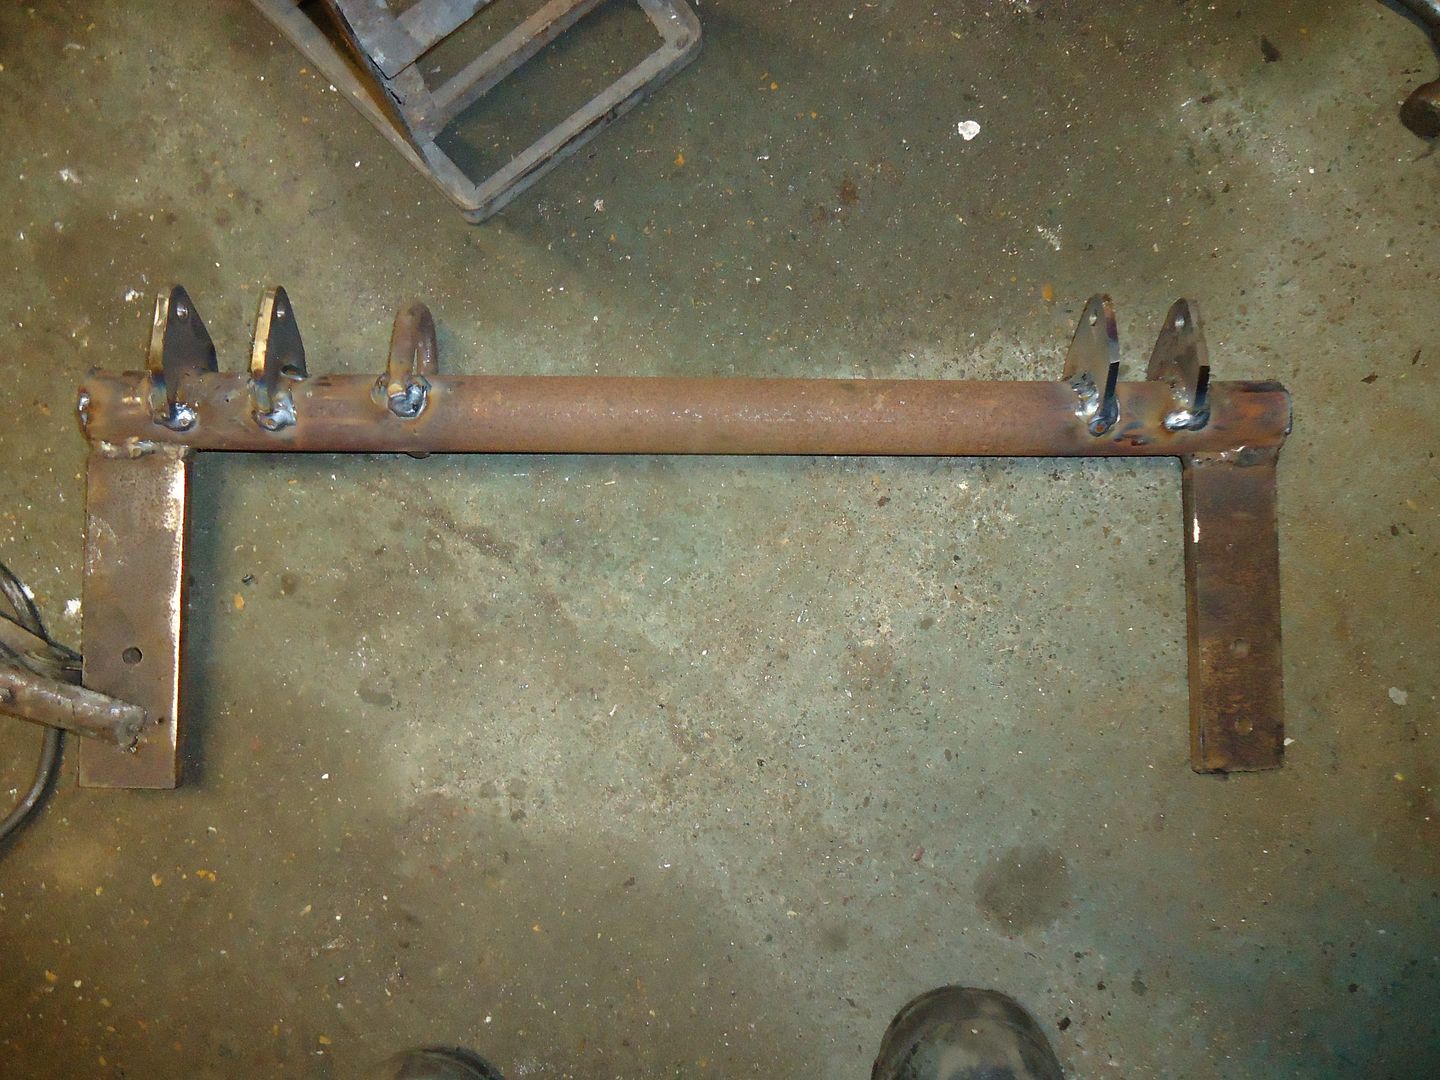
So I welded the brackets onto the bar and added a loop made from 8mm solid rod. (cos you never know when it might be handy)
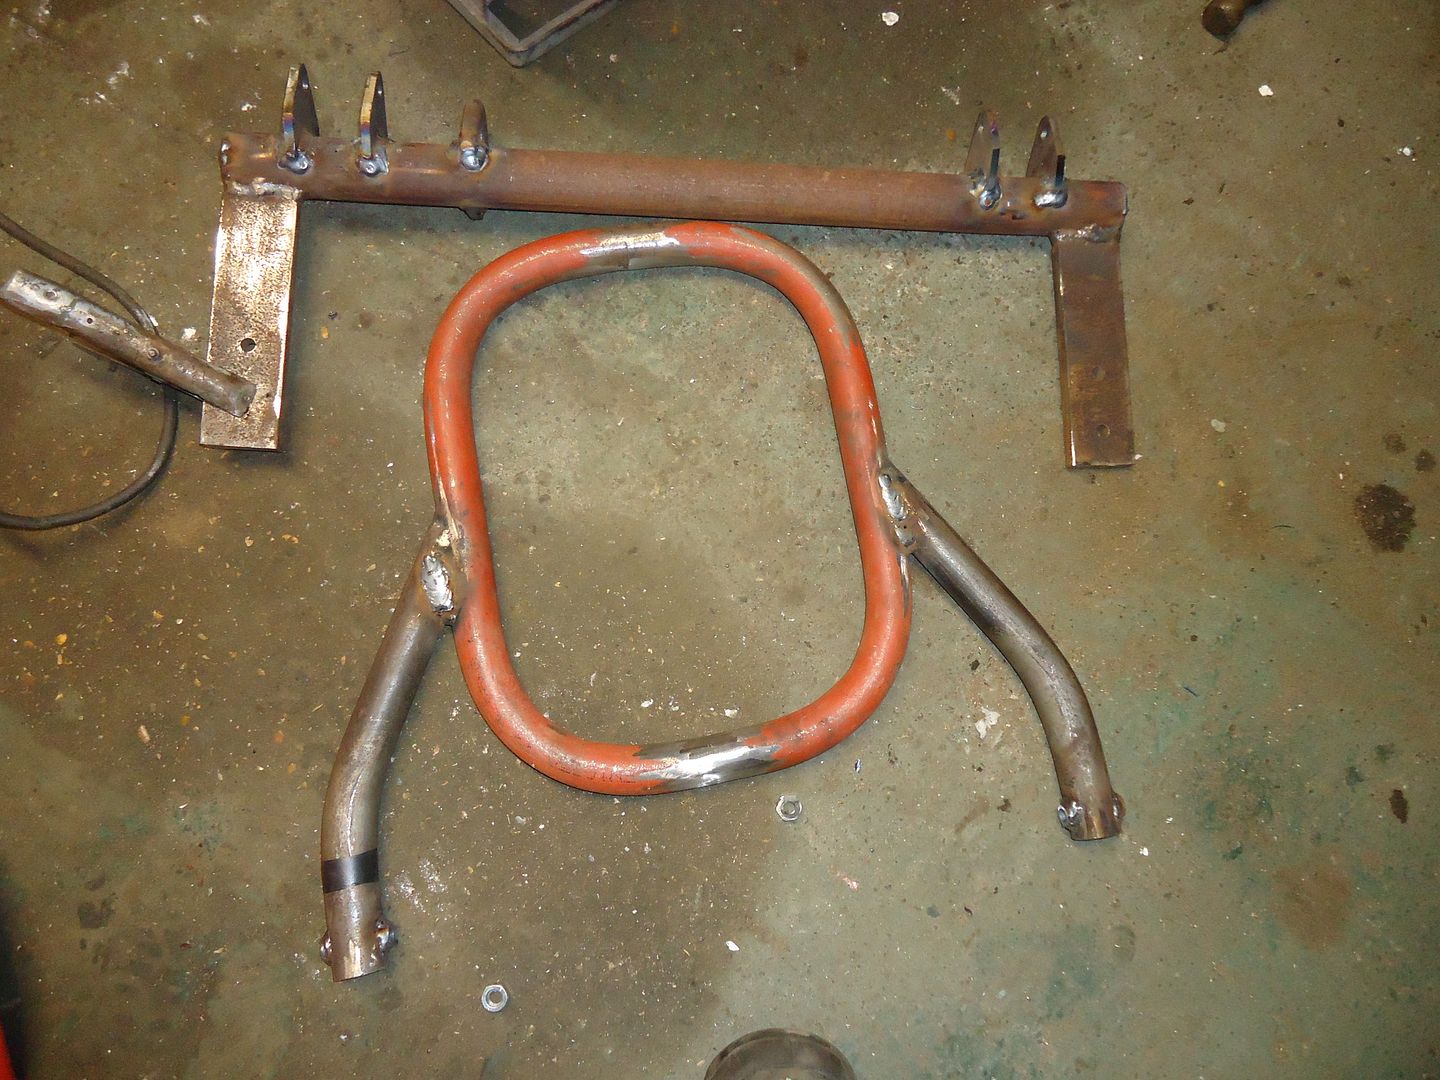
Then I knocked this up.
"Do ya know what it is yet.?"
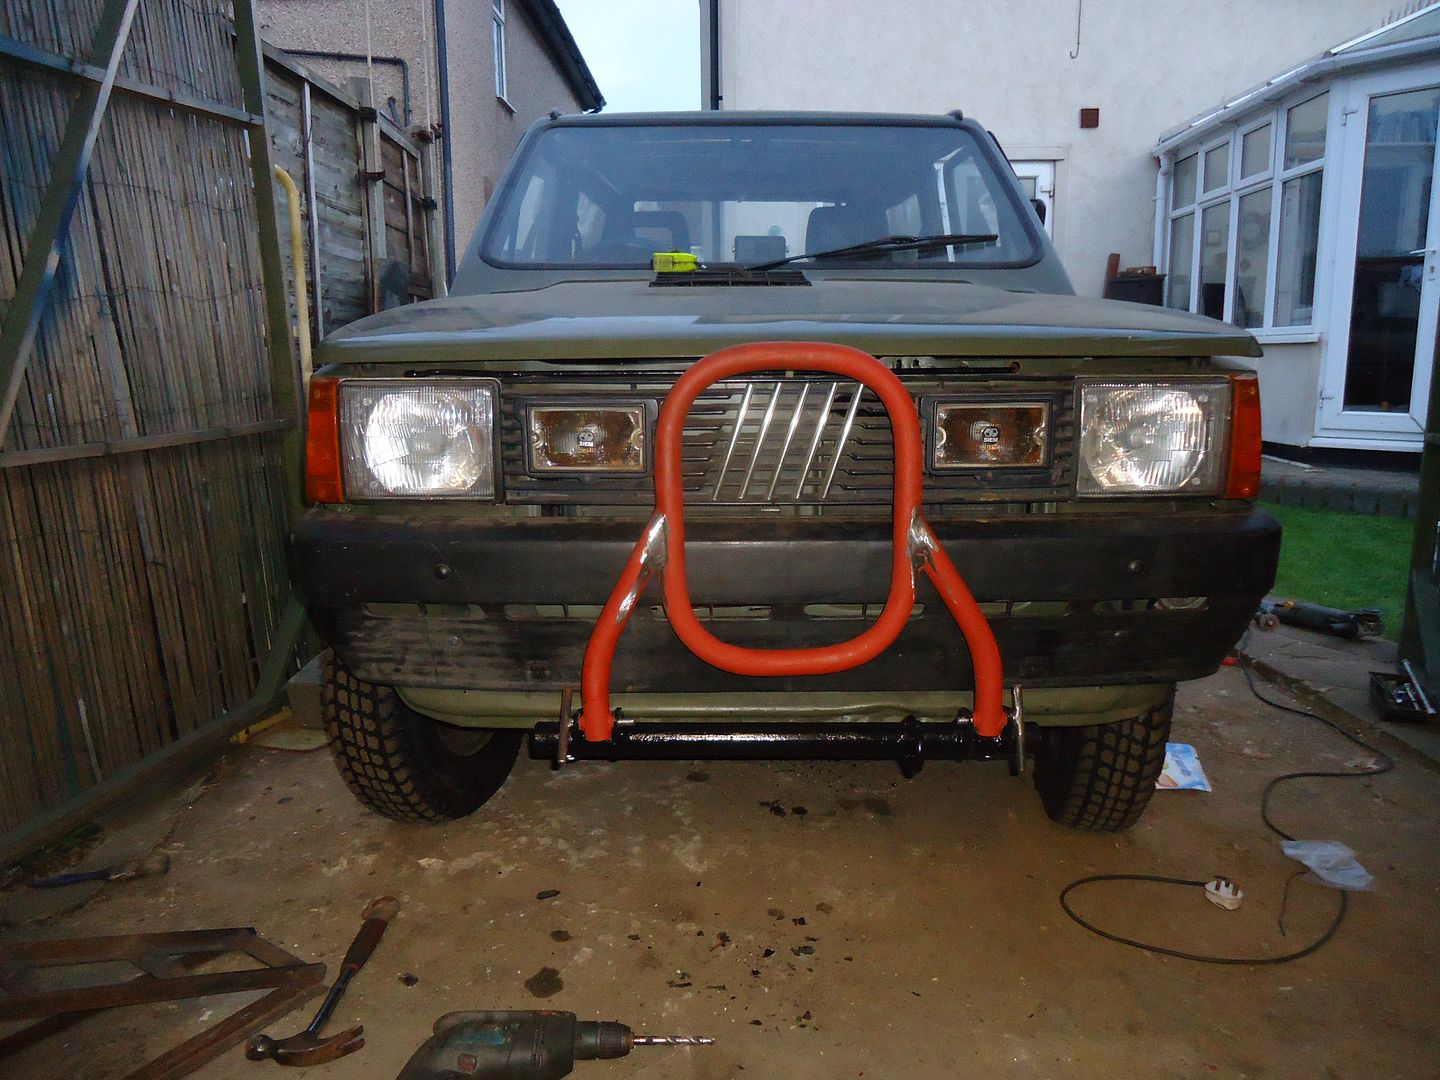
Nah I don't think you do.
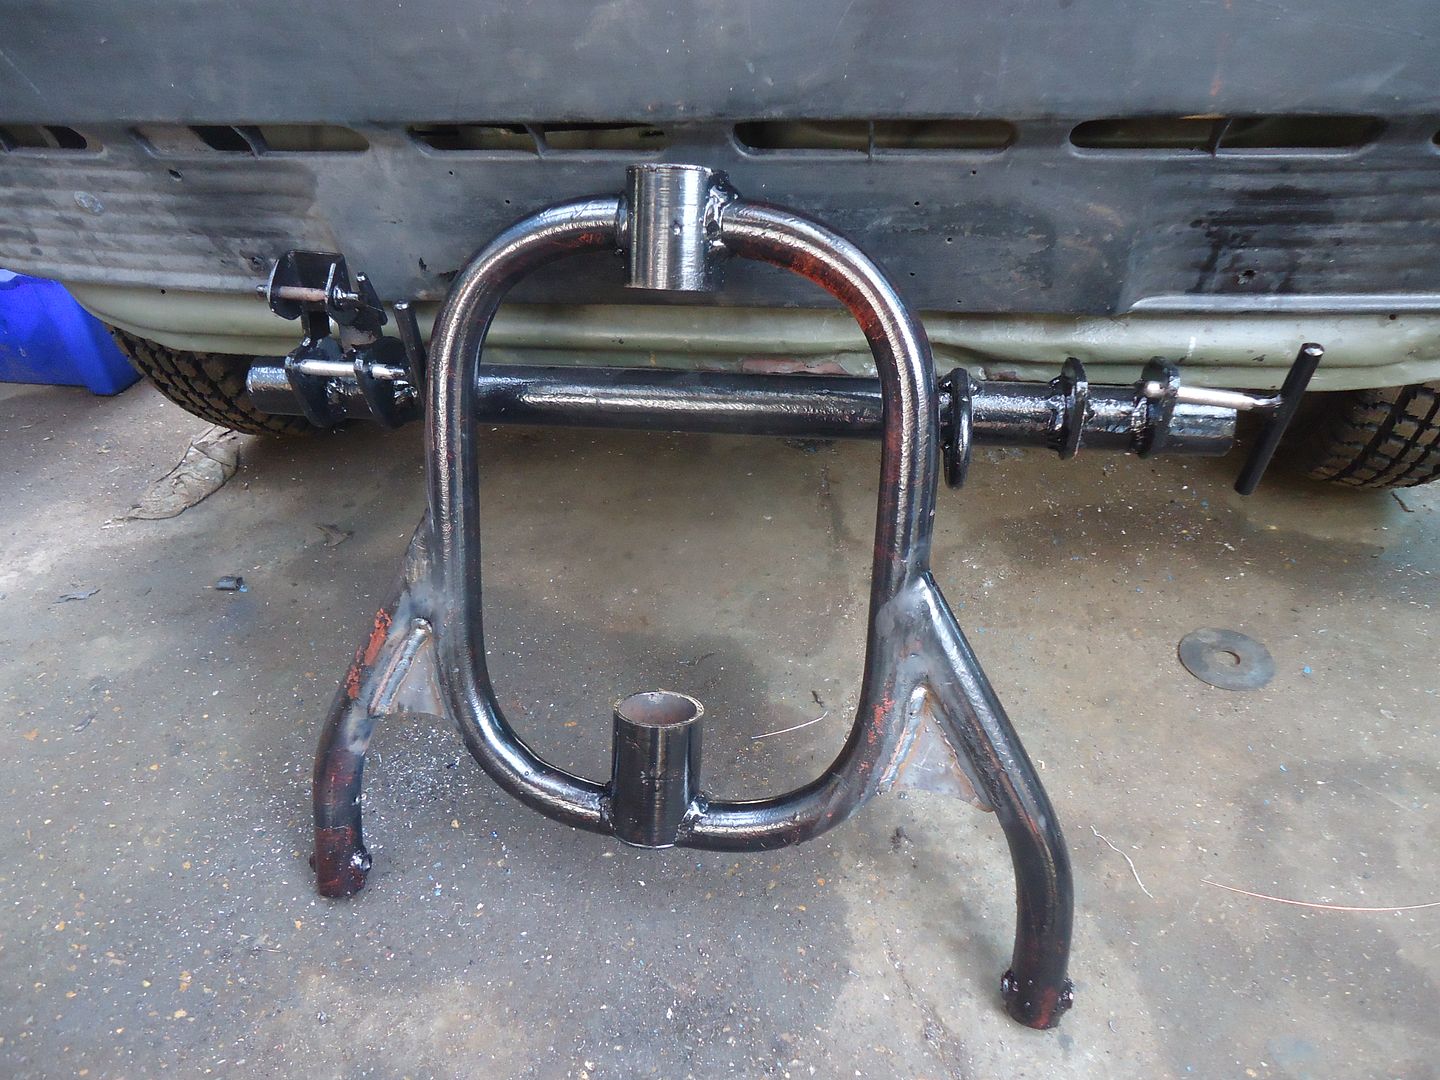
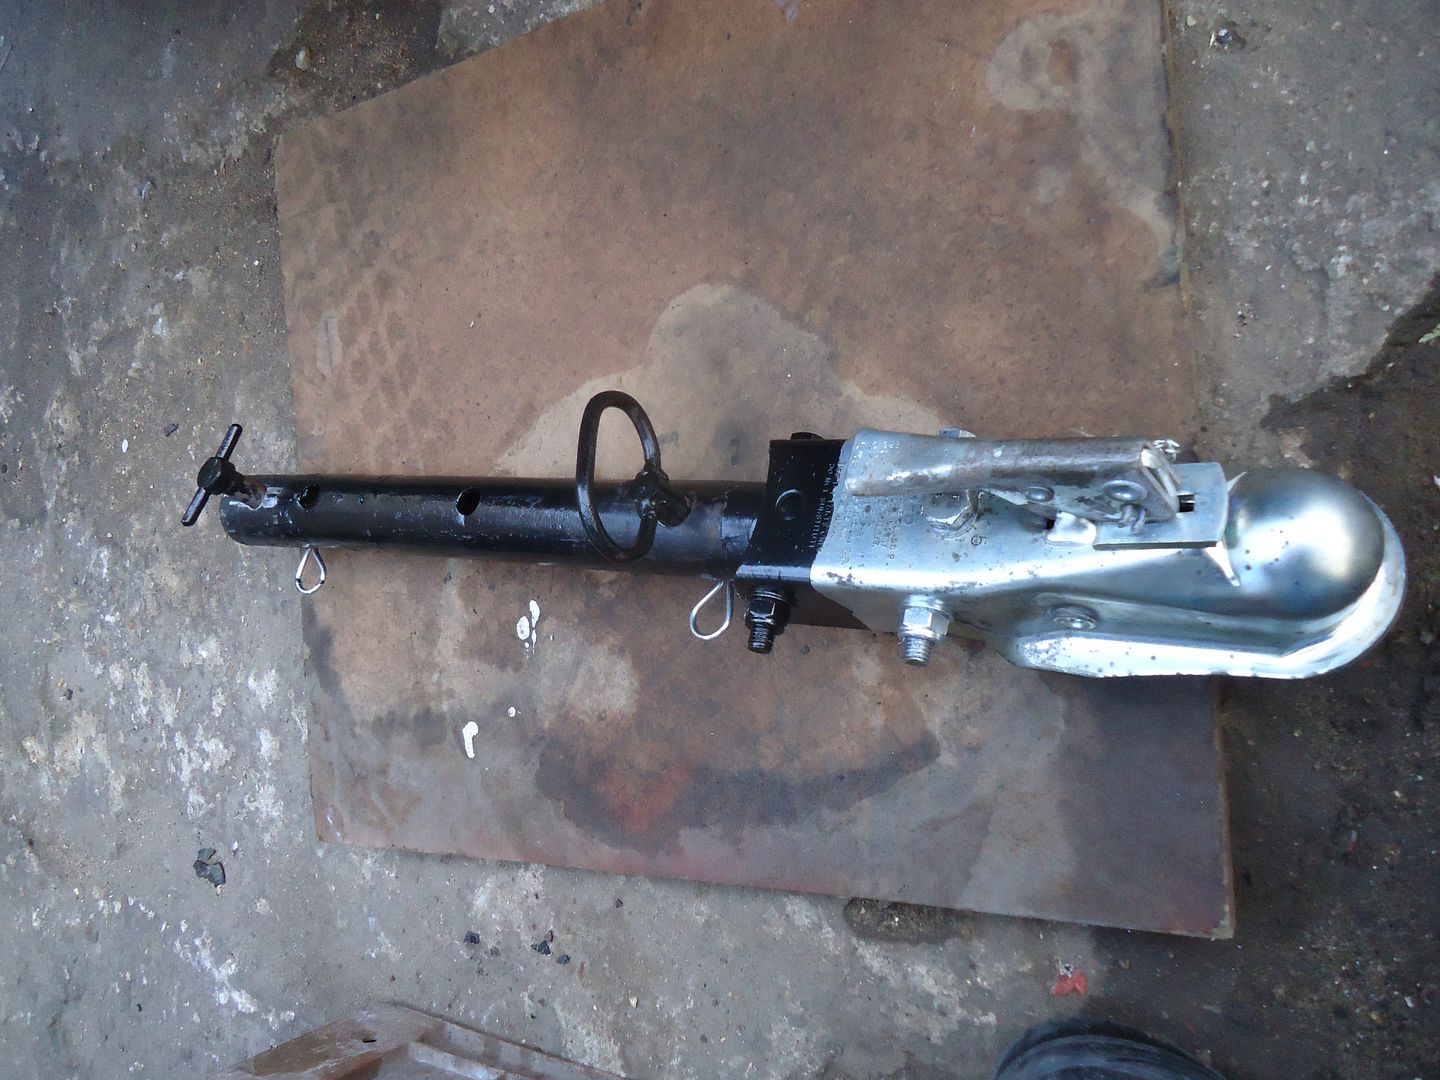
I found and old 'Acrow' prop (builders use them to temporarilyhold houses up) they're made of really strong stuff and consist of an inner and outer tube. The inner being a nice tightish sliding fit.
I cut two bits of outer and welded them as you can see
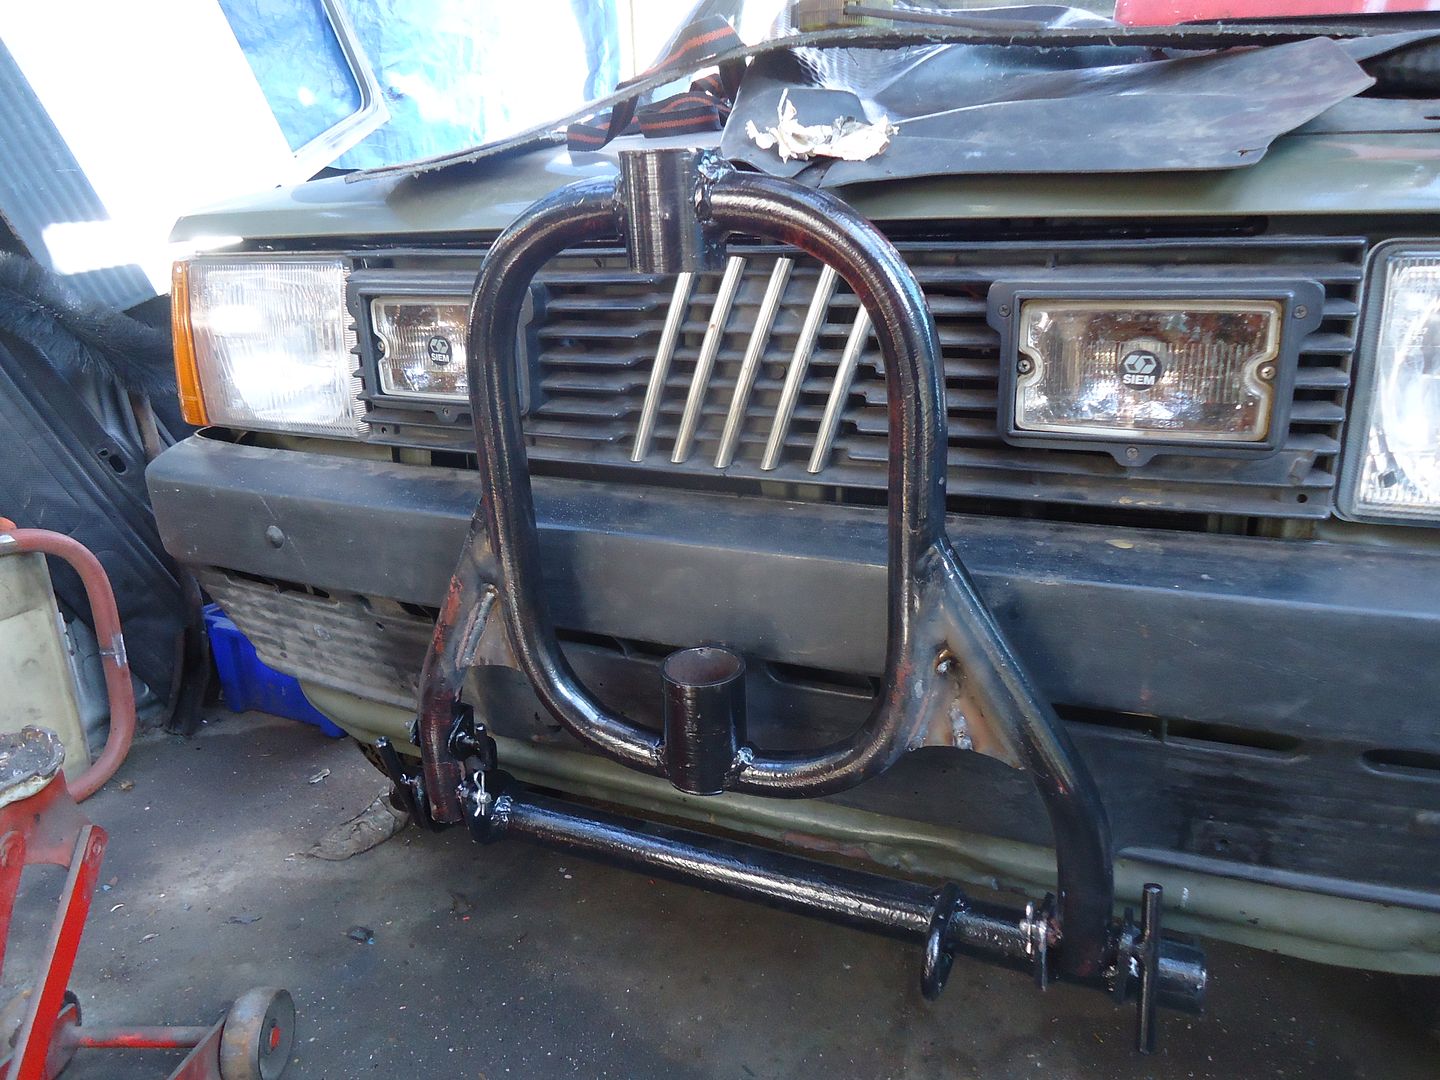
And I welded a couple of 'Webs' into the frame. There is a lot to know about 'Webbing'; suffice to say it makes the joint stronger.
So what about the inner bit of my 'Acrow' I hear you ask.
Well; I bought a tow coupling off Ebay (tested to 3.5 tonnes) £17 inc delivery out of some surplus stock.
It was too big to fit to anything normal so I made some steel bushes (17mm outer with a 12mm hole through the middle) bored out the Acrow tube and....................
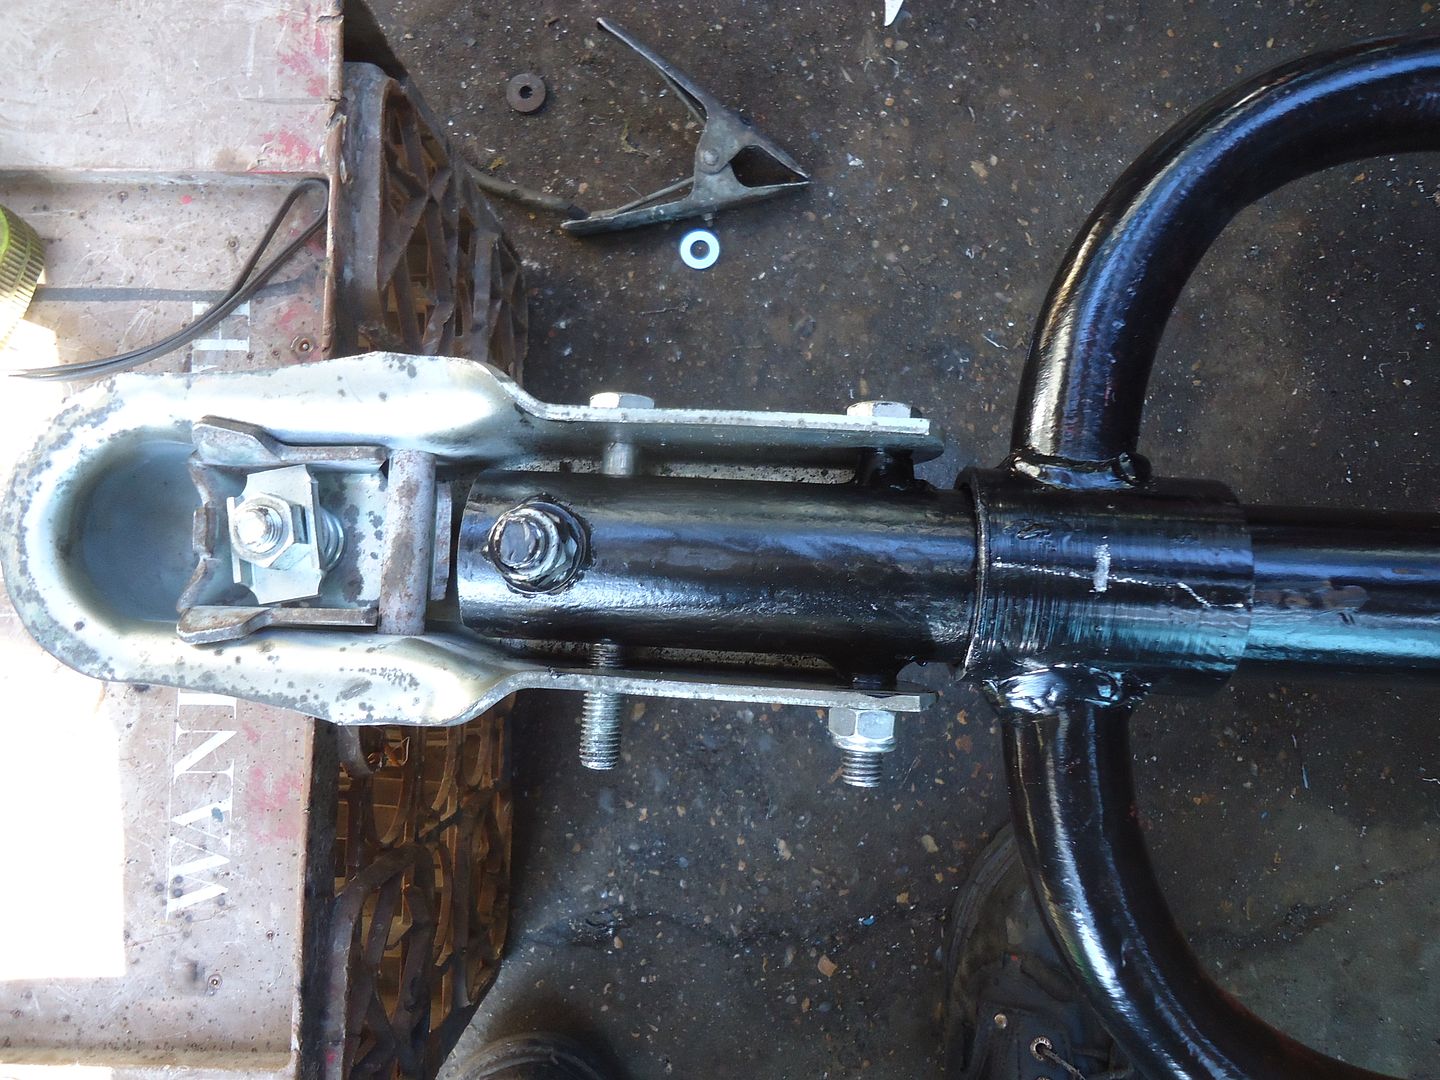
Blow me if it doesn't fit now.
So having spent hours turning, drilling, bending, filing, welding and swearing I now have a custom bull bar that I can slide a tow coupling into.
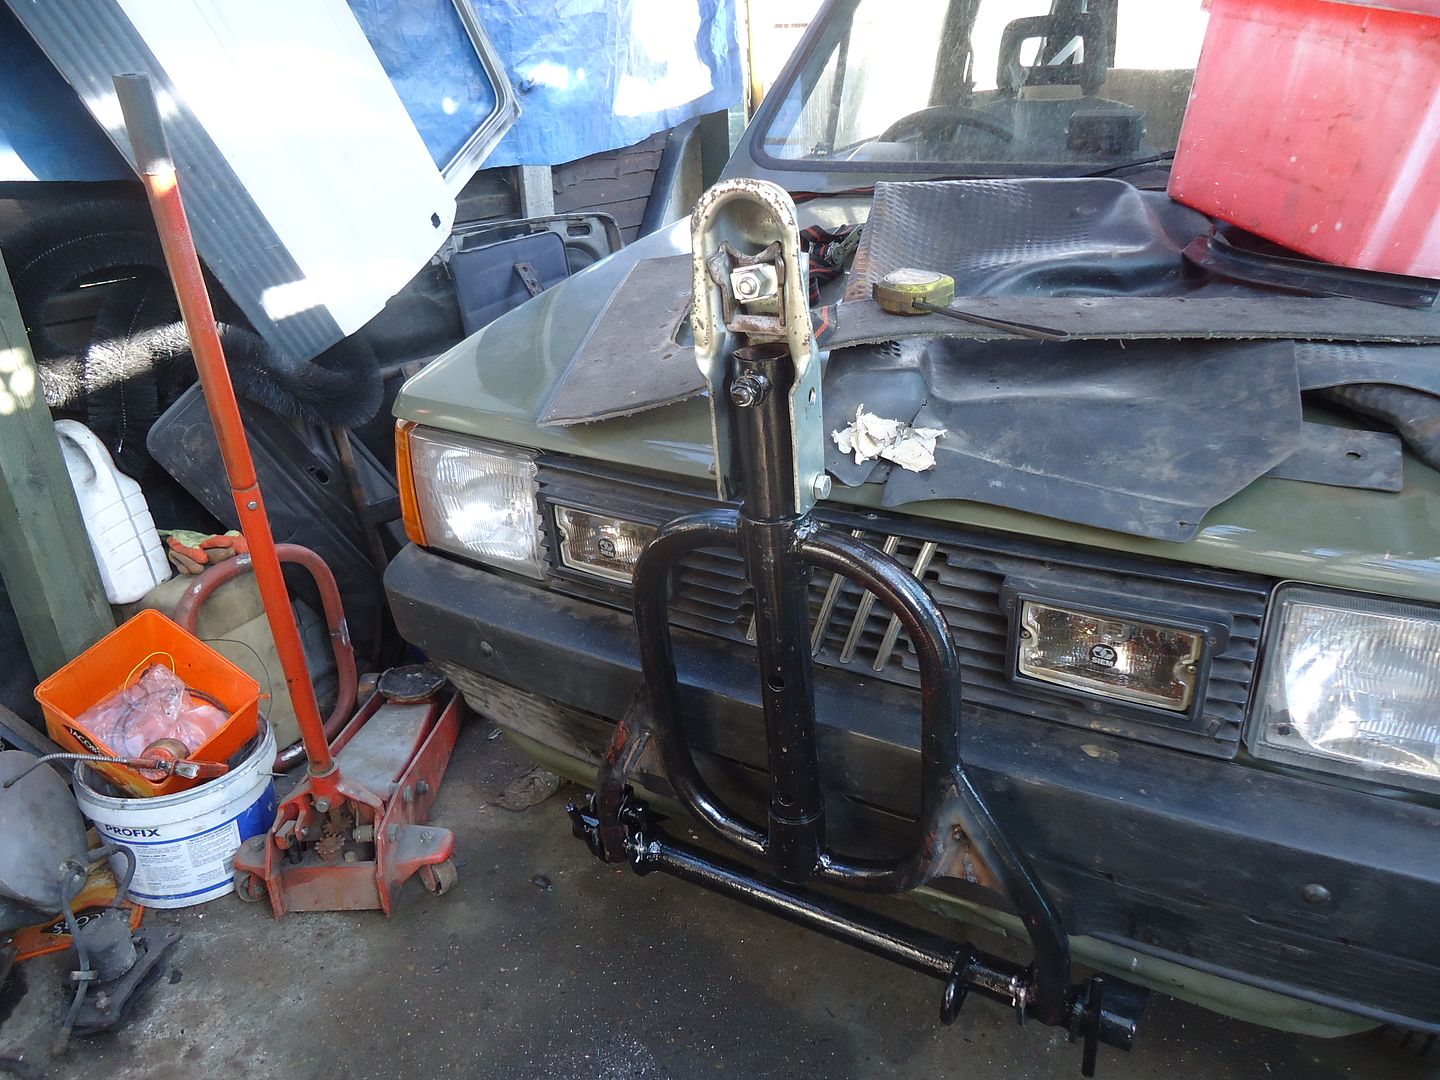
Then I can pull a pin and it does this
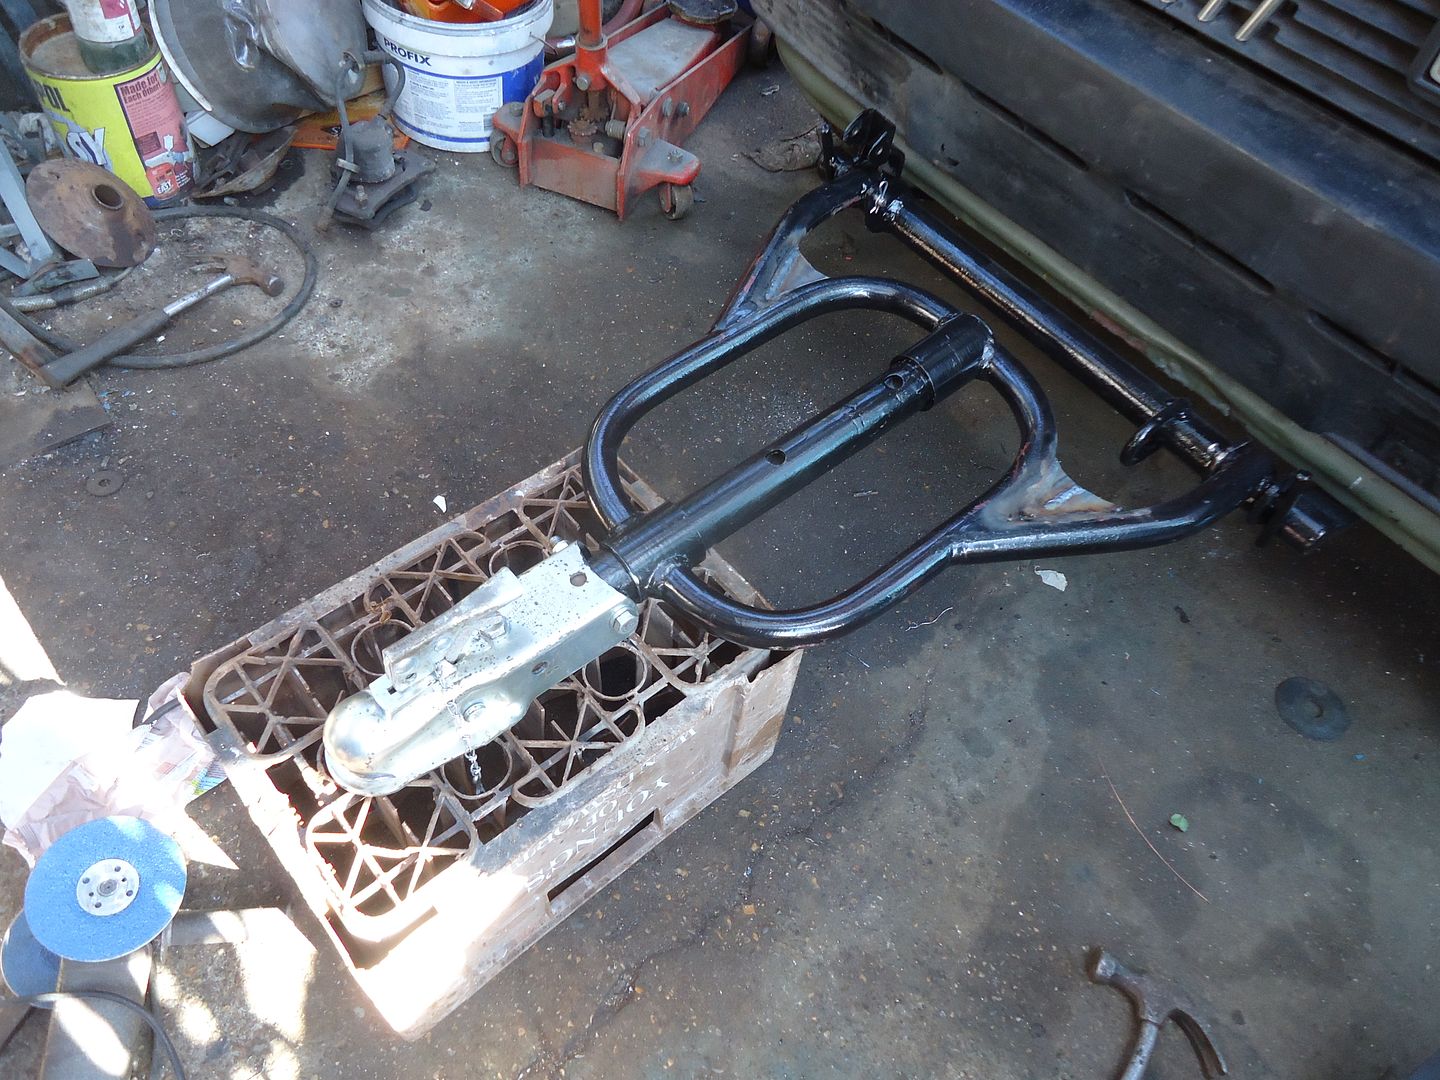
And it can hook onto my camper. I'm just to old for tents.
See you in the summer
I've been putting it off cos I had eight of them to do. i.e. swop the big tyres off the 2wd rims and put them onto the nice 4x4 ones that are painted. Then of course the tyres that were on the 4x4 rims went on to the others.
No I don't have an automatic tyre machine. And I forgot to take a pic. I shall do that tomorrow.
However: possibly someone notice on the Terra Van thread that I was knocking up a few brackets.


Well there was a reason for that.

I have fitted a jolly nice tubed bar on the front which mounts, as a bull bar would, onto the tie rod to body mounts which I modified.

So I welded the brackets onto the bar and added a loop made from 8mm solid rod. (cos you never know when it might be handy)

Then I knocked this up.
"Do ya know what it is yet.?"

Nah I don't think you do.

I found and old 'Acrow' prop (builders use them to temporarilyhold houses up) they're made of really strong stuff and consist of an inner and outer tube. The inner being a nice tightish sliding fit.
I cut two bits of outer and welded them as you can see

And I welded a couple of 'Webs' into the frame. There is a lot to know about 'Webbing'; suffice to say it makes the joint stronger.
So what about the inner bit of my 'Acrow' I hear you ask.
Well; I bought a tow coupling off Ebay (tested to 3.5 tonnes) £17 inc delivery out of some surplus stock.
It was too big to fit to anything normal so I made some steel bushes (17mm outer with a 12mm hole through the middle) bored out the Acrow tube and....................

Blow me if it doesn't fit now.
So having spent hours turning, drilling, bending, filing, welding and swearing I now have a custom bull bar that I can slide a tow coupling into.

Then I can pull a pin and it does this

And it can hook onto my camper. I'm just to old for tents.
See you in the summer
Your ingenuity never ceases to amaze me... -- I'm utterly speechl.... 
I actually turned down going to the pub t'other night because I was in the middle of changing tyres.
I've been putting it off cos I had eight of them to do. i.e. swop the big tyres off the 2wd rims and put them onto the nice 4x4 ones that are painted. Then of course the tyres that were on the 4x4 rims went on to the others.
No I don't have an automatic tyre machine. And I forgot to take a pic. I shall do that tomorrow.
However: possibly someone notice on the Terra Van thread that I was knocking up a few brackets.
Well there was a reason for that.
I have fitted a jolly nice tubed bar on the front which mounts, as a bull bar would, onto the tie rod to body mounts which I modified.
So I welded the brackets onto the bar and added a loop made from 8mm solid rod. (cos you never know when it might be handy)
Then I knocked this up.
"Do ya know what it is yet.?"
Nah I don't think you do.
I found and old 'Acrow' prop (builders use them to temporarilyhold houses up) they're made of really strong stuff and consist of an inner and outer tube. The inner being a nice tightish sliding fit.
I cut two bits of outer and welded them as you can see
And I welded a couple of 'Webs' into the frame. There is a lot to know about 'Webbing'; suffice to say it makes the joint stronger.
So what about the inner bit of my 'Acrow' I hear you ask.
Well; I bought a tow coupling off Ebay (tested to 3.5 tonnes) £17 inc delivery out of some surplus stock.
It was too big to fit to anything normal so I made some steel bushes (17mm outer with a 12mm hole through the middle) bored out the Acrow tube and....................
Blow me if it doesn't fit now.
So having spent hours turning, drilling, bending, filing, welding and swearing I now have a custom bull bar that I can slide a tow coupling into.
Then I can pull a pin and it does this
And it can hook onto my camper. I'm just to old for tents.
See you in the summer
Bugger me that's clever!
I just thought you were making a really ugly bull bar 
To go behind the bedford?
To go behind the bedford?
Looking good 
Are those driving lamps just screwed onto the grille or is it different grille?
Will you have to remove the towing assembly when driving the car to stay legal ?
Are those driving lamps just screwed onto the grille or is it different grille?
Will you have to remove the towing assembly when driving the car to stay legal ?
Got to say I was worried at first and nearly posted NOOOOOO!
Now it's YESSSS!
Now it's YESSSS!
Looking good
Are those driving lamps just screwed onto the grille or is it different grille?
QUOTE]
Hi, it's commonly called (correct me if I'm wrong) a 'Lighted' grille and I believe was a Fiat accessory for countries will daytime light law.
This is one I stumbled across (literally as I broke it)
It needs new lamp reflectors which I am led to believe are the same and Peugot 205 items.
I have broken and repaired this almost irriplacable grille so many times that I decided to pop rivet it in place for safety.
Now everytime I lean in the engine bay I crack another top fin and have discovered that to wire it up and change the reflectors I need to remove the grille as the lights come out of the back.....:bang:
----------------------------------------------------------
Will you have to remove the towing assembly when driving the car to stay legal ?[/
I Intend to pull out the coupling while driving; although I am quite sure it would prove to be a very usefull 'sighting' mechanism for slow old ladies crossing the road ahead of me.
Rather rashly (as it always turns out) I booked an MoT for the little 'Green (not so recently) Neglected One'.
It occurred to me that I had better do something about the 'Lighted' grille as the lights didn't work and the reflectors we rusty and tarnished.
Even the most understanding MoT tester doesn't like havinf the pi** taken.
Originally I intended to blank them off. But that would have been much too easy.
I mentioned before that, in a fit of pique, I had pop riveted the grill on. That was a real mistake. Drilling the rivets out found them spinning and melting their way through the grille. Then I broke a whole fin out of it; and then cracked it into two halves (again)
So needing to take the lights out to do a better job than last time on the grille I was left with this...
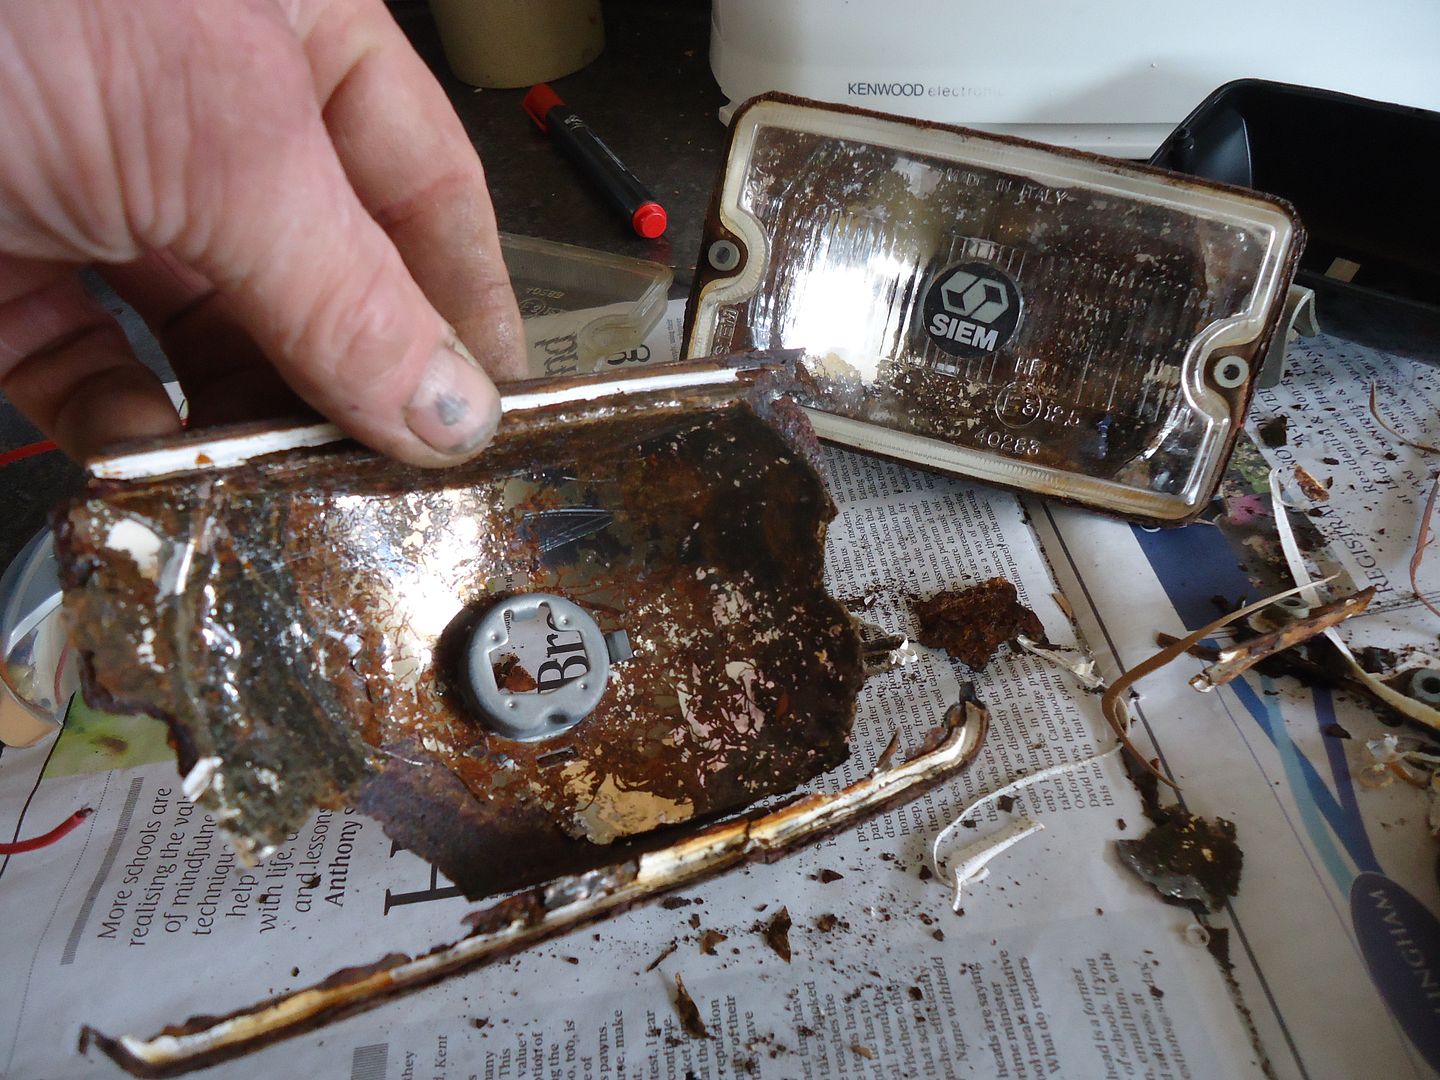
While I believe that these are the same as old Peugeot 205 items I know for a fact that even if they are available they cost at least 40 quid a pop.
4 of them and I could be well on the way to buying another Panda..!!
So a repair/recovery was in order; and quick as now I'm on an MoT countdown.
Rummaging through a box of lights I bought off Ebay (for no other reason than they cost a few pence more than postage) I found a pair of these.
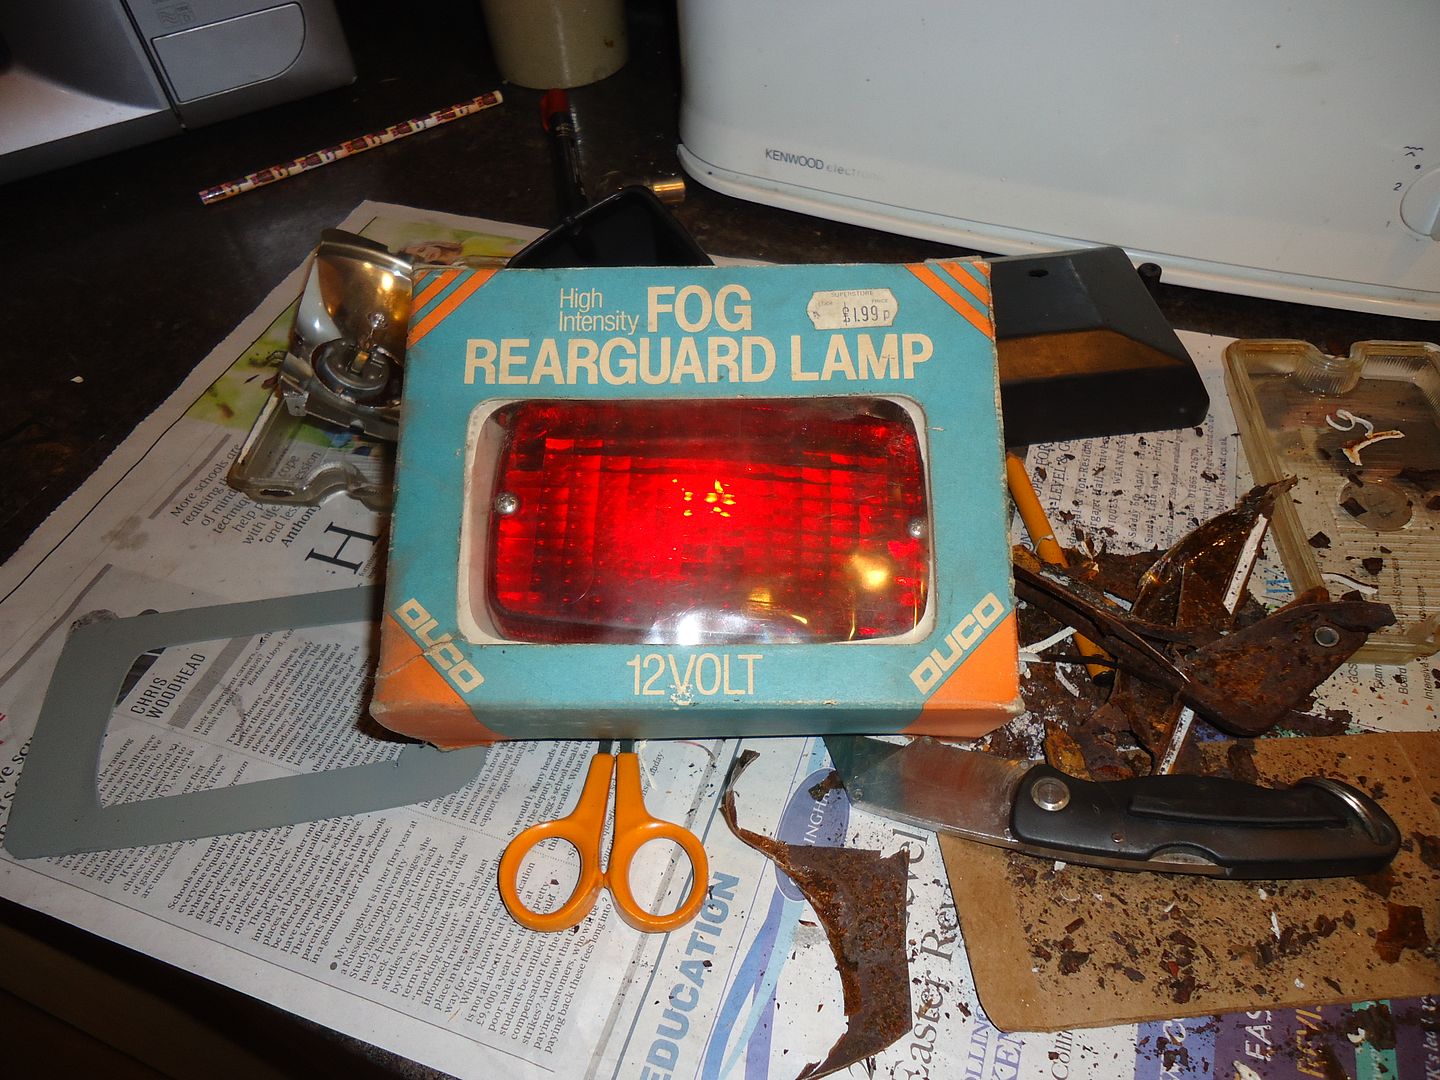
Once taken apart these provided a couple of brand new reflectors; all I had to do was mount bulb holders into them.
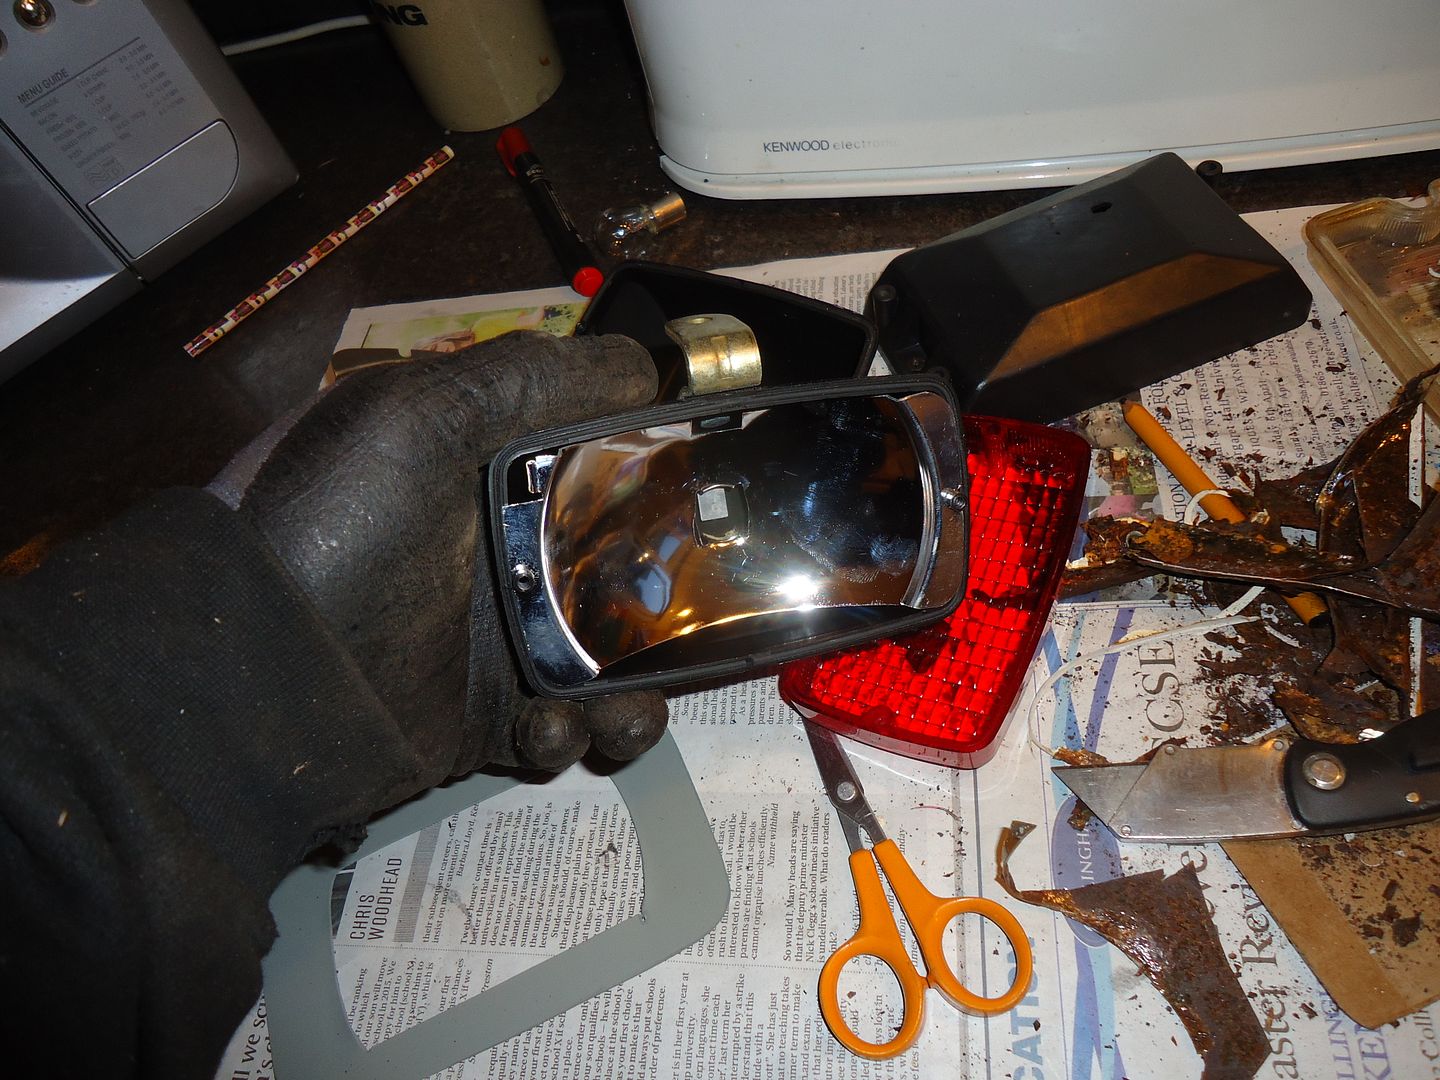
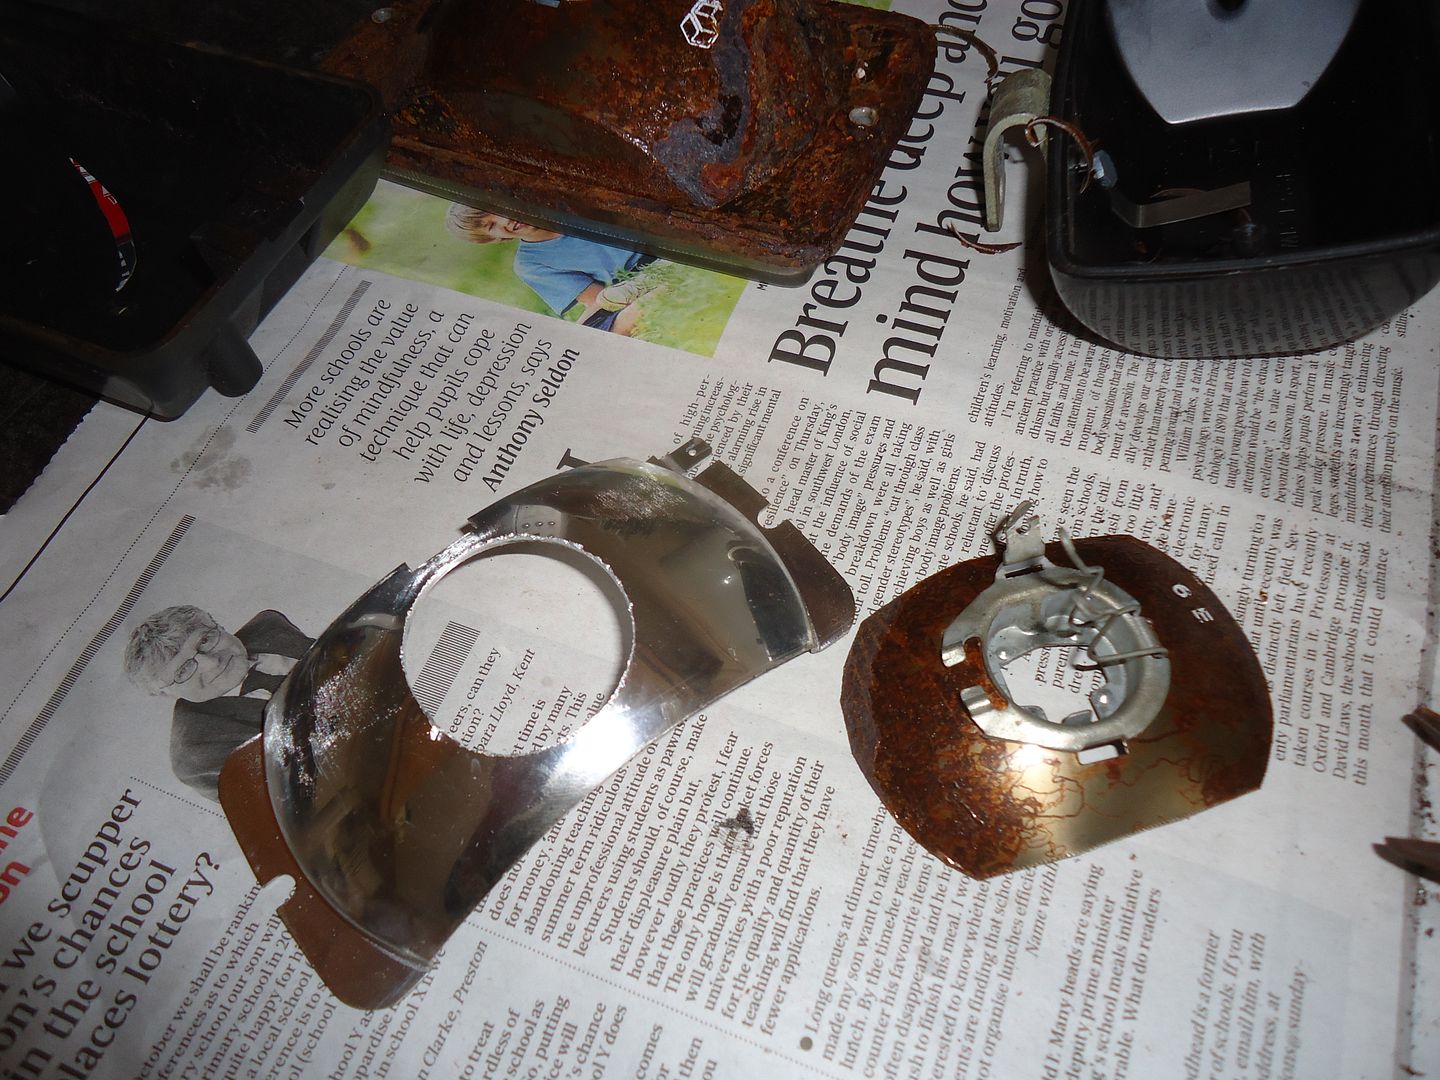
Si I drilled a nice big hole (you must never talk to people when to are sorting out hole cutters as you can very easy put the wrong one into the drill) and cut all the rust off the original reflectors which left me this

So I 'Q' Bonded the old reflector to the new; made up a cardboard template to mount the glass to the new reflector and then used it to cut a shape out of this steel.
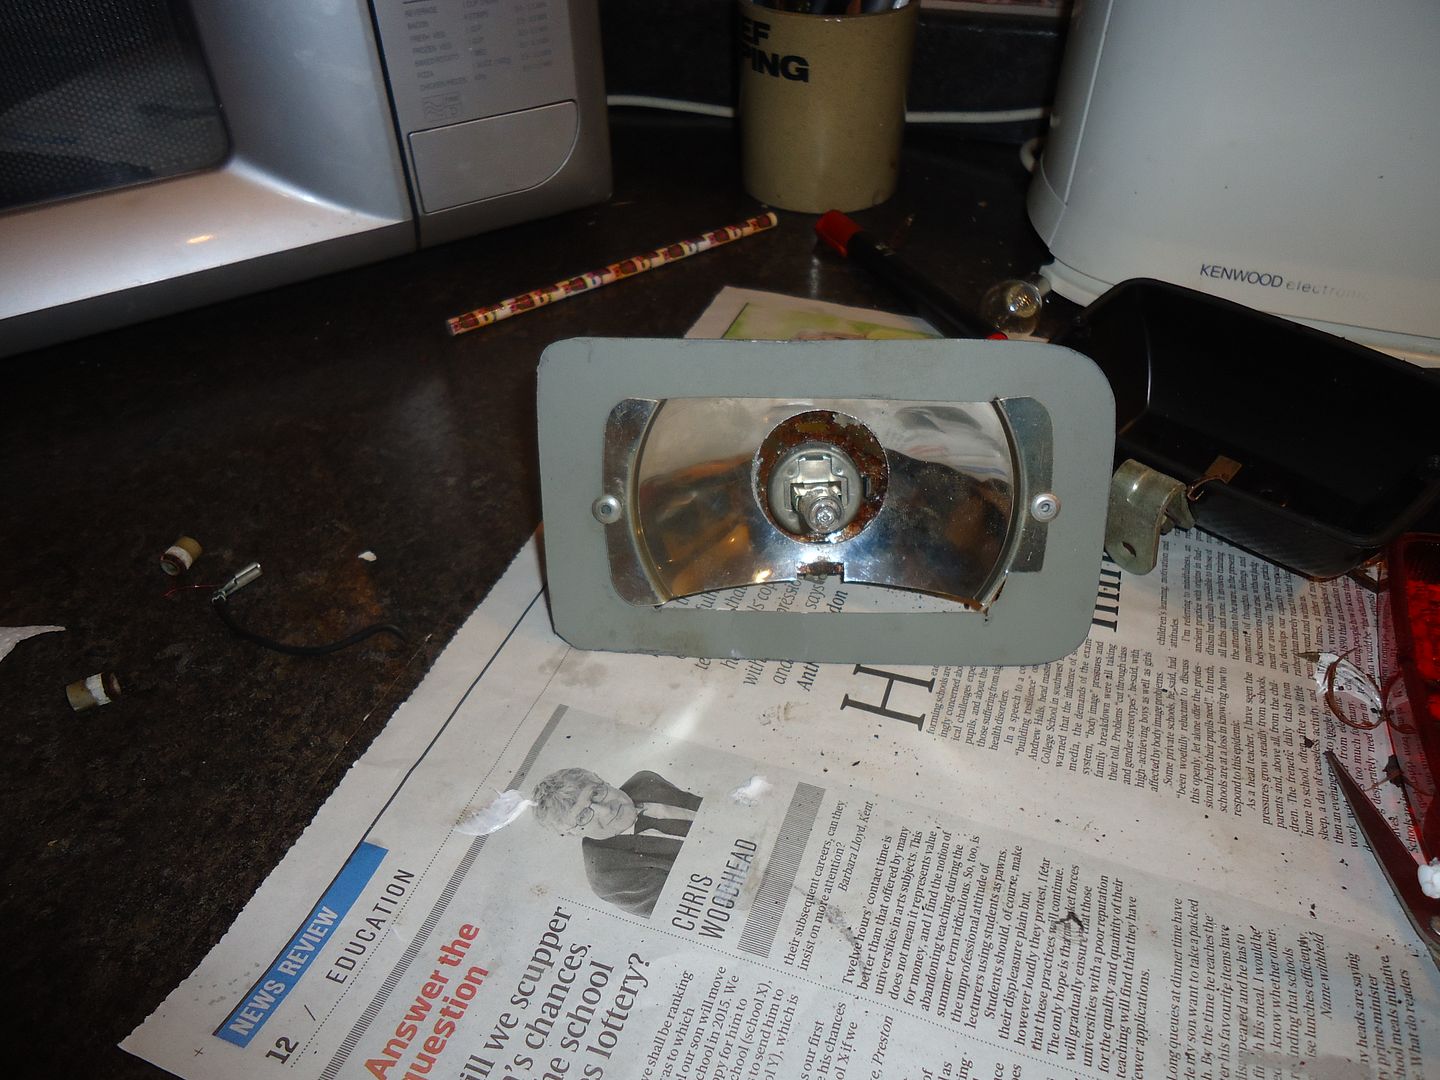
A bit of silicone around the glass edge and reassemble.
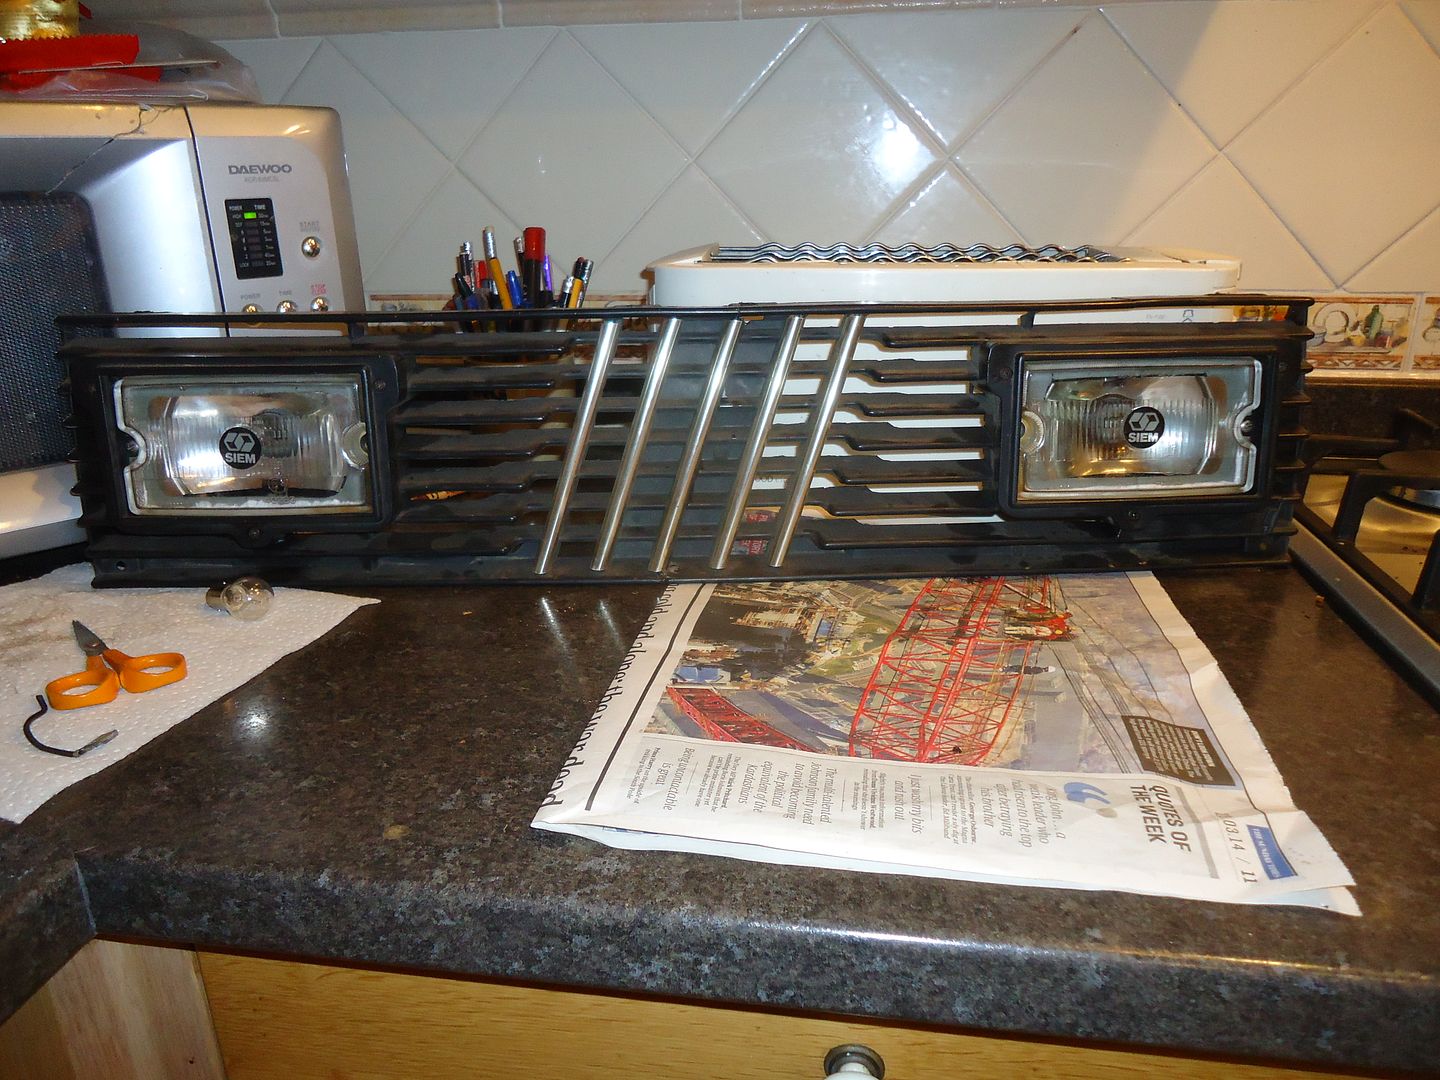
I'm happy with that.
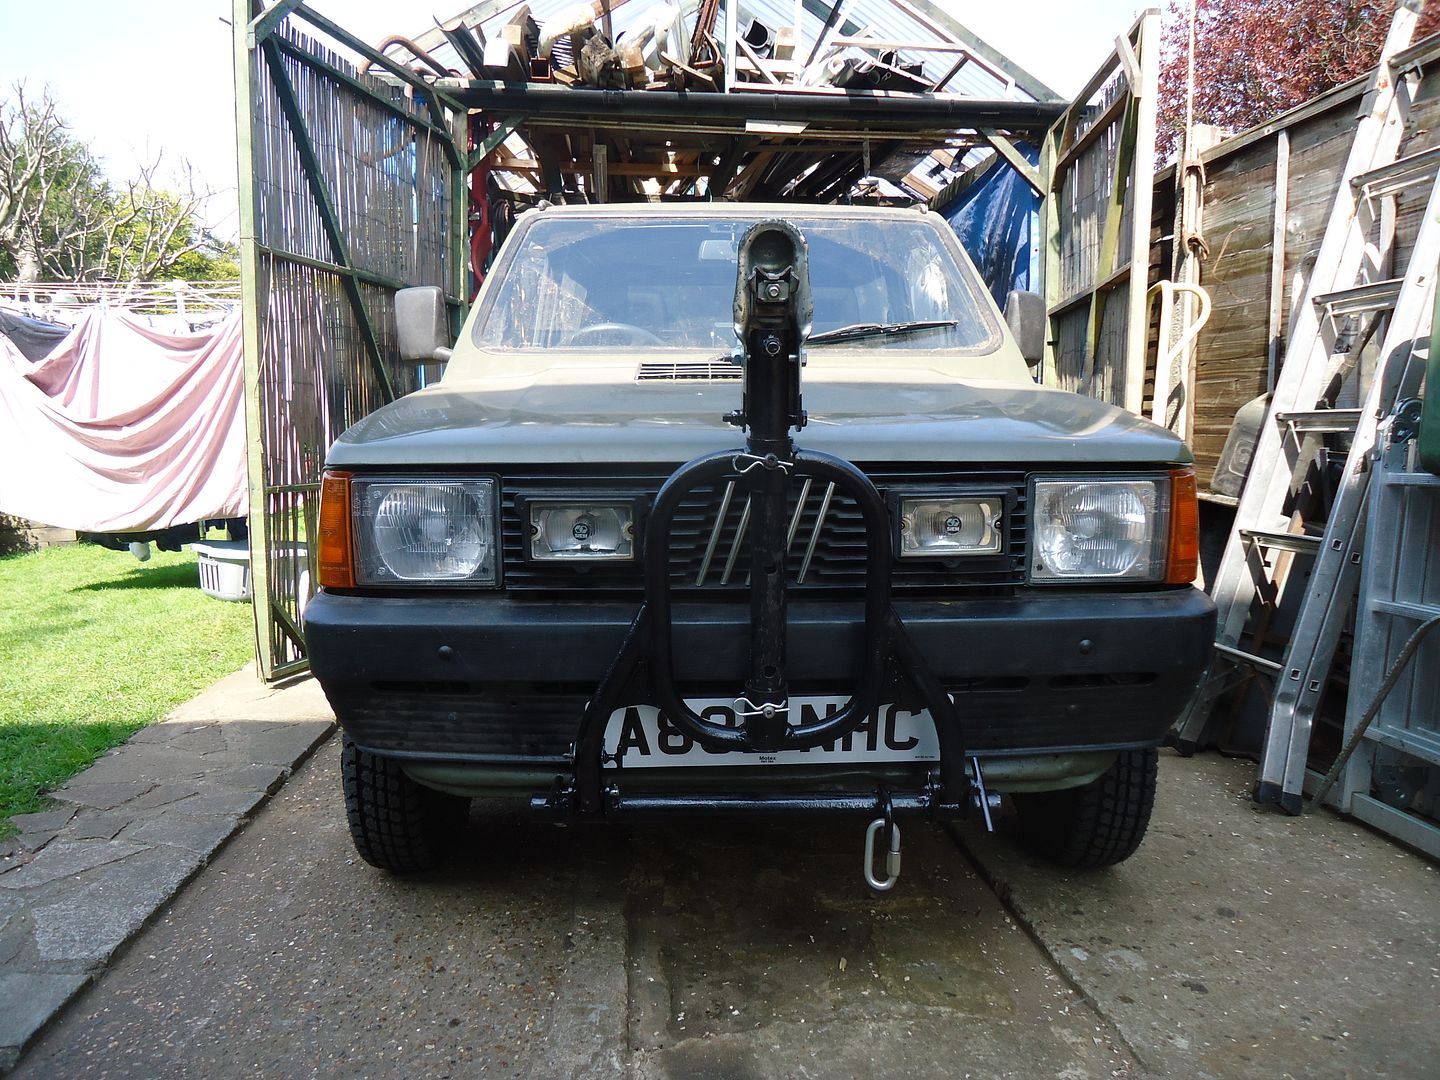
It's a shame my brand new number plate was completely obscured by my towing thingy. But 2 pins and the tow thingy comes off so the nice MoT man doesn't have to worry.
It occurred to me that I had better do something about the 'Lighted' grille as the lights didn't work and the reflectors we rusty and tarnished.

Even the most understanding MoT tester doesn't like havinf the pi** taken.
Originally I intended to blank them off. But that would have been much too easy.
I mentioned before that, in a fit of pique, I had pop riveted the grill on. That was a real mistake. Drilling the rivets out found them spinning and melting their way through the grille. Then I broke a whole fin out of it; and then cracked it into two halves (again)
So needing to take the lights out to do a better job than last time on the grille I was left with this...

While I believe that these are the same as old Peugeot 205 items I know for a fact that even if they are available they cost at least 40 quid a pop.
4 of them and I could be well on the way to buying another Panda..!!
So a repair/recovery was in order; and quick as now I'm on an MoT countdown.
Rummaging through a box of lights I bought off Ebay (for no other reason than they cost a few pence more than postage) I found a pair of these.

Once taken apart these provided a couple of brand new reflectors; all I had to do was mount bulb holders into them.


Si I drilled a nice big hole (you must never talk to people when to are sorting out hole cutters as you can very easy put the wrong one into the drill) and cut all the rust off the original reflectors which left me this

So I 'Q' Bonded the old reflector to the new; made up a cardboard template to mount the glass to the new reflector and then used it to cut a shape out of this steel.

A bit of silicone around the glass edge and reassemble.

I'm happy with that.

It's a shame my brand new number plate was completely obscured by my towing thingy. But 2 pins and the tow thingy comes off so the nice MoT man doesn't have to worry.
Last edited:
The second reflector/bulbmount was a perfect fit but I had siliconed it back together before I took a pic.
The towing thingy works great. Used it today.
DROVE THE CAR FOR THE FIRST TIME. THERE ARE NO 2 PARTS THAT WERE EVER TOGETHER ON THIS VEHICLE BEFORE. DRIVES REALLY NOT TOO BAD. GOT UP TO 40 MPH.!!!!!!!!!!!!!!!! ALL THE GEARS WORK.
PASSED IT'S MOT:worship: BUT DID HAVE TO BASH THE NEARSIDE REAR LAMP UNIT TO MAKE THE INDICATOR WORK.:slayer:
PASSED IT'S MOT:worship: BUT DID HAVE TO BASH THE NEARSIDE REAR LAMP UNIT TO MAKE THE INDICATOR WORK.:slayer:
This proves that you have retained the spirit of the true Panda
I've really struck out and the little car is 'Taxed'
But of course I took the bumpers off and did a bit of rewiring (small modification)
With the big tyres on there were a few clearance issues. Big nobbly tyres on plastic trim rather reound througn a small car with no mats or sound proofing.
Even I am not Philistine enough to cut about MK1 bumpers so the car now wears the late (and lamented) 'Purple Ronnie's' items.
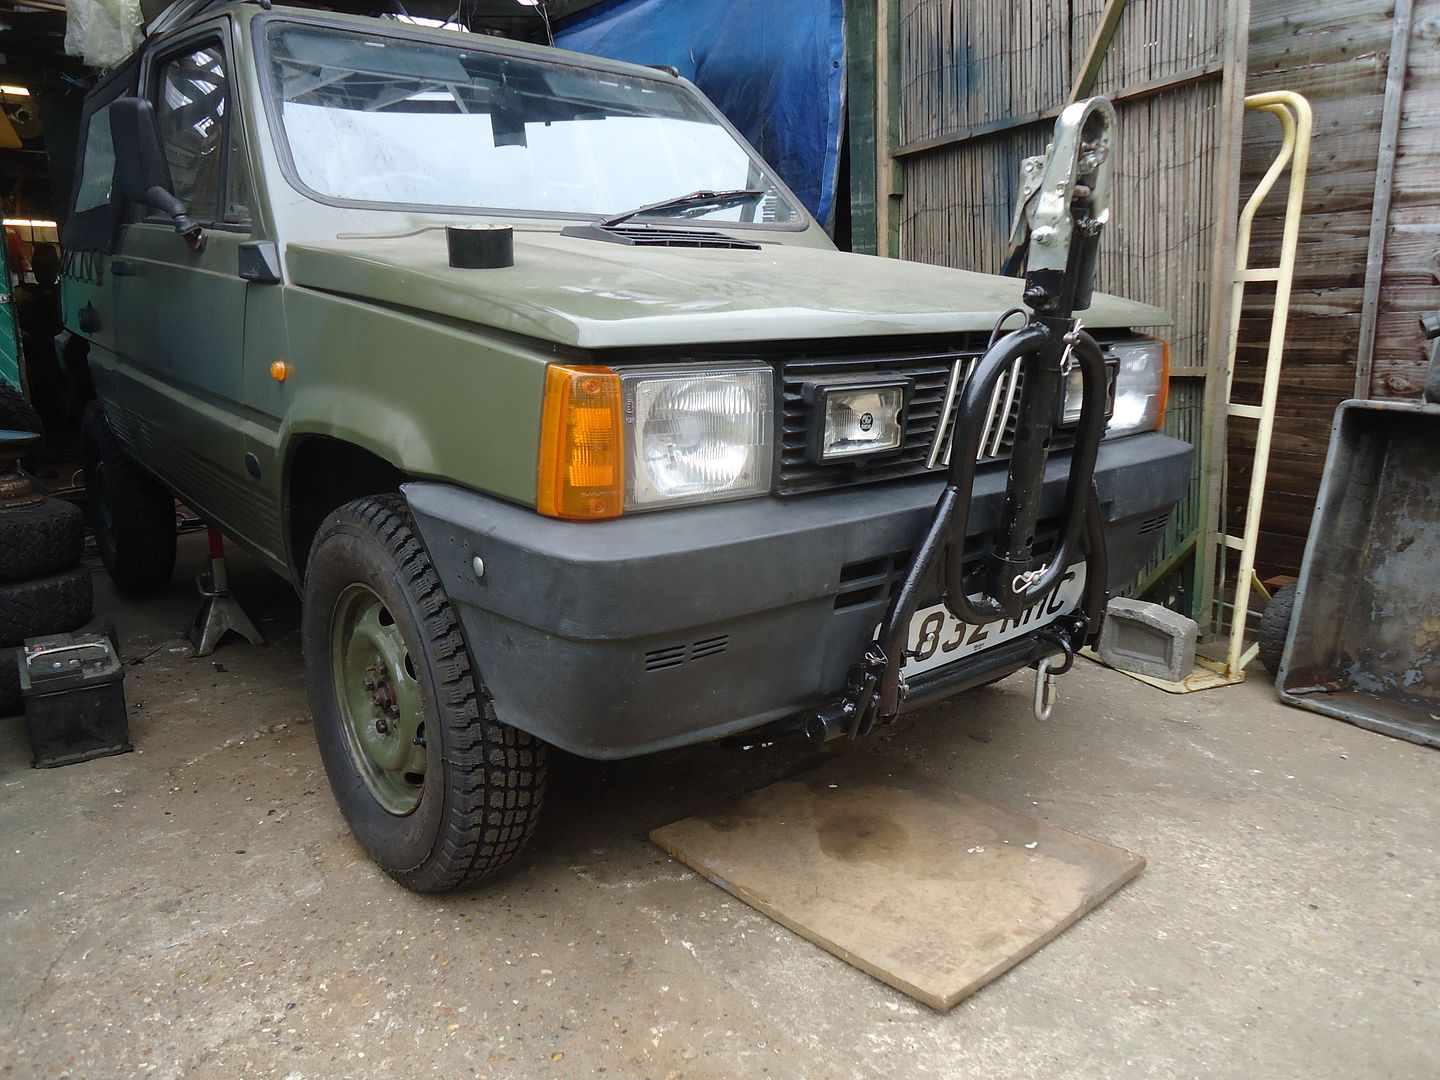
I did have to drop the lower mount of the bull bar thingy out of the way; for a moment I thought I would have to modify something due to the MKII bumpers being much deeper but in the event it all went back OK.
Not sure why I had to use the MK1 bumper brackets? Especially after I had made and extra MK2 one. Bug*er:bang:
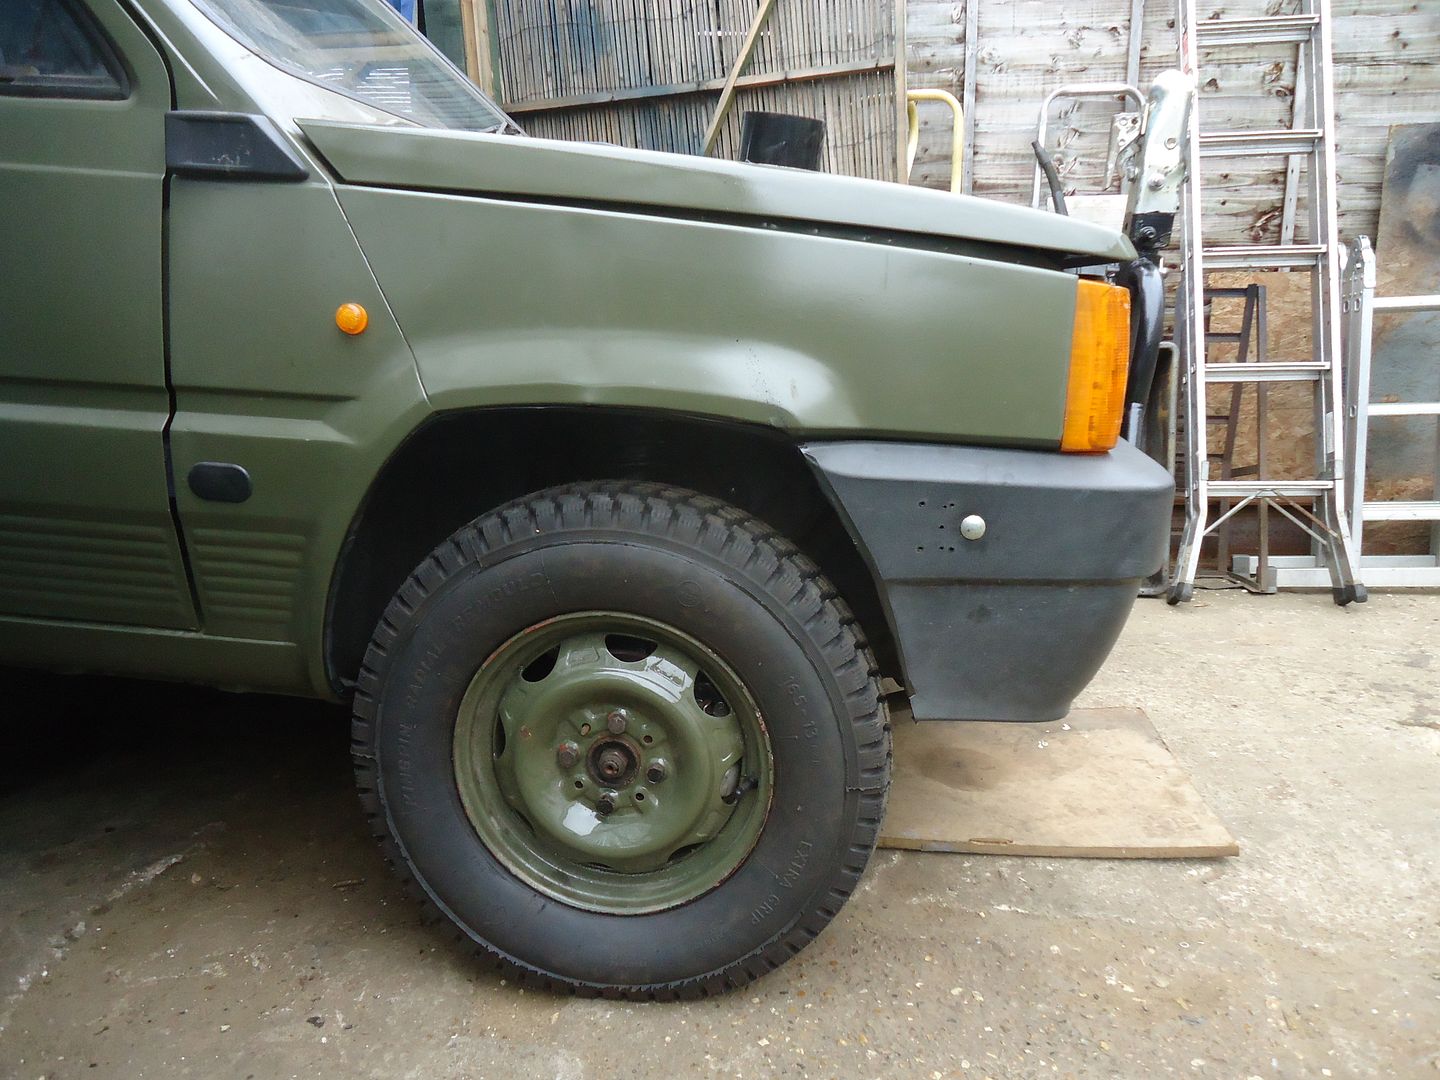
Clearance is really good now. Amusing how Panda bumpers turn liquid when you hit them with a grinder:yum:
I should mention that I prefer the look of the later bumpers. The MK1's look as if the car has grown out of them.
I have had time to have my first proper journey in the car and my first breakdown. Bloomin' handy that tow coupling.
There seems to be a blockage in the fuel tank. It cleared when I stuck an air line down it from the (mechanical) pump end (don't try this at home kids) although I remain suspicious about the pick up pipe inside the tank.
But of course I took the bumpers off and did a bit of rewiring (small modification)
With the big tyres on there were a few clearance issues. Big nobbly tyres on plastic trim rather reound througn a small car with no mats or sound proofing.
Even I am not Philistine enough to cut about MK1 bumpers so the car now wears the late (and lamented) 'Purple Ronnie's' items.

I did have to drop the lower mount of the bull bar thingy out of the way; for a moment I thought I would have to modify something due to the MKII bumpers being much deeper but in the event it all went back OK.
Not sure why I had to use the MK1 bumper brackets? Especially after I had made and extra MK2 one. Bug*er:bang:

Clearance is really good now. Amusing how Panda bumpers turn liquid when you hit them with a grinder:yum:
I should mention that I prefer the look of the later bumpers. The MK1's look as if the car has grown out of them.
I have had time to have my first proper journey in the car and my first breakdown. Bloomin' handy that tow coupling.
There seems to be a blockage in the fuel tank. It cleared when I stuck an air line down it from the (mechanical) pump end (don't try this at home kids) although I remain suspicious about the pick up pipe inside the tank.
Last edited:
Congrats on the birth of your new baby...
Congrats on the birth of your new baby...
Why sir you are kind. Please join me in a virtual pint in whetting the baby's head
Actually the virtual pint I have in my hand right now sez 'John Smiths Original' on it.
Cheers hic
I don't know if this is a classified or not but just out of curiosity there is a Panda Terra advertised in this weeks'Classic Car Buyer'

This one will be left hand drive and have a 900cc push rod engine. To all intents and purposes a MK1 Panda.
We could form our own club. I saw a yellow one advertised some months ago.:slayer:

This one will be left hand drive and have a 900cc push rod engine. To all intents and purposes a MK1 Panda.
We could form our own club. I saw a yellow one advertised some months ago.:slayer:
Similar threads
- Replies
- 5
- Views
- 231
- Replies
- 0
- Views
- 41


