Technical Head Gasket/Cam help needed.

Currently reading:
Technical Head Gasket/Cam help needed.

Haggis23

New member
Joined
Mar 31, 2025
Messages
7
Points
3
Location
Winchester
Hi, bought a cheap 500 last year fro my daughters first car, done clutch myself, replaced thermostat and housing, just in the middle of doing head gasket and needing some advice.

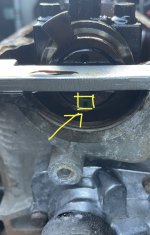
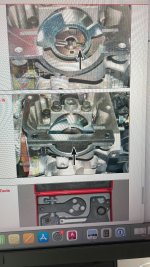
Firstly, have stripped everything out, ready to pull head, only cam belt and head left is place, I have a Haynes Manual but have an issue with the camshaft alignment tool. The pictures I have seen show the square (marked on pic1) at the twelve o'clock position/ the tool very nearly fits in this position, but fits much better in the position shown. Just wondering if it doesn't matter, or my tool might just be rubbish (it was cheap).

Secondly, do you have to take the camshaft out to get head re-skimmed? if so how do you get the pulley off ? and do you 100% need to do this to remove the cam and do the timing when you put it all back together?

any help would be greatly appreciated, the Haynes Manual seems as clear as mud to me.

Thanks for all your help in advance.
Hag
 
Model
fiat 500 POP
Year
2009
Mileage
82000

Attachments

  • IMG_1297.jpeg
    IMG_1297.jpeg
    989.3 KB · Views: 22
  • 0578E5BB-303A-458B-A996-C8FEF2CFD8D8.jpeg
    0578E5BB-303A-458B-A996-C8FEF2CFD8D8.jpeg
    2.5 MB · Views: 14
  • IMG_1298.jpeg
    IMG_1298.jpeg
    1.8 MB · Views: 13
Hi, bought a cheap 500 last year fro my daughters first car, done clutch myself, replaced thermostat and housing, just in the middle of doing head gasket and needing some advice.

Firstly, have stripped everything out, ready to pull head, only cam belt and head left is place, I have a Haynes Manual but have an issue with the camshaft alignment tool. The pictures I have seen show the square (marked on pic1) at the twelve o'clock position/ the tool very nearly fits in this position, but fits much better in the position shown. Just wondering if it doesn't matter, or my tool might just be rubbish (it was cheap).

Secondly, do you have to take the camshaft out to get head re-skimmed? if so how do you get the pulley off ? and do you 100% need to do this to remove the cam and do the timing when you put it all back together?

any help would be greatly appreciated, the Haynes Manual seems as clear as mud to me.

Thanks for all your help in advance.
Hag
Is this your model Engine Series? Please confirm.
It is not one I have changed so others on Forum can better advise, but I would have thought the female Torx in centre of pulley would need to be undone.
To skim the cylinder head it will need to lay flat on the machine so if valves stick out or anything else it will need to be removed.It is better if you do that as although they can it often allows odd bits to be lost.
Another point any sensors or bits likely to get damaged or knocked about I tend to remove before going to machine shop. Afterwards even though it may have been cleaned do a thorough job yourself as I have often found swarf etc.
If you need any torque settings etc . for the return journey let me know as I have Technical Data manuals, but they are for skilled mechanics, so don't tell you how to do the job.;)
 

Attachments

  • DSCF1952.JPG
    DSCF1952.JPG
    462.4 KB · Views: 9
Is this your model Engine Series? Please confirm.
It is not one I have changed so others on Forum can better advise, but I would have thought the female Torx in centre of pulley would need to be undone.
To skim the cylinder head it will need to lay flat on the machine so if valves stick out or anything else it will need to be removed.It is better if you do that as although they can it often allows odd bits to be lost.
Another point any sensors or bits likely to get damaged or knocked about I tend to remove before going to machine shop. Afterwards even though it may have been cleaned do a thorough job yourself as I have often found swarf etc.
If you need any torque settings etc . for the return journey let me know as I have Technical Data manuals, but they are for skilled mechanics, so don't tell you how to do the job.;)
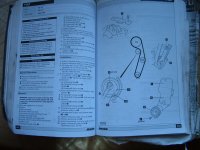
yep, that's the one, line 6 says 'ensure notch is at 12 oclock position, I can't get my locking tool to engage in at that position, ??? maybe my belt is a tooth out?? or my locking tool is not quite made right, but it rang like a dream?
wish I had manual like that, thanks for sharing.
 
yep, that's the one, line 6 says 'ensure notch is at 12 oclock position, I can't get my locking tool to engage in at that position, ??? maybe my belt is a tooth out?? or my locking tool is not quite made right, but it rang like a dream?
wish I had manual like that, thanks for sharing.
Have you locked the flywheel or anything? If not try gently turning engine one way or another to see if tool drops into place incase it is only a fraction out, then see if flywheel lock will engage.
Another cheat may be to mark all positions clearly and as engine ran well before hope that if you fit in same position it will continue to do so.
What ever you do after reassembly and all timing bolts etc. tight, then turn engine by hand with plugs out at least two or more full revolutions, that way if you have timed it wrong then at least you will not break anything.
I know of a main dealer mechanic that did a cambelt job on an expensive motor then turned the ignition causing £2k of damage;)
Not me I was taught right!
If you are still suspicious of your timing tool , would it be worth getting a good one?
 
Thanks for all your replies. So I had a very poorly produced cam locking tool, bent all over the place, managed to grind it flat and it fitted perfectly with cam marker at 12 o’clock.
John202020, it was losing water and very poor starting with no visible signs of water leak did a borescope and found sitting water in two cylinders. I’ve now taken it apart to find two breaks in HG, think it’s gonna need a skim. Praying I get the timing right on the rebuild. 🤞
It will be worth putting a straight edge on the cylinder block as well to make sure it is flat/true.
Also clean out the threads where the head bolts go in the block, so when torqued down you know it is pulling down tight.:)
 
Thanks bugsymike, taken on board. Are there any manufacturers of headgasket to avoid? I’ve been looking at an FCA set from shop4parts?
 
Thanks bugsymike, taken on board. Are there any manufacturers of headgasket to avoid? I’ve been looking at an FCA set from shop4parts?

I like Victor Reinz. Having said that, I've only ever fitted one HG, on an Alfa v6. The Reinz gaskets just looked well made and didn't give me any trouble.. but with my track record of never wrecking an HG, that's probably not saying much. :unsure:


Ralf S.
 
Is this your model Engine Series? Please confirm.
It is not one I have changed so others on Forum can better advise, but I would have thought the female Torx in centre of pulley would need to be undone.
To skim the cylinder head it will need to lay flat on the machine so if valves stick out or anything else it will need to be removed.It is better if you do that as although they can it often allows odd bits to be lost.
Another point any sensors or bits likely to get damaged or knocked about I tend to remove before going to machine shop. Afterwards even though it may have been cleaned do a thorough job yourself as I have often found swarf etc.
If you need any torque settings etc . for the return journey let me know as I have Technical Data manuals, but they are for skilled mechanics, so don't tell you how to do the job.;)

What's "Installation" steps 8 - 10 about? (It says fit the locking tools and then immediately remove the locking tools). Should 10 come after 13 (to avoid any slips during the second tensioner adjustment?

I can't see why you would fit and then remove the locking tools, like the book says.


Ralf S.
Hi Ralf S, I'm new to this, but interpreted as fit all the locking tools, belt and tensioner ( but not fully tensioned) remove locking tools, turn over twice to make sure nothing misaligned inside, then fully tension the belt.

I read somewhere on here that when you originally go to put the Belt on it will be half a tooth out at cam and you need to move it clockwise 1/2 tooth, as when you fully tension the belt it will pull it back anticlockwise 1/2 a tooth and the you will be perfectly in time, apparently a lot of people turn the cam anticlockwise to get the belt to fit originally and then when tightened end up a tooth out.
God I pray I got that right as fitting my first one at the weekend. 😨
 
I like Victor Reinz. Having said that, I've only ever fitted one HG, on an Alfa v6. The Reinz gaskets just looked well made and didn't give me any trouble.. but with my track record of never wrecking an HG, that's probably not saying much. :unsure:


Ralf S.
As many on here will know I was deeply into Hillman Imps for many years. Imps had a bad reputation for blowing head gaskets, mostly due to owners letting the coolant level get too low - sound familiar? Reinz gaskets were very well thought of back in those days and were the "go to".
 
What's "Installation" steps 8 - 10 about? (It says fit the locking tools and then immediately remove the locking tools). Should 10 come after 13 (to avoid any slips during the second tensioner adjustment?

I can't see why you would fit and then remove the locking tools, like the book says.


Ralf S.
Aye, a bit confusing.
 
What's "Installation" steps 8 - 10 about? (It says fit the locking tools and then immediately remove the locking tools). Should 10 come after 13 (to avoid any slips during the second tensioner adjustment?

I can't see why you would fit and then remove the locking tools, like the book says.


Ralf S.
I think the removing is to allow turning engine over to let it settle to recheck tension etc.
Some people tighten/slacken cam and crank pulley bolts using and damaging timing tools instead of using a suitable locking device.
Auto Data manuals are quite expensive and designed specifically for the Motor Trade so generally few errors.:)
The diesel and petrol data manuals along with the cambelt ones used to cost me well in access of £100 each year up until 2012 when I was looking at retirement so I stopped buying and then they went computerised with annual subscription in access of £1k I believe although more detailed.
As long as the OP after checking and timing turns engine by hand at least two full revolutions then even if wrong it shouldn't be catastrophic.;););)
 
Hi Ralf S, I'm new to this, but interpreted as fit all the locking tools, belt and tensioner ( but not fully tensioned) remove locking tools, turn over twice to make sure nothing misaligned inside, then fully tension the belt.

I read somewhere on here that when you originally go to put the Belt on it will be half a tooth out at cam and you need to move it clockwise 1/2 tooth, as when you fully tension the belt it will pull it back anticlockwise 1/2 a tooth and the you will be perfectly in time, apparently a lot of people turn the cam anticlockwise to get the belt to fit originally and then when tightened end up a tooth out.
God I pray I got that right as fitting my first one at the weekend. 😨
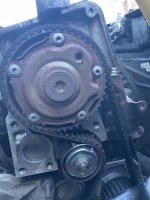
Ok, first off, I'm talking FIRE 8 valve engines here because it's what I know best. The very early engines had timing marks on the pulleys lining up for timing and doing a belt was a doddle! However on the later engines (my 2010 is one) there is no timing mark on the cam pulley. So you need the locking kit. The crank and cam locking tools are designed to be used in exactly the way the FIAT workshop manual describes the task be done. fit the crank locking tool (which can be 180 degrees out of course - so careful) and check the cam locking tool drops into it's slot. - if not turn the crankshaft another complete turn - which takes the cam on by half a turn of course. with cam and crank locked up you can now slacken the adjuster and remove the old belt. Fiat now want you to slacken the cam pulley main bolt which will allow the cam pulley to spin freely on the camshaft. It doesn't need to be slackened much, half a turn is plenty, but there are some problems with doing this. The first, and not inconsiderable one is that the bolt is VERY tight - it has to be to lock the pulley to the camshaft itself. But you MUST NOT have the cam locking tool engaged with the slot in the end of the cam when doing this as it's easy to break lumps off the end of the cam! By the way, if your cam pulley is a solid cast one then the bolt you see when looking at it is the actual bolt. However if you're working on a VVT engine (see the third picture in the OP's first post here) then the bolt head is actually under the Torx bolt you see in that picture. In the VVT pulley that "bolt" is just a plug holding in the oil for the VVT - so get a rag ready to catch the oil if/when you remove it. Having established which type of pulley you have and got ready to undo the holding bolt you must remove the locking tool and hold the camshaft itself with a spanner (open ended) or other suitable tool so you can resist the tendency for it to rotate as you attempt to slacken the big bolt on the pulley. Now refit the cam locking tool to synch up the timing again. With the tools back in place you have a cam and crankshaft correctly timed to each other but with a free running cam pulley. Fit your new tensioner and water pump (I always do a water pump) and then install the new belt. I go round the crank pulley first and wedge it against the toothed pulley with a wee bit of wood or anything to hand. Then up over the water pump, around the top pulley wriggling it into place past the tensioner pulley and, making sure the teeth are all in mesh, apply tension with the tensioner pulley. You'll notice as you do this that the cam pulley rotates slightly anti-clockwise as the tension is taken up. All good so far? Well yes, but now you've got to tighten the cam pulley bold without doing any damage to the cam locking tool! So you can tighten it to a moderate extent with little risk to the locking tool but you must remove the cam locking tool when you finally tighten it to the recommended torque. The problem now becomes how to stop the camshaft moving relative to the pulley as you "lean" hard on the big bolt. Part of the locking tool kit should be a wee blocking tool which locks the pulley to the head but you've got to stop the cam itself moving relative to the pulley and so the big spanner on the cam itself comes into play again. It aint easy". When you've finished, Of course, if nothing has moved, the cam locking tool should still drop into the slot on the back end of the cam, if it doesn't then you've got to slacken it and start again. If it does all line up then the crank, slowly and with the plugs out so there's no compression, to check if the valves are touching.

Well, I'm a great believer in letting sleeping dogs lie. So, I thought, many years ago, if the cam pulley has been locked up in the correct position by the last person who did a belt on the engine, why would you need to "mess" with the cam pulley at all? I researched cam belt design and wrote to the manufacturers where I found that manufacturing tolerances on these products are very tight indeed - so, as long as you use a "big name" kit, one manufacturer's belt is going to be, as near as makes no odds, dimensionally identical to another. Now, this simplifies things considerably I thought.

So, I do these without slackening the cam pulley bolt. I first, before removing the old belt, check that both cam and crank locking tools fit. If they do, happy days. If they don't then the pulley is incorrectly fitted and the bolt will have to be slackened to allow realignment using the locking tools in the way that FIAT specify. I've done a number of these on both 1.2 and 1.4 8 valve Fire engines from Panda and Punto models and, so far, haven't found one miss-timed. So, with both locking tools fitted, slacken the tensioner and remove the old belt. Change the water pump if you're going to, and remove the old tensioner. Fit the new tensioner and offer the new belt up starting at the crank, round the water pump and then the cam pulley. Pull the belt nice and tight just by hand but you'll find the belt is about half a tooth out of going into mesh with the cam pulley! This is because the pulleys are locked in the running position with the cam pulley in the correct running position FOR A FULLY TIGHTENED BELT! You'll never get it on. So most settle for lining it up with the next tooth which puts you one tooth retarded once the tensioner is tightened. So what you need to do is remove the cam locking tool and turn the cam pulley just slightly clockwise until the belt can be made to mesh. Now tighten the tensioner and you'll find the cam locking tool will once again be lining up with it's slot. I've never had a problem doing it this way and, what's more it's the way the wee garages around here all do it. Also, not one of the one's I've done this way needed a Phonic Wheel Relearn on completion but there are reports that if you disturb the cam pulley bolt, they nearly always need a relearn.

Now I must say that the above is not intended as a complete DIY set of instructions as to how to fit these belts. I'm sure it'll all make a lot of sense to an experienced mechanic or enthusiast but, on the VVT engines in particular - which are "interference" engines - the results of getting this wrong can be catastrophically expensive (maybe new engine needed) So, unless you really know what you're doing you're best to leave this to "the professionals" and, reading some of the threads and posts regarding this job, even the experienced sometimes end up with a "sick" running engine due to getting it wrong - very often with the belt one tooth out.
 
Totally agree with @Pugglt Auld Jock , the only point extra is as engine overheated and you wish to have head skimmed then pulley etc. will have to come off to give a flat surface for the milling machine as I mentioned.
Just so Mike. I'm always a bit worried when dealing with engines which have overheated significantly. The imps would have big problems with the cast in steel cylinder liners moving and once they did that it was game over. Aluminium blocks with "open" deck faces - so no support for the top of the bores - need to be checked very carefully if the engine has been "roasted". There was a lot to be said for a nice heavy cast iron block!
 
Just so Mike. I'm always a bit worried when dealing with engines which have overheated significantly. The imps would have big problems with the cast in steel cylinder liners moving and once they did that it was game over. Aluminium blocks with "open" deck faces - so no support for the top of the bores - need to be checked very carefully if the engine has been "roasted". There was a lot to be said for a nice heavy cast iron block!
Apart from the odd Jag alloy head, as an apprentice most I worked on were cast iron blocks and cylinder heads.
I recall the struggles lifting six cylinder heads off rusty studs being a struggle as a 16 year old.
I wonder why I got back ache.;)
Mind you they rarely needed a head skim.
 
Apart from the odd Jag alloy head, as an apprentice most I worked on were cast iron blocks and cylinder heads.
I recall the struggles lifting six cylinder heads off rusty studs being a struggle as a 16 year old.
I wonder why I got back ache.;)
Mind you they rarely needed a head skim.
Worst one I ever did was a Dolomite Sprint. completely seized on. come to think of it the 1850 engine was a pain generally. Even stuff like the "A" and "B" series BL stuff, although a cast iron head, could be well seized on the studs. I remember having a right nightmare with my own Mini getting the ally thermostat housing off the studs - lots of plus gas and "shock" treatment.
 
Back
Top