Technical Fiat panda Cylinder Head Gasket Replacement and timing questions

Currently reading:
Technical Fiat panda Cylinder Head Gasket Replacement and timing questions

Joined
Jul 30, 2023
Messages
208
Points
140
Location
ıstanbul
Hello everyone, thank you for following the topics I opened before. I had a poor idle problem that I couldn't fix.

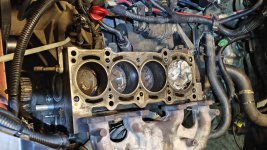
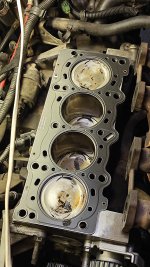
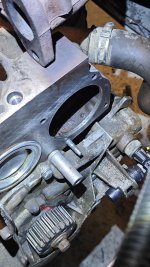
As the last step, I decided to remove the cylinder head gasket.


The cover gasket is in good condition.
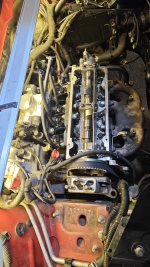
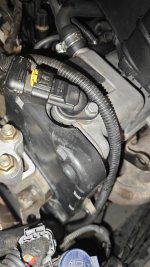
The valves are slightly brown and discolored. While this is being dismantled, a heat resistant valve will be installed.

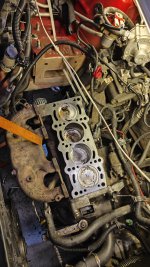
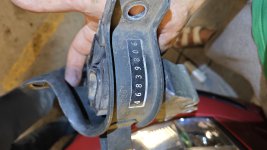
I have questions about timing. How many degrees should the flywheel be when the crank and cam are in correct timing?

I think these 3 variables are not in exactly the right position. Maybe that was my problem.

Especially the flywheel looked 6 degrees.

IMG_20240715_191616.jpg
 
Model
169
Year
2005
Mileage
70000

Attachments

  • IMG_20240715_121131.jpg
    IMG_20240715_121131.jpg
    3 MB · Views: 127
  • IMG_20240715_204656.jpg
    IMG_20240715_204656.jpg
    2.4 MB · Views: 97
  • IMG_20240715_204444.jpg
    IMG_20240715_204444.jpg
    1.7 MB · Views: 152
  • IMG_20240715_204441.jpg
    IMG_20240715_204441.jpg
    2.7 MB · Views: 90
  • IMG_20240715_203756.jpg
    IMG_20240715_203756.jpg
    3.2 MB · Views: 112
  • IMG_20240715_203749.jpg
    IMG_20240715_203749.jpg
    3 MB · Views: 83
  • IMG_20240715_174832.jpg
    IMG_20240715_174832.jpg
    3.5 MB · Views: 79
  • IMG_20240715_174825.jpg
    IMG_20240715_174825.jpg
    3.1 MB · Views: 81
  • IMG_20240715_174816.jpg
    IMG_20240715_174816.jpg
    3.1 MB · Views: 81
  • IMG_20240715_170141.jpg
    IMG_20240715_170141.jpg
    2.4 MB · Views: 138
  • IMG_20240715_170134.jpg
    IMG_20240715_170134.jpg
    3.1 MB · Views: 81
There's three different methods of timing on the 1.2
Two types of timing belts and tensioners

Depending on engine number and oil filler cap

Square oil filler up to engine 2533527 uses timing marks and a different type of timing belt


Square oil filler from 2533528 uses this locking tool
169003791_2.jpg


Round oil filler, Evo 2 uses this locking tools
199002762_2.jpg
 
Last edited:
Fiat tells you to lock the crank and the cam, tension the belt and remove the locks. Thus causes the belt to pull the cam 1 tooth out of step.
I marked the cam wheel and cylinder head with white marker then locked crank and cam then added black lines that align to each.
Lock crank, remove cam lock, fit belt one tooth regarded and tension the belt. The Pen marks should align.

If they don’t align you’ll need to loosen the cam pulley retaining bolt, fit locks and finally tension the belt. Nip the bolt but DO NOT go full torque. Finally removed both locks and use a cam pulley holding tool to torque the centre bolt. Refit crank lock and confirm cam is correct.

EDIT - DO NOT loosen or tighten the cam sheel with the alignment lock in place. The wheel has to be back held with a suitable fog tool while the nut is unscrewed or fully torqued up.
 
Last edited:
There's three different methods of timing on the 1.2
Two types of timing belts and tensioners

Depending on engine number and oil filler cap

Square oil filler up to engine 2533527 uses timing marks and a different type of timing belt


Square oil filler from 2533528 uses this locking tool
View attachment 448508


Round oil filler, Evo 2 uses this locking tools
View attachment 448509
Where did you get these photos? Trying really hard to get a workshop manual without dropping cash for it
 
I installed the cylinder head gasket and adjusted the engine timing.

While removing it, I replaced 2 radiator hoses. I'm refreshed.

The engine mount was very worn. It was quite difficult to find a new one. Its production has ended and it is not available in our country. I had to buy it from an out of town parts dealer for 2-3 times the normal price.


I'm currently waiting for the engine mount to arrive.
 

Attachments

  • VID_20240727_145005.mp4
    24.5 MB
  • IMG_20240727_202700.jpg
    IMG_20240727_202700.jpg
    3.1 MB · Views: 44
  • IMG_20240727_132924.jpg
    IMG_20240727_132924.jpg
    3.1 MB · Views: 43
  • IMG_20240727_132919.jpg
    IMG_20240727_132919.jpg
    2.9 MB · Views: 46
  • IMG_20240727_132625.jpg
    IMG_20240727_132625.jpg
    3.2 MB · Views: 38
  • IMG_20240726_180849.jpg
    IMG_20240726_180849.jpg
    3 MB · Views: 37
  • IMG_20240719_232505.jpg
    IMG_20240719_232505.jpg
    1.8 MB · Views: 39
  • IMG_20240719_232027.jpg
    IMG_20240719_232027.jpg
    3.4 MB · Views: 45
  • IMG_20240719_230708.jpg
    IMG_20240719_230708.jpg
    3.2 MB · Views: 149
  • IMG_20240727_151619.jpg
    IMG_20240727_151619.jpg
    2.6 MB · Views: 37
  • IMG_20240727_151626.jpg
    IMG_20240727_151626.jpg
    2.5 MB · Views: 271
I finally finished the car and it ran smoothly.
I ran it parked for a few 30 minute periods.
I used it for about 10 km. There don't seem to be any problems yet.

I supplemented with 3 glasses of water 3 times at different times. I hope it's just filling the gap. And there is no water leakage.


I couldn't place the timing belt cover properly.

I think I tightened the engine mount a little from the top during assembly.
Because even though I want the cover, it doesn't fit properly.


I don't want to lift the engine again and disassemble many parts. I will use it this way for a while during testing.


I don't know if my idle problem has been solved. I will continue to use it.
 

Attachments

  • VID_20240731_230714.mp4
    37.7 MB
  • IMG_20240801_214809.jpg
    IMG_20240801_214809.jpg
    2.5 MB · Views: 58
  • IMG_20240801_214815.jpg
    IMG_20240801_214815.jpg
    2.8 MB · Views: 74
  • IMG_20240801_214911.jpg
    IMG_20240801_214911.jpg
    2.9 MB · Views: 40
Back
Top