Am I correct in thinking “forward” (towards firewall) is COLD (Low temp) and “Up” (towards gear shifter) is HOT (high)??
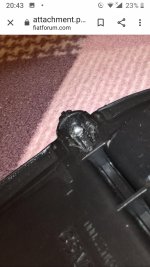
Fixed (this is actually my second attempt - in my first attempt I used only a single screw, which wasn’t enough to hold the flap to the actuator lug; a second pin /2mm diameter nail fixed the issue).
Yes, “forward” is cold, and “up” is warm.
Before attempting to repair the blend flap pin, set your climate control to COLD so that the actuator is at its “forward” limit.
Australian Fiat 500 Lounge (10/2007)
(right-hand drive)
1. Unclip gear shifter boot & lift up (no need to remove)
2. Undo 2 x phillips head screws
3. Pull up firmly to remove top section of centre trim
4. Undo 2 x size 30 torx bolts
5. Undo size 20 torx screws in each footwell
6. Remove large centre section
7. Remove trims from around handbreak; 2 x 10mm nuts under front cup holders + 1 10mm nut under handbreak, + 1 x 10mm nut under rear cupholder (this step may not be necessary; I did it so I could clean the car… maybe someone can confirm if the handbrake surrounds can be left in place)
8. Undo torx screws under knee airbag

9. Pull firmly at the bottom edge of the airbag panel - be careful as the wires to the airbag are short… prop airbag out of the way (no need to disconnect wire unless you want to)
10. Undo 5mm hex bolts accessed through steering wheel height adjustment gap


11. wiggle small bracket so that it comes off
12. Unplug blue plug and black plug. It just makes it easier later.

13. Undo 13mm nut under dash, right side

14. Manoeuvre large bracket out; it has locating pins on each side so it wont just “pull down”


15. Undo 7/32” screws from actuator & remove actuator; remove white “gear” from actuator keyway

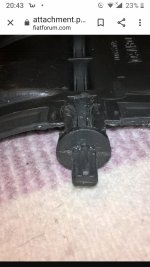
16. Pre-drill through the busted (black) lug, fit a fine screw up the center (I had to use a flap disc to make the screw head small enough to fit up the middle of the actuator gear, & screwed it in via there)
17. Make sure blend flap is “forward” (cold)
18. fit actuator “gear” against the hole to the blend flap, tighten screw into the blend flap
19. (this is the bit I missed the first time & it didn’t work for long…) pre-drill a fine hole right next to the keyway on the gear, towards the blend flap
20. Insert a fine nail, pin or similar - ensure it goes into the blend flap; you can now check by moving the gear back & forth, you should hear the flap moving. Make sure flap & gear are “forward”.
21. Fit the actuator onto the keyway (it only fits one way)
22. Reassemble in reverse order. Make sure you put the handbrake surrounds back before the centre pieces!
23. Test