The Goal
The goal was to fit Marea Poly Elliptical Headlights without modifying the Bravo’s wiring loom in anyway and without using stealers. In effect being able to plug the lights straight into a Bravo as you can with standard lights.
Ideas
Working from wiring diagrams without seeing a headlight up close my first thought was to create an ISO style connector. This turned out to be near impossible because 4 Pin male Junior connectors are not commercially available.

The male connector on the poly unit has the side light pin missing, plus it is removable. So all we would need is two male pins and two 2 pin female junior connector some wire and I could wire up the sidelight connector inside the poly. Making a very professional modification.
The Result
A Poly Elliptical Headlight ready to plug straight into your Bravo or Brava. No messing.
View attachment 58318
The goal was to fit Marea Poly Elliptical Headlights without modifying the Bravo’s wiring loom in anyway and without using stealers. In effect being able to plug the lights straight into a Bravo as you can with standard lights.
Ideas
Working from wiring diagrams without seeing a headlight up close my first thought was to create an ISO style connector. This turned out to be near impossible because 4 Pin male Junior connectors are not commercially available.
The male connector on the poly unit has the side light pin missing, plus it is removable. So all we would need is two male pins and two 2 pin female junior connector some wire and I could wire up the sidelight connector inside the poly. Making a very professional modification.
The Result
A Poly Elliptical Headlight ready to plug straight into your Bravo or Brava. No messing.
View attachment 58318
What You Will Need
What You Will Need
· Marea Poly Elliptical Headlights
· 2x Junior Connector 2 way female
· 2x Junior Connector male pins
· 1x Crimping Tool
· 2x 4mm diameter ring connector
· 2x small rubber grommets
· Wire (earth 72cm total)
· Wire (Positive 92cm total)
· Heat Shrink tube (18cm each side)
· Black cable ties (small)

Make sure the male pins you buy are like this one. Not the ones with two fixing wings.

The male pins PN:192174 can be bought at Vehicle Wiring Products.
Be sure to buy the correct ones. I already made that mistake so you don’t have to
")
http://www.vehicle-wiring-products.eu/VWP-onlinestore/connectors/housings.php
The Junior connectors are also available from The Toolbox Shop.
http://www.thetoolboxshop.com/
I had to order Heat Shrink tube on eBay. I could not find long enough lengths locally.
The Range has a motorfactor stand with the cheapest parts by a long way.

Preparing the Lights
Preparing the Lights

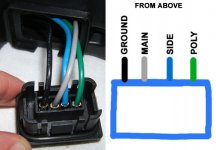
Remove the grey light covers. Take a look at the Main light connector you can see three pins and a hole where the Bravo has the sidelight pin.

Remove the male connector. I used the biggest screwdriver to hand. You can see securing clips on all four edges of the connector.

Now the hard decision. Where to bring the wire back out of the light and to the sidelight plug.
There is a lot to consider. Clearance for the lens internally and being sure you don’t effect the strength of various mounting points. Also clearance for the covers and adjuster motor.
You can see in this image where I have decided to drill a hole for the wire to come out (marked in blue).

And here it is with a grommet. The size all depends on the gauge of wire. I made an 8mm hole. Double check everything make sure the hole will not effect the cover. When drilling I put masking tape behind to help catch any plastic swarf.

Wiring
Wiring
First Make the female end of the cable.
Positive wire 46cm long
earth wire 36cm long
Heat shrink tube 18cm

I decided to mark the positive side on the poly sidelight bulb holder. In case LEDs are fitted.

I cut the Heat shrink tube to 18cm 16cm of it will be outside the light the rest inside.
The Heat shrink tube was not shrinking very much with the hair dryer, I heated it above a ring on the cooker.

Adding a zip tie inside the light stops the cable being pulled out.
Before pulling the wire back through add a ring connector to the earth and the male pin to the positive.

To get the earth connection I decided to undo one of the elliptical lens screws and put the ring connector behind that screw. If you prefer you could always solder into the original earth wires. I added electrical conductive grease on both sides of the ring connector.

Push the male pin into the lights main connector.

Finished
Finished
Push the main connector back in and you're finished.

Both right and left main connectors are wired identically, as shown in the image above.
The result is a Poly Elliptical Headlight ready to plug straight into your Bravo or Brava. No messing.

Don’t forget to get your new headlights aligned.
Thanks to Jug, rallycinq, :worship:
freepdfconvert.com
A Guide by 'Adrian Bravo' and 'The Sultan'
Downloadable PDF - View attachment Guide.pdf