

lordsnowy
New member
- Joined
- Jul 1, 2012
- Messages
- 24
- Points
- 4
Finally after a few years or so of ignoring a job that needs doing I finally got around to replacing my rear subframe on my 1994 Tipo, mileage 240,000.
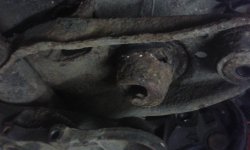
The rubber mounts where well rusted as you will see from the pics. The rubber bump stop mounts was rusted and the rubber stopper had fallen out.
I managed to find a 1995 fiat tipo, no paperwork or keys, lower mileage than my own, it had not been on the road since its owner died a number of years ago.
Here are the steps required to take off the subframe for anyone else considering doing this job. The time process is in the cleaning and preparation of all the parts, some of these parts being touched for the first time on 22 years.
Simply outlined it goes as follows, Exhaust removal, petrol tank removed, handbrake disconnected, brake pipes disconnected, release 4 bolts and subframe falls from car complete with shocks, springs, hubs….not the case on a 22 year of car. I would advise that all the nuts and bolts are wire brushed clean and lot of WD40or similar applied night before or even days. The two bolts are the back of the car holding the petrol tank where badly rusted, one breaking on me. The bolts holding the subframe to the body can be got to with WD40 from inside the boot by removing a grommet, these 4 bolts do come out easy enough. It’s the smaller bolts that cause the problem.
Exhaust removal
No issues here, it needs to come off, I placed mine with a stainless steel unit. I only get about 5 years or so out of an exhaust. So the stainless steel should pay for its self. Plus I can polish it.
You will need to remove the heat shield for access to the brake pipe joins and helps in getting the tank out.
Removing petrol tank.
3 bolts under the car and one bolt holding the tank neck under the rear wing and a few rubber stoppers hold the tank in place. Wires on the petrol level sender unit need to be removed and the pipes, there is also an extra pipe you cannot see connected to the tank on the top, this will be exposed when you drop the tank a little. At the filler neck the rubber the connects to the body is held on by a steel ring that slips into a grove in the rubber. It will take a little pushing and moving to get the filler neck out from the wing. The straps on my tank where rusted but not beyond repair…a little wire brushing and painting sorted them. The straps are riveted into the tank so not easy to take off. I ended up leaving mine in place and just sanding them.
Handbrake and brake pipes.
Straight forward removal. While off I cleaned the cylinders, new shoes and rubber pipes fitted. One of the steel brake pipes come in for a lot of exposure to the elements, this pipe had rusted out on the donor car, on my subframe the pipe was in better condition, I always clean and paint the brake pipes every few years.
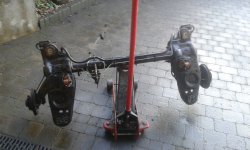
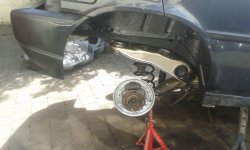
Subframe removal
I had to take my four bolts off, plus the four bolts of the donor car, on both cars they came off without breaking, just need a bit of effort to remove them. I supported the frame with a trolley jack. Really no issues, with everything cleared to just came down with the jack.
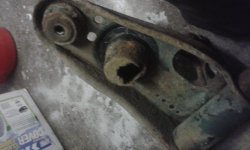
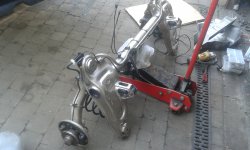
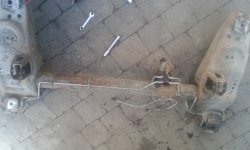
Wherethe sub-frame meets the body at the mounts I was worried about rust but happilymy fears were not justified, despite a little surface rust the area was solidon both cars. The actual mounts were bad as you will see in the pics.
Youwill see from the pics that my subframe was in a much worst state, there waslarge pitting of the steel from rust, bump stop mounts had totally rusted away,swing arm bearing where gone, brake pipes where ok but I always did clean andpaint these ever few years where I could.
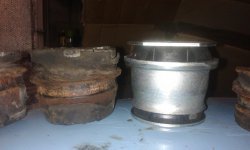
Themounts on both subframes where in bad shape, the actual design of them help theunits to rust and rot. I would say these were never painted since new. The new backsubframe bushes were slightly different from what was on both frames, roundedtop as opposed to square tops (see pics) but the body of them were the same.
Subframe renovation
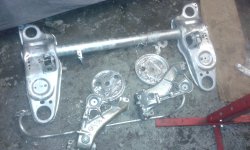
Thedonor subframe was full of dirt, a quick power hose revealed a solid frame withonly minor surface rust. Both bump stop mounts were filled with dirt to thetop, three holes at the top seem to let dirt in, drain hole gets blocked anddirt fills up leading to rust, as was the case with mine. I think that fact thedonor car was laid up for a few years and the back end was under cover helpedsave the mounts.
Myplan was to strip the subframe and send it off to be galvanised dipped so I wouldnever have to do this job again in my lifetime! I than painted the subframewith bitumen paint, just in case! When it came back from being galvanised I hadto file down the hole for the hubs and the swing arm bearings, the galvanisingprocess adds metal to threads and holes, make sure oyu leave bolts in toprotect the threads. To remove the bolts after its galvanised I had to heat thebolts up and slowly turn. It took a bit of work to prep the galvanisedsubframe.
Ihad purchased two sets of swing arm kits, once again I would recommend using apress for this job. The shocks were only a few years old on my subframe, mysprings seemed okay, yes rusty but seemed to be higher than the donor carsprings, which had a tow bar fitted. I just sanded the springs and sprayedthem.
Iswapped the wheel bearings of my subframe as these were only fitted about 40kmiles ago and I knew they were still good.
Thebushes were easy enough to take out using a press, you would be mad to try anyotherway but I am sure someone will say they did!
Steelbrake pipes were cleaned and painted, I also greased the break pipes in exposedareas and covered them with electrical heat shrink rubber ensuring. The break balance unit was cleaned andchecked.
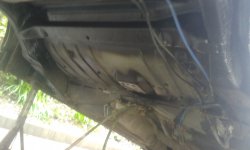
The Exposed body
Thankfullythe body was in great condition and only needed a clean, I sprayed underbodyspray to be safe. The only area needed more attention was where the inner wheelarch met the boot floor, a small hole had appeared, to small to weld so I usedfiller. The area behind the petrol tank neck had a lot of surface rust, I alwaysthought I kept this area cleared of muck and dirt, I was surprised of theamount of dirt that was still there.
Refitting
Basically everything went back on in reverseorder, I used clear sealer around the bushes to try stop future rust attacks,the rubber in the bushes seem to be designed to capture water and dirt so I filledin where I could with sealer. Brakes bled, handbrake adjusted, petrol in thetank and job done to last 30 years or so! I can’t really offer any advise here,its just a matter of getting the job
Next on the list is to replace the front subframe with a galvanised one!
The rubber mounts where well rusted as you will see from the pics. The rubber bump stop mounts was rusted and the rubber stopper had fallen out.
I managed to find a 1995 fiat tipo, no paperwork or keys, lower mileage than my own, it had not been on the road since its owner died a number of years ago.
Here are the steps required to take off the subframe for anyone else considering doing this job. The time process is in the cleaning and preparation of all the parts, some of these parts being touched for the first time on 22 years.
Simply outlined it goes as follows, Exhaust removal, petrol tank removed, handbrake disconnected, brake pipes disconnected, release 4 bolts and subframe falls from car complete with shocks, springs, hubs….not the case on a 22 year of car. I would advise that all the nuts and bolts are wire brushed clean and lot of WD40or similar applied night before or even days. The two bolts are the back of the car holding the petrol tank where badly rusted, one breaking on me. The bolts holding the subframe to the body can be got to with WD40 from inside the boot by removing a grommet, these 4 bolts do come out easy enough. It’s the smaller bolts that cause the problem.
Exhaust removal
No issues here, it needs to come off, I placed mine with a stainless steel unit. I only get about 5 years or so out of an exhaust. So the stainless steel should pay for its self. Plus I can polish it.
You will need to remove the heat shield for access to the brake pipe joins and helps in getting the tank out.
Removing petrol tank.
3 bolts under the car and one bolt holding the tank neck under the rear wing and a few rubber stoppers hold the tank in place. Wires on the petrol level sender unit need to be removed and the pipes, there is also an extra pipe you cannot see connected to the tank on the top, this will be exposed when you drop the tank a little. At the filler neck the rubber the connects to the body is held on by a steel ring that slips into a grove in the rubber. It will take a little pushing and moving to get the filler neck out from the wing. The straps on my tank where rusted but not beyond repair…a little wire brushing and painting sorted them. The straps are riveted into the tank so not easy to take off. I ended up leaving mine in place and just sanding them.
Handbrake and brake pipes.
Straight forward removal. While off I cleaned the cylinders, new shoes and rubber pipes fitted. One of the steel brake pipes come in for a lot of exposure to the elements, this pipe had rusted out on the donor car, on my subframe the pipe was in better condition, I always clean and paint the brake pipes every few years.
Subframe removal
I had to take my four bolts off, plus the four bolts of the donor car, on both cars they came off without breaking, just need a bit of effort to remove them. I supported the frame with a trolley jack. Really no issues, with everything cleared to just came down with the jack.
Wherethe sub-frame meets the body at the mounts I was worried about rust but happilymy fears were not justified, despite a little surface rust the area was solidon both cars. The actual mounts were bad as you will see in the pics.
Youwill see from the pics that my subframe was in a much worst state, there waslarge pitting of the steel from rust, bump stop mounts had totally rusted away,swing arm bearing where gone, brake pipes where ok but I always did clean andpaint these ever few years where I could.
Themounts on both subframes where in bad shape, the actual design of them help theunits to rust and rot. I would say these were never painted since new. The new backsubframe bushes were slightly different from what was on both frames, roundedtop as opposed to square tops (see pics) but the body of them were the same.
Subframe renovation
Thedonor subframe was full of dirt, a quick power hose revealed a solid frame withonly minor surface rust. Both bump stop mounts were filled with dirt to thetop, three holes at the top seem to let dirt in, drain hole gets blocked anddirt fills up leading to rust, as was the case with mine. I think that fact thedonor car was laid up for a few years and the back end was under cover helpedsave the mounts.
Myplan was to strip the subframe and send it off to be galvanised dipped so I wouldnever have to do this job again in my lifetime! I than painted the subframewith bitumen paint, just in case! When it came back from being galvanised I hadto file down the hole for the hubs and the swing arm bearings, the galvanisingprocess adds metal to threads and holes, make sure oyu leave bolts in toprotect the threads. To remove the bolts after its galvanised I had to heat thebolts up and slowly turn. It took a bit of work to prep the galvanisedsubframe.
Ihad purchased two sets of swing arm kits, once again I would recommend using apress for this job. The shocks were only a few years old on my subframe, mysprings seemed okay, yes rusty but seemed to be higher than the donor carsprings, which had a tow bar fitted. I just sanded the springs and sprayedthem.
Iswapped the wheel bearings of my subframe as these were only fitted about 40kmiles ago and I knew they were still good.
Thebushes were easy enough to take out using a press, you would be mad to try anyotherway but I am sure someone will say they did!
Steelbrake pipes were cleaned and painted, I also greased the break pipes in exposedareas and covered them with electrical heat shrink rubber ensuring. The break balance unit was cleaned andchecked.
The Exposed body
Thankfullythe body was in great condition and only needed a clean, I sprayed underbodyspray to be safe. The only area needed more attention was where the inner wheelarch met the boot floor, a small hole had appeared, to small to weld so I usedfiller. The area behind the petrol tank neck had a lot of surface rust, I alwaysthought I kept this area cleared of muck and dirt, I was surprised of theamount of dirt that was still there.
Refitting
Basically everything went back on in reverseorder, I used clear sealer around the bushes to try stop future rust attacks,the rubber in the bushes seem to be designed to capture water and dirt so I filledin where I could with sealer. Brakes bled, handbrake adjusted, petrol in thetank and job done to last 30 years or so! I can’t really offer any advise here,its just a matter of getting the job
Next on the list is to replace the front subframe with a galvanised one!
Attachments
-
 20151015_172744.jpg1.5 MB · Views: 175
 -
 20160330_200755.jpg1.1 MB · Views: 97
 -
 20160330_200840.jpg1.3 MB · Views: 99
 -
 20160428_195848.jpg943.4 KB · Views: 91
 -
 20160421_111607.jpg1.5 MB · Views: 107
 -
 20160416_180214.jpg1.3 MB · Views: 91
 -
 20160421_135520.jpg1.3 MB · Views: 92
 -
 20160421_111635.jpg1.1 MB · Views: 87
 -
 20160428_195856.jpg887.7 KB · Views: 81