Fiat arrives 1.jpg

500 (Classic) Re-Nuovo-ing an Anziano Nuovo

Introduction

I promised to start a restoration thread on my 1959 Nuovo. I also promised it would be a slow process...
I'm located in the Gippsland region of the state of Victoria, Australia. I retired around 18 months ago and decided it would be a great idea to do a classic car restoration as a long-term, when-I-feel-like-it kind of project. Don't know what decided me on a Cinquecento but once the idea took root, nothing else was in the running.
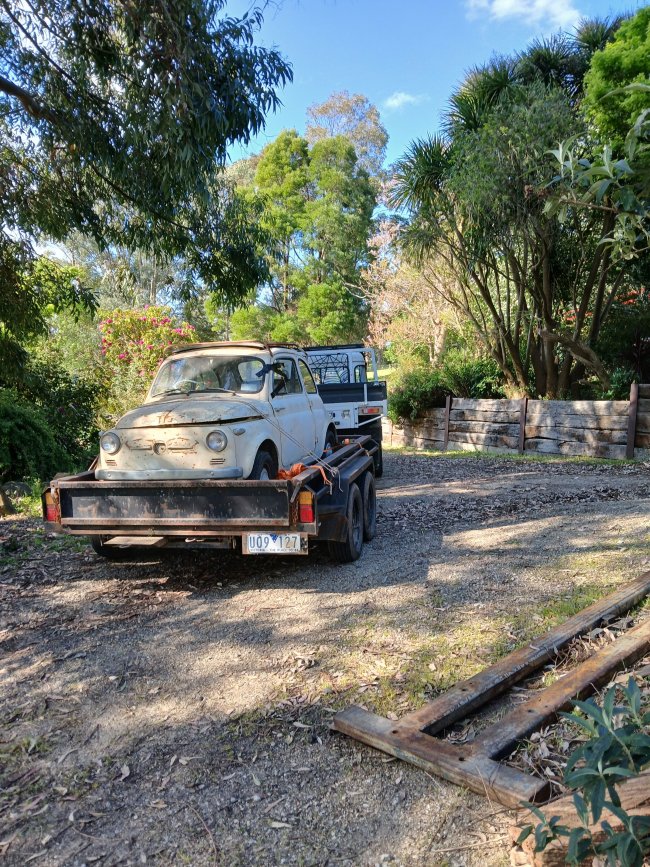
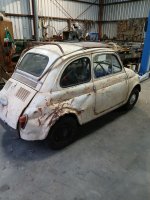
I got a lead on a 1961 car that sounded reasonable but the owner ended up giving it to his brother before I even got a look at it. Another lead on a 1959 car that had been sitting under a lean-to on the side of the owner's shed for at least 10 years and had sat under a tarp for another ten years before that. I went and had a look, wasn't very impressed by what I saw- lots of rust, missing trims and a passenger seat, a makeshift luggage rack WELDED to the roof gutters, body damage etc but it WAS a Cinquecento, it had matching numbers and SUICIDE DOORS!! How cool is that? My legs would look so good swinging out of that. The owner said he would talk to some friends and come up with a price.
The next lead I got was on a 1969 car in South Australia (a different state). It belonged to an old bloke, it had been his mother's car, he had parked it in the shed in about 1986 and had driven it out again last week after changing the oil and cleaning the points. I spent a day, flew over there and hired a car, went and had a look at the Cinq. The asking price was a little high as the car was a runner. The shed it had spent the last decades in was 900 meters from the ocean and was missing several wall sheets. Potentially just as rusty as the other car, being a runner was not important to me as I planned a nut-and-bolt resto either way.

I called the owner of the 1959 car and we eventually agreed on a purchase price that neither of us was happy with (seemed fair) and agreed to sort it out when we both got home from our holidays. A couple of weeks later I borrowed a trailer (mine was about 4" short) and went and collected the car.

Fiat arrives 1.jpg
Fiat arrives 2.jpg
fiat lhs.jpg
fiat rhr 2.jpg
lhs lscp.jpg
  • Like
Reactions: Slotman and porta
That was early October 2024. The car sat there for a good while before I started stripping it down (although I can happily report that the 'roof rack' went to the scrap metal yard the next day). The first undertaking was to strip all of the remaining upholstery out of the car. This revealed a bit of a surprise find that I think comes under the heading 'Desperate measures'; behind the back seat was a big sheet of plumber's lead flashing lining the firewall / bulkhead. About 10kg of lead. I reckon it probably had more effect on performance than on cabin heat.
 

Attachments

  • lead flashing.jpg
    lead flashing.jpg
    1.2 MB · Views: 16
  • lead sheet.jpg
    lead sheet.jpg
    1.3 MB · Views: 15
I stripped all the wiring and electrical components out, then put the car on the hoist and dropped the engine and gearbox. Last time I did this was on my XF Jaguar; that took 2.5 days to get the engine out; the Tony took me about forty minutes. So far this thing is a breeze to work on.
I was nervous about removing the glass but every piece came out intact.

I decided to put the car on a rotisserie, I'm too old to be crawling around the floor. Thought about fabricating a rotisserie but with the price of steel, I'd probably spend a thousand dollars and have something that would work 'ok' and be scrap at the end of the project. I decided to buy a used rotisserie instead, got a heavy-duty one as I figured that would be easier to sell on than one designed for a microcar. After removing the roof and doors, I welded some light bracing inside the body and then put it back on the 2-post hoist so I could make the necessary brackets to mount the body to the rotisserie.
 

Attachments

  • body on rotisserie LHS.jpg
    body on rotisserie LHS.jpg
    1.2 MB · Views: 14
I have now removed every component from the body, seems I now have completed the 'Cheap' part- buying the car- and the 'easy' part- pulling it apart. I've got a lot of cleaning up to do as most of the parts that have been removed with the car on the rotisserie are on the floor underneath it. I think the rotisserie is a winner- so much easier to manipulate the car body rather than my own.
My next task is to work up the courage to start cutting out rusty sheet metal. I am very confident with mechanical work but have close to zero experience with body repair, going to be a LOT to learn.
pile of parts under rotisserie.jpg
bare underside.jpg
tumbled cinq.jpg
 
I have now removed every component from the body, seems I now have completed the 'Cheap' part- buying the car- and the 'easy' part- pulling it apart. I've got a lot of cleaning up to do as most of the parts that have been removed with the car on the rotisserie are on the floor underneath it. I think the rotisserie is a winner- so much easier to manipulate the car body rather than my own.
My next task is to work up the courage to start cutting out rusty sheet metal. I am very confident with mechanical work but have close to zero experience with body repair, going to be a LOT to learn.
View attachment 461286View attachment 461287View attachment 461288
Well done Peter---I have seen a lot worse with regard to the underside. It would be interesting to see how it cleans up on the underside. It does help a great deal when one has a workshop like yours---the "green-eyed monster" strikes again!
 
Hard to tell from a few pictures I know but it appears to be very solid, just that knackered rear quarter to replace and lots of elbow grease.
Yes certainly from what I have seen online I'm starting from a better position than many well-salted UK and US cars. There is certainly a reasonable share of 'speed holes' though, both sills inner and outer, the entire floor, everything within spitting distance of the battery, bottoms of both doors (skin and frame).
floor holes.jpg
front underside.jpg
lh floor and sill.jpg
lhf floor and sill.jpg
under battery area 2.jpg


With my lack of bodywork experience I'm not sure what the next step should be; wondering about getting the shell sandblasted- opinions? There's a sandblaster near me who I have used before for things like trailers and machinery, as he does mostly agricultural type stuff I don't think I would let him blast panels but thinking maybe letting him loose on the underside, engine bay and interior might give me a clearer starting point?
 
I neither have experience with bodywork, but sandblasting is one of two possible ways of getting rid of that crap. The other one is etching.

The body panels are thinner on cars than on machinery, so probably the guy should adjust the air pressure or grain size.
 
use plastic not grit!!! need very big compressor big nozzel and lots of CFM...
The plastic will melt before it reaches a temp that could warp the body.. was use on US fighter jets for many years didn't distort the alloy!
 
More pictures show it does need a.bit more chopping than I thought. Are the structural panels much different than later cars?they at least are easily available but maybe yours need age specific?

Having learnt the hard way I advise not letting a blaster anywhere near any outer panels unless supervised, horrible damage can occur.
 
Yes I'm very wary of sandblasting on panels; many years ago I had a car body (1963 Chevrolet Impala hardtop) blasted by an agricultural sandblaster, everything came back buckled and warped, absolute nightmare. I was very young and lacked the resources to complete that car, ended up selling it unfinished at a massive loss.
I got a couple of quotes from stripping specialists back in October when I brought the Tony home, very similar costs to either dip or blast the body shell- several thousand dollars either way, which I'd rather have in my pocket for necessary parts. Dipping sounded like a great option until I did some reading about the potential problems afterwards. I'm thinking of taking it to the local bloke who has done blasting for me and just getting him to do the sills, engine bay, floor and luggage space- in other words, keep OFF the panels- given their size, it's really not much work to strip them manually anyhow.
Or perhaps I should just get to work with a strip disc on the angle grinder. Did a great job on cabin side of the firewall, much more awkward in the engine bay though.
 
I read somewhere about an attachment that you can get for a pressure washer to feed in sand to make your own sandblaster. May be worth investigating, especially if you are going to do it on just the more unobtrusive parts of the shell, so it wouldn't matter so much if it made a few marks?
 
It’s worth having the structural nooks and crannies done after you’ve chopped out the worst of it, it”ll ease prep for welding and ensure there’s no nasties waiting to spoil your new surface coatings. I’d use my local mobile blast guy and have him do it with paving sand whilst I was present.

Your practiced in patch repairs with butted metal joints? Tiny tacks at close centres with dressing of the weld (and only the weld!) ?
 
I cleaned up all the mess from under the rotisserie, filed everything away in labelled zip-lock bags and plastic tubs in a way that will hopefully enable me to make some sense of it later on.
I've been working away with a heat gun and scraper to remove the bitumenous coating from under the car and inside the wheel arches.
underside scraped 1.jpg
underside scraped 2.jpg


I had thoughts of repairing the damaged rear quarter, as much for the sake of acquiring skill as anything, but when I removed paint at the rear it is full of rust holes as well as being bashed in so it'll need replacing. No, the image isn't upside down, the car is.
rust in damaged rear quarter.jpg


I'll keep attacking the underbody goo for the time being. Horrible stuff to remove but it seems to have done a reasonable job of keeping the nasties out. There are two different types of goo on the body- the stuff that has been sprayed on over the paint, in the engine bay (super thick!), under the wheel arches and under the floor; then there's the seam sealer which is some kind of non-hardening caulking compound, it peels away quite easily but has done an amazing job of protecting the metal for 65 years. When I get in and pick it out of a little crevice, the metal underneath is shiny like new.

I'm still considering getting the body sandblasted but I want to get rid of all the thick body deadener first.
 
Last edited:
Look up Seans thread "Murph....."
he did a complete rebuild on an L then a D.. he made a frame basically to wheel his shell anout on, but using measurements it also allowed him to keep the shell square when removing metal and also correct accident damage and alighn the shell better...

N's did't have any underseal applied by the factory just bare paint (hence the rust) some had a thick sort of matt paint applied to the engine bay and arches more sound deadening rather than protection...
 
Back
Top