Okay, so drafted myself up a quick 'idiots guide' and order in which to do things, so far this is what I have... which will need a lot of refinement before being good enough to help anyone else.. but posting in case anyone has the time to make any suggestions for any of the steps... always keen to hear!
Panda Major Service
Order of tasks:
- Timing Belt, Water Pump & Tensioner Change
- Coolant ^
- Alternator Belt ^
- Spark Plugs ^
- Air Filter ^
- Oil & Filter
- Brake Fluid
W E A R G L O V E S
TIMING BELT …
- Support the oil sump with the jack
- Disconnect car battery
- Remove the auxiliary belt* (see below)
- Remove centre bolts in the bottom big pulley
- Remove 10mm bolt on plastic timing cover trim
- Remove 10mm bolt for air box on both sides, squeeze off air intake pipe on right (10mm at front holding it)
- Pull side and back pipe from under air box off to free it
- Unplug connector on right side of engine top
- Undo behind and forward 10mm bolts connected to it, pop loom off and set aside to right
- There is a lower right connector lower than the right air box bolt hole, disconnect it
- Remove coil pack (10mm 3 bolts around it), unplug connector on back left of it
- Push coil pack back out of the way
- Remove the rocker cover, pop off plastic clips holding pipe along the front of it in
- Undo the bolts for the rocker cover (8mm?)
- Remove the bolt down on the front of the engine, left of the exhaust heat shield which holds timing plastic cover trim in place
- Double check jack supporting engine
- Undo crankshaft sensor connector at the bottom of the engines left side
- Remove left engine support (right bolts 50mm, left bolts 70mm) IMPACT GUN
- Lift up to remove engine mount
- Jack the engine up slightly if needed for next bolts, may loosen all for now and try turning it right to release before jacking!
- Remove 15mm bolts on the engine mount (one is hidden at the bottom too)
- Remove rear 10mm bolt from timing cover / back of engine
- Peel off stocker over timing cover to reveal last bolt on the timing cover to remove it
- Timing cover should come off, but carefully pull out routed wire that goes through it and remember place
- TAKE A PHOTO OF EXISTING BELT
- If not already done, take off 8mm bolts around the rocker cover
- Ensure crank pulley at bottom notch points UP (check pic)
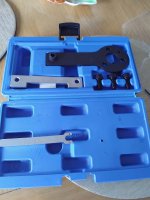
- At the top, use metal [ bracket to lock cam, using bolts from rocker to hold it, tighten
- You still need to mark the position of the camshaft VVT sprocket because it can move independently of the actual camshaft. Make sure it doesn't move when the cam belt is removed.
- Line up bottom crank tool (spanner looking one) with the dot on the 7 o’clock position) which should line up with top bolt hole on engine. Lock with bolts that belong here
- Check nothing can slip, crank or cam
- Release the tensioner pulley with a 13mm
- Pull off old Timing Belt
- Undo nut from tensioner pulley and slide it off
- PREPARE BUCKET ON FLOOR TO CATCH OLD COOLANT
- Remove water pump 10mm bolts, including hidden lower left one, use small extension to access it
- Pry off old water pump, may need breaker bar or big flat head screwdriver
- Screw on new water pump and gasket (with sealer)
- Slide on new tensioner pulley
- Put new belt on as the old one picture shows, start with crank at bottom. Tensioner should budge to allow it on for now.
- Ensure belt is tight on water pump side. Check teeth to ensure right. Looseness under tensioner is fine until tightened.
- Check sitting fine at crank as well so it won’t slip
- Use locking kit tool to tighten tensioner (up loosens, down tightens) - ensure it lines up (down?)
- Remove the locking tool from the top
- Remove the locking tool from the bottom
- TURNAROUND POINT
- Refit Rocker Cover with new gasket / sealant and allow to cure
- “If you remove the rocker cover there are O ring oil seals underneath for the oil gallery contained within the cover. Make sure they go back in position.”
- Refit bolts for rocker cover 8mm
- Re-route wire through the top side timing cover trim carefully
- Re-do the timing cover bolt that was covered by the sticker
- Refit rear timing cover bolts / all other timing cover bolts possible (including back of engine one)
- Refit the engine mounted mount piece, turning it right to fit in with bottom bolts fed through it, don’t forget hidden one near back to be tightened too
- Lower / heighten jack to bring engine level with mount if done before
- Drop engine mount down onto its bolts (piece that’s on the chassis side)
- Tighten 50mm right bolts, 70mm left bolts on engine mount
- Reconned crankshaft sensor at bottom of engine left side
- Re-do bolt on front of engine on the left of the exhaust heat shield holding timing plastic cover trim in place
- If not already done, tighten 8mm rocker cover bolts
- Re-clip plastic clips holding in the wire along the front of the rocker cover
- CHANGE SPARK PLUGS NOW
- Refit coil pack in place, tighten 10mm 3 bolts around it and re-connect connector
- Reconnect air filter box (right and rear pipes slide back onto it), push down into place
- CHANGE AIR FILTER NOW
- Re-connect lower right connector near the air box right bolt holt
- Re-tighten bolts connected to the connector pushed out of the way to the right and re-connect the connector itself. Pop the loom back into its place / holder
- Reconnect air box air pipe to front grille (pop into place and do 10mm bolt near front)
- Tighten 10mm bolt on plastic timing cover trim
- Re-righten centre bolts on bottom big pulley
- REPLACE AUXILIARY BELT NOW
- Re-tighten auxiliary belt / alternator in place
- Reconnect car battery
DO NOT START THE CAR
DO NOT START THE CAR
- CHANGE OIL & FILTER NOW
- Loosen cap
- Prepare buckets underneath
- Drain sump
- Remove old filter
- Refit new filter
- Close sump plug
- Refill with engine oil
- FILL WITH ENGINE COOLANT NOW
- 4.85L near full container but do less and burp as some left in system
- The car may now be started.
- Check oil level - TOP UP AS NEEDED
- Check coolant level - TOP UP AS NEEDED
- Cycle hot / cold on heater and loosen air bleed valve once up to temperature
- REPLACE BRAKE FLUID NOW
And that's it... 71 convenient steps... fingers crossed minimal disruptions
Edited to add in
@KPat 's helpful notes in an earlier post


") . It's OK if you are the sort of person who checks the fluids, brakes, tyres etc at least once a month, but for those who don;topen the bonnet from one service to the next, a lot can deteriorate in 18000 miles! I also think they later changed thei oil change interval to 9k miles too, but only for the TwinAir. Modern oils and modern bearings should be well able to last at least a year, or at least 12000 miles -- so long as looked after (eg allowed to warm up fully before being stressed). Plenty of car makes still have 'extended service intervals' (eg VW/Audi/Skoda who offer a two year or 24000 mile service interval)
. It's OK if you are the sort of person who checks the fluids, brakes, tyres etc at least once a month, but for those who don;topen the bonnet from one service to the next, a lot can deteriorate in 18000 miles! I also think they later changed thei oil change interval to 9k miles too, but only for the TwinAir. Modern oils and modern bearings should be well able to last at least a year, or at least 12000 miles -- so long as looked after (eg allowed to warm up fully before being stressed). Plenty of car makes still have 'extended service intervals' (eg VW/Audi/Skoda who offer a two year or 24000 mile service interval)