Technical Fiat ducato 2014 motorhome wiring help

Currently reading:
Technical Fiat ducato 2014 motorhome wiring help

PWLambert

New member
Joined
Jul 13, 2024
Messages
9
Points
1
Location
Essex
I have an Adria Sunliving on a fiat ducato base 2914
The horn stopped working so used the forum to help
Checked all common problems-
fuse good
relay T03 works
horn itself works
Removed steering wheel and checked connectors etc one has earth fine other wire does not have continuity to relay
If I bypass it from relay to circular wire on horn pad then press spring connector horn works thus diagnosed broken wire
Removed unit under steering wheel tested this ok
Got to black wire in steering column loom and connector under fuse box under bonnet
No continuity
Took off dash panel around steering and loom seems to go straight down column into main loom then through firewall to engine bay
Does anyone know or have a full wiring diagram to show and other loom connector I have missed that may be corroded etc before I start cutting and patching into my loom to bypass this
Sorry so long winded
Thanks in advance
 
Hello,

is it an x250, or x290?

as for x250, in the download section of the forum you can find the eLearn module. It is available twice: as a single file or spilt into multiple files, but it is the same.
You have to download it, unzip it, install (on a PC), then mount the iso file into a virtual CD drive (I'm using UltraISO), and finally you would be able to run the module. You will find the diagram with the connectors descriptions :)
 
1720997937477.png


That should help identifying ;) Headlights and bumper are different. Then, the bumper evolved more during the next years with the faceliftings.
 
back to trying to resolve my horn properly as did a temp fix while using g last summer
Does anyone know the location of Front/Dashboard connector D001
From diagrams it seems to be after loom passes through dashboard but cannot locate
From other research I see it is bypassed it if there is no tachometer( in can bus diagrams) but can’t find what else it affects
 
From experience with my x244 2.8jtd, identifying a particular connector requires more than knowing the location, which in this instance is under the dashboard.
My technique is to determine the size and format of the connector. This information can be extracted from eLearn by scrolling down from the wiring diagram, and clicking on the appropriate connector, D101 in this instamce.
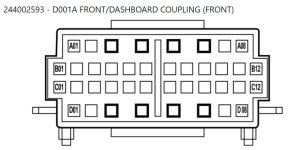
Clicking on the connector name provides the pin numbering, with a table providing colour code, csa, and destination of every connected conductor. Armed with this information, it is possible to positively distinguish between similar connectors, and locate the appropriate pin.
 
thank you both looks from diagram if attached to bulkhead in centre if same on RHD
I shall have to try and get the eLearn info for D001 before diving under the dashboard again today - this is my second time trying to find it but vision/ access is so difficult I don't know which bit of the dash to remove yet!( got fuse cover and steering shroud off at present)
 
Not sure on how it looks on the early x290, but on the x250 there's this document holder in the middle of the dashboard. On top. I'd try through there. It's secured by 4 screws as far as I remember. I don't have access to my van now, will probably be there during the weekend, so I can have a peek, as this holder is temporarily removed.
 
No luck locating D001 either under document holder/radio or via passenger foot kick panel( it may be one of the many connectors here but I could not identify it) - also the wire colour on pin 21 of my van is yellow(Tested and corresponds to pin 86 of relay T03) not Brown green as in diagram! I think will have to run new wire from here to steering column and splice into pin 8 Brown green of D047 clock spring coupling - thanks though for the help
 
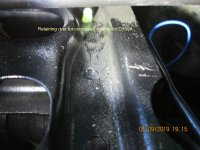
Some connectors can be difficult to locate, even after consulting eLearn. The attached example required several attempts, until finally I located the retaining rivet under the instrument binnacle.
 

Attachments

  • Concealed Connector D160A.jpg
    Concealed Connector D160A.jpg
    444 KB · Views: 17
Been at the van tonigth, I could check, in fact the document holder is too far away.

But there are two plastic strips that go along the windscreen. I managed to unclip a single clip on the passenger side, but it was just below zero, I was afraid that I could break it...

The one closer to the rear of the van (1) looks attached on metal clips, no idea about the other, but in warmer conditions should be quite easy to take both of them out. The other one (2) could be just held in place by the first one :)

1738550713606.png


The part on the very bottom of the photo is the glove box on top of the passenger's airbag (or the place where it should be).
 
Hi

Not sure if this helps, but as with many vehicles the Ducato's looms are split into multiple assemblies presumably for ease of construction. Where the looms join there are multi-way loom to loom connectors. On the older vans D001 was a rectangular connector under the dashboard, see pic.
 

Attachments

  • Ducato D001.jpg
    Ducato D001.jpg
    81.9 KB · Views: 6
Hi

Not sure if this helps, but as with many vehicles the Ducato's looms are split into multiple assemblies presumably for ease of construction. Where the looms join there are multi-way loom to loom connectors. On the older vans D001 was a rectangular connector under the dashboard, see pic.

It looks like they even changed the naming to avoid confusion. It's D001 the OP needs (from the x250 and x290 eLearn diagrams). And it's D01 on the x244 diagram.

Just got an idea: the x290 diagram shows the wire goes through a rubber seal from inside the cab to the engine bay (marked with the arrow):

1738591735007.png


This seem to be located on the left side of the vehicle, at least on a LHD van. According to the diagram the wire should be brown with a green stripe. Perhaps that could be another hint to locate the connector.
 
Last edited:
It looks like they even changed the naming to avoid confusion. It's D001 the OP needs (from the x250 and x290 eLearn diagrams). And it's D01 on the x244 diagram.

Just got an idea: the x290 diagram shows the wire goes through a rubber seal from inside the cab to the engine bay (marked with the arrow):

View attachment 460031

This seem to be located on the left side of the vehicle, at least on a LHD van. According to the diagram the wire should be brown with a green stripe. Perhaps that could be another hint to locate the connector.
No D001[A] in x244 eLearn. (On the x244 there is also a D001. All intermediate connectors have the format Dxxx. On the x244 D001[A] is a 20 way connector with an 8 + 12 + 12 + 8 format.
D001[A] is typically towards the LHS of the dashboard.
My method when searching for connectors, is first to note the size and format as above, then match the wire colour codes. The wiring varies with vehicle specification.
I had some problems until I realised that my all black fuel filter, was in fact a so called "green filter".
 
Thanks for all the suggestions
I took so much out of the dash, the centre bin, the radio , the document pop up, both sides the kick panels the air vents beside the radio and surrounding trim, the passenger cubby and the lower centre trim
Still could not locate D001
As diagrams were LHD and van RHD I decided the van was in too many pieces already
So fed wire alongside bonnet release cable through firewall then spliced into loom at fuse box connector and direct to watch spring connector (both ends were the brown green wires on the indicated pins from the x290 horn wiring diagram) and the horn worked immediately.
Then a few hours working out how to get everything back into place!
 
Back
Top