@bugsymike has described it well, including the timely warning about refitting the rotor arm correctly.
But I'll mention a few other thoughts if I may,
Be careful when handling a removed distributor, the 'oil flinger' mounted on the distributor shaft just below the dist. body is a fibre material and delicate...
In the Fiat dealership where I worked (back in the last century!) we used to remove the distributor to deal with the points etc. The spanner size is 8mm iirc.
I'd like to suggest if you do decide to remove the distributor, to first turn the engine so that the timing marks on the timing belt cover relative to the crank pulley are aligned , if this is done, the rotor arm will be pointing to either No. 1 or No. 4 cylinder contact in the distributor cap (the cylinder numbers should be marked on the cap, if not just trace the plug leads). Which is correct? This can confuse people.
These twin cam engines are timed on No.4 cylinder if the distributor is removed and it's correct position not noted.
If you align the ignition timing marks on the crank pulley/timing belt cover and the rotor arm is pointing at No. 4 cy;inder, then that's fine. If it's pointing at No.1 cylinder, then just turn the crank by 1 full turn (i.e. 360*), the rotor arm will then be pointing at No. 4 cylinder. In this crank position, the valve timing marks on the camshaft pulleys will also be aligned with their corresponding marks on the cylinder head. This is what confuses people who've refitted a cylinder, set up the valve timing marks correctly and then tried to refit the distributor by setting it to fire on No. 1 cylinder instead of No. 4 cylinder.
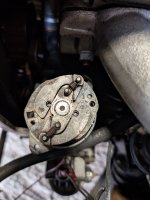
One option for setting the points gap with the distributor in situ might be to use a flashlight and mirror to see what you're doing a little better.
The correct gap is iirc, 16 - 18 thou (0.016 - 0.018 inch). Ensure there is no 'pip' built up on the contact faces, if there is, remove it using a 'points file' or abrasive paper ensuring that any abrasive dust is cleaned off. If the contact faces are burnt, replace them and the condenser. Check that the faces of the contact breaker points are meeting squarely, if not gently re-align them. Clean the feeler gauge of any oil, reset the gap with the points heel on one of the cam lobes, don't over-tighten the points screws, recheck the gap on a different points cam lobe (should be the same), apply a tiny amount of grease to the points heel where it contacts the cam, apply a drop of oil to the 'bob' weight' pivots in the advance unit. Do not attempt to tighten the advance weight springs, the heavier spring may seem loose or to have free play - this is intentional so that the ignition advance is a curve instead of a straight line.


")