Technical 4x4 prop shaft question

Currently reading:
Technical 4x4 prop shaft question

jivah

New member
Joined
Nov 22, 2016
Messages
4
Points
2
Hi all,

I posted a question up here about three years ago about replacing the center joint of a prop shaft out of my 2005 fiat panda 4x4 (petrol 1.2). I managed to get the shaft out and reconditioned, with a new center bearing fitted which ended up costing me about £230.

Anyway its happened again, I have done about 30k since the bearing was changed, this time the universal joint has gone, which seems to destroyed the center bearing at the same time, so now I have to replace both.

So here is the thing, got the shaft out no problem, and managed to split it as well with a certain amount of violence, not easy but is doable, but the UV joint appears to be held in place by washers that have been welded in place. All the prop shafts I have seen in the past on other 4x4s had circlips to hold the UV joint in place.


Is this normal? strikes me a s a pretty crazy way to fit a component with bearings. Do you think someone has worked on this in the past? Or is this how they build them?

Suggestions and advice welcome. I have attached an image of the joint.


Cheers
 

Attachments

  • IMG_20181103_110439299.jpg
    IMG_20181103_110439299.jpg
    4.4 MB · Views: 814
Circlips are rare these days as are grease nipples.


UJ bearings are usually "staked" with a star shaped spike that crimps the bearing cap into place. Your spot welds look a better option. Grind or milling machine the old spot welds, strip the shaft, fit new cross & bearings and spot weld when correctly aligned.

There's the rub - you need a lathe or jig to ensure the new UJ is running true before spot welding the bearing caps.
 
Last edited:
surely the heat from welding would have degraded the grease and possibly damaged the needle rollers hence the early failure?
 
surely the heat from welding would have degraded the grease and possibly damaged the needle rollers hence the early failure?
As Dave says above, I haven't seen a U/J with either circlips or a grease nipple in years. (Unless the vehicle itself is of the "Classic" type). Again, as he says, they are usually staked in place now - if you have the tools you can change them maybe once or twice before you run out of metal to stake over. The problem is that with no circlips for location it's very difficult to end up with a shaft that's in balance. Even with the circlip type you could still end up with annoying vibrations. It's possible to achieve quite a good result on an out of balance shaft with two "jubilee" clips but, as anyone who knows what I'm talking about will know, it's a very time consuming task. The most satisfactory outcome is achieved with an exchange rebuilt shaft which will have been properly balanced - but not so good for the wallet!

As regards the spot welds/heat problem. I have a MIG/MAG and "stick" type welders (used to have gas too but keeping the cylinders at home, now I'm retired, is to hazardous) and I "mess about" repairing horticultural machinery, trailers, etc. Don't really like doing cars much as the metal is so thin it's very difficult! Anyway, those spots on your shaft will have been done at a high current setting of very brief duration, possibly less than 2seconds. Although the metal obviously gets extremely hot in the immediate area of the weld (it has to to melt it of course) the heat penetration and spread on such a relatively large mass of metal will be very localised and would not even be enough to melt the grease a little by the time the heat front reached the bearing cup. I've never seen a U/J secured in this way before but actually I quite like itl
 
I had the uj 's replaced on my 4wd starlet prop shaft by a local engineering firm and that is the exact way they secured the new uj in place.

It's been fine for the last 5 years. As mentioned staking or welding is the standard way it is done nowadays.
 
I really should be putting my boots on and raking up the leaves which have blown, like a snow drift - as they do every year, into my front garden from the two big sycamore trees on the other side of our road. But instead what am I doing? Sadly, sitting in my living room allowing myself to be distracted by this thread!

So what is it that's caught my attention? Well, if you look closely at jivah's picture of his propshaft joint (I expanded it to about 3× magnification) you can, interestingly, see the remains of the stake marks in the yoke around the outside of the washer. I would guess this is not the original joint and that it has been replaced in the past at some time? Also interesting to note that whoever performed the spot welds really seemed to know what they were doing! Why? Because getting a good weld where you are joining a large mass which is going to heat up "slowly" (the yoke) and a small mass (the washer) which is going to melt quickly is quite difficult. In this case you have to aim the MIG wire mainly at the yoke whilst allowing the melt to overspill onto the washer sufficiently to get penetration on the washer, and all this in just a second or so duration. Looking closely at each weld, you can see there is slightly more metal on the yoke than the washer which illustrates what I'm talking about and, the more experienced among you, will see that a good "melt" has been achieved on both component parts and the welds are very "neat" with no sign of wander or excess spatter. When I was younger I taught 2 evening classes. One was in car maintenance and the other was "Hobby welding" if one of my students had achieved a weld of this quality they'd have qualified for an extra chocolate biscuit at the tea break!

Oh dear, can't put off the leaves any longer. Think I'll make a start on them before Mrs Jock chases me out the door! Keep safe everyone
Regards
Jock
 
Well, that's the leaves roughly gathered , there's always more later though! So I just had a few thoughts about prop shafts in general, just in case you've not all gone to sleep yet!

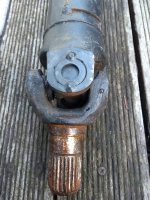
You'll notice that there is a small piece of curved metal spot welded to the side of the shaft (at the very top of the picture). More "mechanically savvy" forum members will know that this is a balance weight. There is usually one at each end of the shaft, near the U/J's. Their purpose is to take any out of balance forces out of the equation to eliminate vibration. I remember it being a very big problem on Triumph Herald/Vitesse models in particular but I've seen it on others. Balancing at the factory would be done on completed shafts so, right away, you can see the problem when replacing a joint. The overhaul kit you buy is quite likely to have been produced by a different manufacturer and machining tolerances may mean that even on a perfectly installed new joint there may be run out or mass distribution problems. These shafts rotate rapidly, often, in 5th gear, faster than crankshaft revs, so small imperfections generate surprisingly large forces. In addition you may not end up with the cups pressed back into the exact same position in the yokes - not so much of a problem with the circlips type. Also you may "shift" a cup as you are staking it and either end up with a lateral displacement of the joint or a "pinched" joint which is partially siezed (sometimes they slacken off in use though). That's why I said I really quite like the idea of the welded washers - much less chance of displacement. Assembly in a lathe or specialist jig largely gets over the alignment problems but does nothing about mass distribution. However ussualy a shaft assembled in this way will be so little out on balance that you won't notice it unless you swop it for a factory fresh unit when often a small, but noticeable, increase in smoothness and refinement is detected. The problem can manifest itself on badly balanced final drive (axle) shafts on independently suspended cars, but as they typically rotate far slower (maybe 3×) the imbalance has to be considerable to be felt. So we often found ourselves doing the driveshaft joints on Herald/Vitesse but if it was a prop shaft joint at fault the boss would sell a replacement shaft and, although more expensive, it really was the best option for the customer. Don't ask about the Rotoflex couplings on the MK2, or FWD Triumph 1300 - that one was fun to do! - (or Hillman Imp, or Lotus Elan, or??? - did a lot of them, the couplings in general I mean!)

Lastly. I would say to anyone who hasn't had a go at one of these and is thinking about it to get a scrap shaft from a breaker (he'll probably buy it back at reduced value later - mine does, by weight, so the cost is kept minimal) and have a go at removing and then refitting the joint. This is not an easy task if you've never done one before. The cups are full of (never counted them but I would guess maybe 20 to 30) needle roller bearings. I have once seen a design which had the needles caged (maybe Quinton Hazel?) but they are usually loose! You have to position them around the outside of the cup with grease to "stick" them in place and try not to displace them (of course you can't see them during assembly as the journals on the cross piece hide them!) as you manipulate the heavy shaft, the flange (which is the bit with the bolt holes where it's fixed to the diff or, at the other end, the splined sleeve) whilst trying to keep the whole thing lined up in your vice so you can squeeze the cup back into the yoke without any of the needles being displaced! If a needle falls into the bottom of the cup you can fracture the bottom of the cup which scuppers the whole job and you'll have to buy another kit! That one really makes you popular with the boss, I know, been there, done that! Then you've got the good fun of doing it all again 3 more times as the joint has 4 arms! Enjoy, as the youngsters say these days! The first one I did almost had me in tears and the rest of the lads laughing cruelly at my ineptitude! They did stand me to a beer on the way home that night though. I felt I'd passed some sort of mechanics initiation ceremony!

Being now older and wiser and not quite so impecunious as I was in my youth, if an exchange shaft, FROM a REPUTABLE MANUFACTURER or SPECIALIST REBUILDER, (so I could be sure a proper rebalance had been performed), were available at reasonable cost that would always be my preferance. If I had to, as a last resort where no other option were available, I would do it myself but I'd keep in the back of my mind that I just might have to shell out to a specialist engineer for a balance. Oh, and get the children/grandchildren well out of the way, "blue air" is a given!
 
The bearing on mine needs replacing (2006), how easy was it to split the shaft?
could it be done with a basic tool set?
Different specialists are saying different things, one says it can be split and replaced, another says it cant be split and is welded after bearing is fitted. its about £30 for me to buy the bearing, £100 to have one company supply and replace, failing that its £220 for a new shaft, I know what id rather pay (y)

If you've read what PAJ says you'll know it's not a DIY job with ordinary tools. ;)


It looks like the one with "spot" welded caps may have caps specially made for the job that sit flush with the yoke, then all it needs is truing on a jig and spot welding. Balancing would probably not be needed as only the cross and bearings are new. The original shaft is unchanged and should still be in balance.

U/Js with circlips are DIY and fairly easy. These don't so are not.

Its the centre support bearing im after swapping out, not the UJ bearings
 
Google comes in handy. This is for the Classic Panda but makes the point.

completely un-related to what I was asking, provides no info relevant to me at all, bearing are readily available for the panda 169, I refer to my original question to the original poster...…

how easy was it to split the shaft?
could it be done with a basic tool set?
 
If it exists of two parts with splines it should be pretty easy. Make sure to mark the position before you try anything. Otherwise it's virtually impossible to get it back in the original balanced position.

gr J
 
Back
Top