Technical rev counter

Currently reading:
Technical rev counter

Mennywise

New member
Joined
Feb 5, 2006
Messages
20
Points
4
hi all! I'm back... i would like to install a rev counter on my Uno 60S mk1 (carburettor with cut off)...i could recover one from an old uno...they told me that's easy to do, just to connect positive, negative and a wire to the ignition coil..is it correct?

here's 2 photos of the old dashboard i'm going to buy...
c0_1_b.JPG

95_1_b.JPG


is there everything i need?
thank you all! :)
 
ehi! thank you for the usual "speedy gonzales" speed replies...:D Long life to the Uno!!!! :)
 
In the words of Chas, "Old Unos never die - they just get upgraded!"

See the three small nuts on the left side as you face the rear of the cluster? One of those is wired to +12V, another is wired to ground. The third is the one you need to wire to the green-wires terminal on the ignition coil. If you trace the circuit, the third nut will have a connection to one plug pin only. This is the one you need - it is easiest to use a crimp-on eye terminal directly under the nut itself.

The check panel (with the six LEDs) will not be operational unless you swap large chunks of the wiring loom - probably not worth it! So leave off the black ECU box...

Thanks,
-Alex
 
I only would like to remove the clock from my dash and put the rev counter in place of it, but I have several doubt. Can i mantain the original blue plastic? how to remove the clock exactly (including the regulation hinge...)?:confused:
Thanks:eek:
 
I don't think that will work. The clock (if I remember correctly) is smaller than the tachometer, because the warning lights in the centre are bigger. Also you would have to swap the "blue plastic" (circuit traces).

You can always set the odometer of the replacement panel to the distance that you want (you take off a bar that links the drums together).

-Alex
 
Try removing the knob on the regulating pin first by pulling the knob while holding the pin.
This works with the other two pins (odometer/brake check), but, in my case, it did not work on the clock. I had to pull hard and remove the whole knob/pin assembly (losing a tiny spring inside the clock mechanism in the process :mad:).
Once you remove the clear plastic panel, the clock can be removed after releasing (three, 6 mm?) nuts on the rear side of the instrument panel. It is also necessary to release the two tiny bolts on the econometer dial and slide the dial up before removing the clock.
The clock is then removed including its dial.
 
ok i've got the rev counter...it has the same dimension of the clock..but how to distinguish the three nuts? they aren't marked..:bang: and could a predisposition (with the coil signal) already be in the instrument panel?:confused:
thanks:)
 
Great - sorry I was wrong about the clock size! :bang:

OK, you'll have to trace the circuit - follow the copper track around from the three nuts to other parts of the circuit. For example, consider the oil pressure warning light bulb. This has one side connected to a pin in the plug, that goes to the pressure switch (earth/ground), the other side is powered by 12V with the ignition on, which will be connected to a number of other bulbs - and you should find one of the three tachometer nuts to be connected to this 12V power supply. Mark this one '+12V'.

If you follow this +12V connection around to the other two gauges (temperature and fuel) you should find that it is connected to those two as well. There will be two more nuts on those gauges that are connected together - follow these back around to the tachometer, and mark this nut as 'Ground' or 'Earth' etc. So as you can see, the tachometer already has power and ground...

The nut left unmarked needs to be connected to the ignition coil green wires. There probably won't be a signal already 'predisposed' in the wiring, but you can check this by following the circuit back to the plug and seeing if there is a corresponding wire in your car.

Another way to identify the wires - get a multimeter, plug the instrument cluster into your car, and measure voltage between a known ground (something metal on the car) and the 12V nut will be obvious with the ignition on. Use the multimeter's resistance/continuity setting (with the ignition off) to identify the ground/earth nut. Again, the remaining nut is for the coil signal.

-Alex
 
Last edited:
Sorry I've not replied earlier - been up my neck in exams and stuff at college.:bang:

Firstly, I too have swapped a rev counter into the standard dashpod of an 's' model (the one with the clock). The printed circuit incorporates the circuit for both the clock and the tachometer, so there is no need to swap the circuit over.

Going from memory, you remove the clock and then offer up the tachometer in its place. The mounting holes for the tachometer are in the 's' casing, BUT, there might not be any holes in the plastic circuit behind it to push the one of the tachometer pins through. You very carefully use a sharp, pointed tool to make a hole in the correct place. I can't remember if it is only one hole you need to make, or two. With this done, the tachometer will push into place and can be bolted up.

Problem is, you need to make sure that some of the plastic coating is removed from the new hole to reveal the shiny copper/ gold electrical circuit before bolting in the tachometer. Using a very small flat bladed screw driver, gently scrape around the area of the hole to reveal the shiny circuit underneath. You should do it enough so that the nut and washer make contact when the tachometer is bolted down.

With this done the tachometer will have the power it needs to run. All you have to do is to run a wire from the coil to the tachometer as Alex mentioned. You can either run a wire and connect it directly to one of the mounting nuts (can't remember which though), or for a more standard looking job you can run it to one of the dashboard connectors. It's one of the free slots, though again I can't remember which! What I did with mine was to cut off and remove one of the connector pins (with some wire still attached) in the wiring block from an old wiring loom, then solder/ crimp the wire from the coil to this. Then you can push the pin with wire into one of the free slots in the connector, and it will clip to the dashpod and look factory standard.

Ironically, I just realised that it's taken me longer to type out the instructions than it probably takes to actually do the swap! It really is quite easy.

By the way, you could always swap speedometers over instead. That way you'd still have your orginal speedometer but in the tachometer instrument pod. It would save the hassle of making the holes and connections for the tacho :idea:

Chas
 
Last edited:
Ooh thank you all..sorry but exams take a lot of time me too...unfortunatly there's not only the Uno in life:mad:
Anyway, i watched my dash and the circuits seems to be different from the one i bought...i will try to trace circuits as Alex said, on my dash. i've got another doubt..at work finished, rev counter must be connected to +12v only with dashboard turned on? is it correct?

Ciao!
Mennywise
 
Last edited:
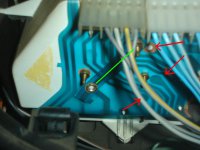
well...i have taken a photo of my uno's dash...it seems to be a predisposition for the rev counter, in the 3 points i marked with the red arrows.

crusc forum.jpg

But now i have the following doubts :confused: :

1) why the clock has got 3 nuts? could one of them be be only a fixing screw?

2)the "bridge" i marked in green..should be removed with the clock?

3) the first nut of the revcounter in my car doesn't go at the second pin, as in the originary dash of the instrument..is it possible that i should invert some wire in the revcounter ??

I know i'm continuously useful of your courtesy, but you are the only really competent people i found in a lot of forums.
Thanks again:)

-Mennywise
 
At this point, I would do as Chas suggested and swap the speedometer from your cluster into the replacement, then fit that. I'm aware that will leave the check panel not functioning, but the rest is guaranteed to work.

Otherwise you're just going to have to experiment. Are you saying that the three nuts on the tachometer don't line up with the three circuit 'pads' you pointed out?

-Alex
 
No, the nuts are lined with the holes i should have to do, but their "destinations" don't seem to correspond. Anyway, i can't swap the dashboard because in mine
there's also the econometer. I will install the tachometer eventually revoving the nuts, and connecting it with some wire behind the instruments..i will take the +12v and earth from the fuel indicator, than i'll connect the lacking wire, to the green group on the coil. It should be a safe way...:rolleyes:
 
Back
Top