

Have to say, although the thread has "drifted" somewhat, it's making a very interesting read.I agree that you shouldn’t “just get the sh*t ripped out of you for asking a quite sensible question” (which in my case concerned where to connect the negative terminal for a top up charge)
Being told in response that “you have no need to be charging the battery” at 85% isn’t helpful - I think that’s for me to decide?
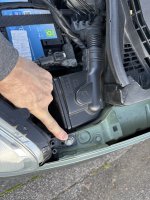
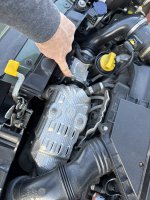
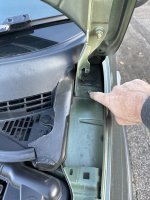
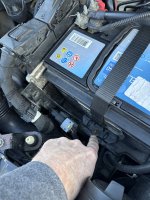
Let's get back to the question asked thought. We're talking about charging this battery and where to connect the negative charger lead - taking into account that this particular lead on your charger doesn't have much "reach". I said earlier in the thread that I prefer not to disconnect battery terminals unless I'm doing something - like changing the battery etc - which makes it unavoidable. I've now charged a number of different makes of vehicles with stop start systems by connecting the battery charger positive lead to the battery positive terminal and the negative lead to the engine block or other obvious chassis earth point without disconnecting either the pos or neg battery terminals and had no issues at all. My charger leads are long enough to allow me to do this without any problems but you tell us your's are not. So connect a jump lead (or fabricated extension wire - we're talking small currents here, around 10 amps would be a pretty "meaty" smart charger output and 5 or 6 amps is very common) to the engine block, gearbox casing, chassis earth point, you get the idea I'm sure, and then connect the other end of the lead to the charger negative lead clamp. You don't even need to worry much about this connection being uninsulated as it's on the earth side so, as long as it doesn't contact the battery positive terminal, it can't do any harm - wrap an old rag round it if you like?
Believe me I completely understand your nervousness about possibly damaging electronics on modern cars. I remember very well when we started to see the Lucas ACR alternators appearing on cars which had previously come with dynamos. There were a lot of "horror" stories at the time about how easy it was to blow the diode packs on them, and indeed, if you were stupid enough to connected the battery leads the wrong way round they would indeed be blown and a new alternator would be required. I well remember the boss coming over to us during a tea break - we had a big "volcano" waste oil burner with old car seats and a sofa arranged around it in the back of the workshop - and telling us in no uncertain terms that if any of us did that the cost would be coming out of our wages! Ever since automotive electronics is something I approach with great caution and respect. However my thinking is that when the battery is being charged normally by the car's alternator, the flow of electricity applied to the system and the involvement of the battery condition monitor will be the same as from the charger when connected as above.
I am very much in the same situation as you regarding low vehicle usage. Our Panda is abused terribly as it does mostly very short shopping trips for over 90% of it's running and the Scala doesn't do much more in terms of mileage although it does go out to my boy's house and back once a week which is a round trip of about 40 miles but it often then sit's on the drive for a week without being started. The Ibiza I had before that suffered the same usage and it's battery failed early which was why I started putting it on the smart charger and I never had another problem with it 'till I sold it some 6 years later. I'm doing the same with the Scala. I check the standing battery voltage - which is usually around 12.5/12.6 volts the day after the run out and when/if it falls by much - so maybe 12.3/12.4 - I whack the charger on. I monitor my two shop batteries in much the same way and stick the charger on them when needed and they've both survived for many years and are able to jump start vehicles with plenty of "vigor"
I've looked into battery condition monitors in some depth and there are a number of types but the common ones seem to fall into two main groups of interest to us DIY types. Those which seem to be able to "reset" themselves when a new battery is fitted - the Fiat ones seem to be this type, but I don't yet own a Fiat with a battery monitor so I'm just going by what I read - and the type which requires intervention by way of resetting with a scanner or dealer tool. Unfortunately for me the VAG ones are this type. If you have the type that requires resetting then ignore this at your peril. Unfortunately with this type, if you fit a new battery but don't reset the ecu then, initially, all will seem to be well. However the charging system ecu will be applying a charging regime which is modified for a failing battery and this will slowly damage the new battery (I think what it does is over charges the battery so causes electrolyte to gas and heat damages the plates?) My friend, who owns our local VAG independent tells me a new battery can fail within a year to 18 months if the reset is not carried out. I suppose it depends on how bad the old battery was and therefore how much the charging regime had been modified before the new battery was fitted. Reading between the lines I think the "auto resetting" type are more basic and concern themselves with restricting what can pull current when battery condition is less than optimal - so cuts out stop/start and maybe other "big" current consumers to conserve battery power. Whereas the type which need to be reset do all that but also alter the charge being applied as the battery internal resistance increases with sulphation. This type seem to only be able to alter in the one direction - think of a ratchet strap. it can tighten, but to loosen it has to have the ratchet mechanism released.
Hope that was helpful - and please remember, this is all just what I've found and experienced. It works for me but I'm not promising in any way that you won't manage to damage something by not doing what the owners manual recommends.
Last edited:
")

 ) electrical ‘extensions’ +cost/hassle of getting same