This is from my experience changing out the Uniair Actuator on a 2014 (64 plate ) Fiat 500 Lounge , 105PS Twin Air. (Euro 6)
I decided to have a go myself as there was no local independent Fiat specialist and I didn't trust the engine reliability to drive 100+ miles to a specialist who wanted the car overnight. Of course I was also hoping to save a few hundred pounds on labour ! ( I would not consider going to the Fiat main dealer ) From the symptoms and diagnostic checks I made I was 95% certain my UniAir was on the way out , but you need to be pretty sure it is faulty before committing to replace it . It will cost around £850 for parts etc..
Parts / material required:-
There are a few options/variations here depending if your car has AC or not and how "professional" you want to be and what facilities/equipment you have available . Also, is your car driveable with the defective UniAir unit.
Option a)
In the unlikely event you have AC gas equipment you have to evacuate the AC gas so the AC compressor can be removed in order to access the bolts to remove the inlet manifold . The inlet manifold air box has an integral moulded plastic support bracket that fixes to the top of the Tappet/rocker cover . This support bracket prevents the Tappet/rocker cover being removed to access the UniAir unit.
Option b)
Take the car to a local garage that does AC servicing and negotiate a price to get them to evacuate the AC gas and oil and then to put it back at a later date after the UniAir job. ( I was quoted £185 but you might get a better price ). Cost may depend on what grade of AC gas you have , The newer ( greener ) gas might be more expensive . Then you can remove the AC compressor your self . To remove the AC compressor requires the auxiliary drive belt removed which requires the offside front wheel off and the wheel arch liner removed for access to the belt tensioner . This needs a 7 mm square insert tool to move the tensioner.
Option c) ( The "Purists" among you will be appalled by this ! ) After much deliberation on my part considering the actual bracket structure , the age/mileage /value of the car and my intention to keep the car and the overall costs I decided to do this :
Carefully cut the plastic support bracket off the inlet manifold air box with a junior hacksaw at the red line as shown below .
 Then the inlet manifold and AC compressor do not need to be removed to allow the tappet/rocker cover to be removed . The plastic support bracket can be re-joined with a bit of engineering skill and araldite to restore it to sufficient strength. You have to make the same judgment whether to do it this way on your car. It is not for everyone for sure. Scroll down in the sequence for the photo and info of the repair.
The sequence I followed for option c) any references to left and right side in the description are based on standing in front, facing the car/engine .
I hope this guide has been of interest and it helps some of you to carry out the work yourselves .
Sequence to dismantle :
I decided to have a go myself as there was no local independent Fiat specialist and I didn't trust the engine reliability to drive 100+ miles to a specialist who wanted the car overnight. Of course I was also hoping to save a few hundred pounds on labour ! ( I would not consider going to the Fiat main dealer ) From the symptoms and diagnostic checks I made I was 95% certain my UniAir was on the way out , but you need to be pretty sure it is faulty before committing to replace it . It will cost around £850 for parts etc..
Parts / material required:-
- New UniAir Actuator
- Gasket under the Actuator
- Tappet/Rocker cover gasket
- Some gasket sealant Loctite 5900 or equivalent
- Spark plug pockets seal gasket ( under Tappet/rocker cover )
- Inlet manifold seal gaskets onto cylinder head and throttle body
- 3.2 Litres of 0W30 ACEA -C2 Oil to Fiat 955535 GS1 spec. ( I use Millers )
- Sump drain plug copper washer
- New Oil Filter ( preferably decent quality EG Bosch , Mann etc )
- Hose clamp or Jubilee clip 50-70 mm diameter
- Torx T45 bit
- Torx T30 bit
- Torque wrench up to 25 Nm
- Hose clip pliers (preferable)
- Access to MultiECUscan on a laptop connected to OBD port
- (option ) AC gas equipment to evacuate and recharge your AC system
- (option) car lift ideal, or vehicle ramps or jack & axle stands or a maintenance pit
- Pair of Tin snips
There are a few options/variations here depending if your car has AC or not and how "professional" you want to be and what facilities/equipment you have available . Also, is your car driveable with the defective UniAir unit.
Option a)
In the unlikely event you have AC gas equipment you have to evacuate the AC gas so the AC compressor can be removed in order to access the bolts to remove the inlet manifold . The inlet manifold air box has an integral moulded plastic support bracket that fixes to the top of the Tappet/rocker cover . This support bracket prevents the Tappet/rocker cover being removed to access the UniAir unit.
Option b)
Take the car to a local garage that does AC servicing and negotiate a price to get them to evacuate the AC gas and oil and then to put it back at a later date after the UniAir job. ( I was quoted £185 but you might get a better price ). Cost may depend on what grade of AC gas you have , The newer ( greener ) gas might be more expensive . Then you can remove the AC compressor your self . To remove the AC compressor requires the auxiliary drive belt removed which requires the offside front wheel off and the wheel arch liner removed for access to the belt tensioner . This needs a 7 mm square insert tool to move the tensioner.
Option c) ( The "Purists" among you will be appalled by this ! ) After much deliberation on my part considering the actual bracket structure , the age/mileage /value of the car and my intention to keep the car and the overall costs I decided to do this :
Carefully cut the plastic support bracket off the inlet manifold air box with a junior hacksaw at the red line as shown below .
The sequence I followed for option c) any references to left and right side in the description are based on standing in front, facing the car/engine .
- Warm engine up if you can run it,
- Put car up on a jack, then axle stands ( it is at better height to work on for the job )
- Take out filler cap and dip stick. Drain oil at sump, remove oil filter
- Disconnect Negative terminal at battery
- Remove air filter housing above the engine and take out the large locating grommet at the back ( it will get in the way later on )
- Start to remove hoses and pipe connections to and above the rocker/tappet cover etc, marked in yellow highlight
- These are:- a) fuel vapour recover hose ( on left side). b) Degassing pipe /hoses from Thermostat. Just fold this out of the way to the right by the battery, c) Turbo charger bypass hose . d) oil vapour recovery hose.( on left side) e) wastegate actuator air delivery hose pipe, f) cooling water hose from turbo charger back to header tank ( this not highlighted )
- Disconnect the electrical connectors ( green arrows) on inlet air pressure sensor and throttle body ( red arrow )
- Then disconnect the air hose from the Turbo charger intercooler onto the air trunk ( this is probably held on by a single use hose clamp and will require a new hose clamp or a jubilee clip 50-70mm diameter ) Then unbolt the air trunk from the throttle body ( 2 x 10mm A/F bolts ) and 1 x 10mm A/F bolt on the support bracket under the trunk into the side of the engine block. Quite awkward to access this bolt . Remove the air trunk . There is an O ring seal on the air trunk where it fits into the throttle body . If this O ring is in poor condition it will need to be replaced ( I couldn't find it in the ePER parts .) You may need to measure it and get one . I don't think it is a special high temp. one just a standard nitrile O ring . ( sorry , I should have measured it , approx 60 mm x 4mm )
- Then remove the throttle body ,secured by 4 x T30 head M6 machine screws into the air chamber body of the inlet manifold
- There is an orange rubber gasket on the face of the air chamber , this should be replaced. It comes in a kit of three gaskets for the manifold . You can see the AC compressor below the air chamber inlet. On the support bracket are two ground wires bolted to it. These need to be disconnected as they go into the wiring loom that needs to be removed.
- Now remove all connector plugs and wiring above rocker/tappet cover etc . These are the 2 UniAir solenoids , Uniair oil temperature sensor, 2 coil packs , wastegate actuator solenoid, fuel vapour recovery solenoid . Also remove the two coil packs from the spark plugs
- There is one wire on this loom that goes behind the oil filler pipe and down the rocker/tappet cover left side and down to the turbo charger by pass solenoid on the front left of the engine block . This connector is awkward to get your hand on to disconnect.
- Unclip the cover to open up the wiring trunk on top of the rocker/tappet cover and lift out the wiring and then remove the wiring trunk. Then carefully pull back all the wiring loom to the rear and to the right side clear of the rocker/tappet cover.
- Unbolt the 2 x 10mm A/F bolts securing the waste gate vacuum reservoir to the right of the rocker/tappet cover and move it to the right by 2-3cm clear of the rocker cover
- About this time, I refitted the sump oil drain plug with a new copper crush washer and fit the new oil filter .
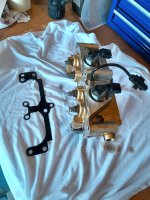
- Now the contentious part! Cut the support bracket off the inlet manifold air box . But before I did I made up a small tin plate and drilled 3mm holes in the bracket and the re-joining plate so I would be sure to restore the bracket to the same place . For this repair plate I used the bottom of an old biscuit tin (0.5 mm thick tin plate ). Also I didn't want any drilling swarf going in the engine. You need a pair of tin snips and a handful of 3mm allen head machine screws and some araldite/epoxy resin .Picture below shows the final repair .
- The tin plate is underneath and folded up on both sides and is glued with araldite and secured with 8 machine screws and one self tapping screw . All threads are locked with a small blob of araldite too. At the time of writing this guide the car has done 220 miles since the repair and it is still sound and no sign of coming apart. Of course there are other ways of making a repair and could and would be as good . Just be aware there is not much clearance under the bracket and next to the oil filler pipe.
- See view below with everything removed ready to take off the rocker/tappet cover, No need to remove that heat shield, Remove the 10 x 10mm A/F bolts around the outside plus one in the centre between the spark plug pockets and lift off the rocker/tappet cover.
- Note the the brass insert for securing the support bracket stud is missing . This was actually turning round and round when I tried to undo it. It just pulled out after I cut the bracket. I had to araldite it back in place before re-assembling .
- This is the view with the cover off and the UniAir in place on the right . I have poked two small pieces of rag into the spark plug pockets in order to prevent any oil slopping or dripping down around the spark plugs. Note the gaskets around the edge and around the plugs . You can see some extra sealant in places at the edge . Just out of view on the right are two other blobs where the gasket rises up from the cylinder head over the UniAir ( 5 blobs of sealant in total )
- The underside on the Rocker/tappet cover showing the grooves where you will install the new gaskets after cleaning the grooves out.
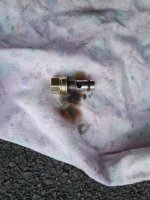
- Now remove the old gaskets and unbolt the UniAir Module . You have to unclip the wiring connector for the UniAir temp sensor attached to the air chamber and pull the cable clear from the foam sound insulation under the air chamber. The UniAir is secured by 7 machine screws ( marked with green arrows ) using the Torx T45 bit . The UniAir is located on two dowels and needs to be eased up evenly . Depending on where the engine stopped the position of the camshaft may be applying some pressure on the cam follower/springs on the two pumps on the UniAir . Lift the UniAir off carefully . Check the 4 actuators on the underside don't fall out ( they shouldn't ) . Keep the UniAir the same way up . Then remove the metal gasket from under the UniAir .
- Clean off any remaining sealant and clean the seal face for the gaskets. The 2 dowels marked in red , The red arrow is the oil feed from the cylinder head into the UniAir . The green arrows show the 4 inlet valves/springs . Fit the new metal gasket
- Don't worry about that blue tinge you see on the metal and plastic on some photos. It was reflected from the blue plastic rain sheet over my garage door above the open bonnet as there were rain showers when I did the work.
- Carefully fit the new Uniair in place on the dowels and tighten the 7 x T45 bolts down evenly . Check the 4 actuators make proper contact onto the inlet valves , The final tightening torque is 20-24 Nm ( from the Fiat E-learn-WEB FCA )
- I applied a squirt of the engine oil over the new cam followers. The Fiat E-Learn-WEB FCA guide says to do a first fill of the UniAir with 80 cc of engine oil via the small non return valve on the strainer filter in the top of the UniAir . I only managed to get about 5-10 cc in using a plastic syringe . I also removed the strainer filter but did not get anymore oil in .
- Apply the 5 blobs of Loctite 5900 or equivalent oil resistant sealant as mentioned earlier and fit the rocker/tappet cover with the new seal gaskets . Tighten the cover down evenly not forgetting the one bolt through the centre . The Fiat E-Learn-WEB FCA say tighten to 8-10 Nm .
- First fit the custom repair tin plate and the support bracket. Then basically reverse the dismantling sequence putting back the vacuum reservoir , wiring and connectors , the Throttle body, the air supply trunk and all the hoses . Do not refit the coil packs at this time.
- Fill the engine with 3.2 litres of fresh 0W30 C2 oil and fit the filler cap and dipstick
- The UniAir needs to be fully primed with oil (80 cc) to get the engine to start . To do this I removed the spark plugs and the fuel pump relay T17 in the relay box to the right of the battery . At this time I took the car off the axle stands and re-connected the battery
- I then tried to start with the key. Cranking the engine whilst observing the oil pressure light . It turned easily ( with no compression) and the cranking cut out itself after about 8-10 seconds. The oil pressure light stayed on. . I waited 30 seconds then cranked it again . Only on the 3rd cranking cycle did the oil pressure light go out . I then gave it one further cranking cycle to ensure that fresh oil would be pumped through to the UniAir.
- I then refitted the spark plugs and coil packs , and fuel pump relay T17 and then fitted the air filter housing .
- At this stage I connected my laptop with the MultiECUscan at the OBD port . I went through the resets in the "adjustments" section for new a UniAir, New Oil temperature sensor and new oil .
- I then tried to start the engine for real. It started after 5 seconds of cranking with a bit of a splutter but then settled on a steady idle at about 1200 rpm. I revved it up to about 3500 rpm all OK . I let the engine idle and warm up to 2 bars on the temperature gauge and took it for a short test drive on side roads for about 2 miles . All seemed OK and it got up to full temperature.
- I then removed the air filter housing and checked around the rocker cover for any leaks, also around the oil filter . I also checked the oil dipstick level.
- A further longer test drive up to 70 mph and revving to 5000 rpm , all OK
I hope this guide has been of interest and it helps some of you to carry out the work yourselves .
Sequence to dismantle :