Technical best way to remove driveshaft

Currently reading:
Technical best way to remove driveshaft

RichyLJ69

New member
Joined
Jun 8, 2024
Messages
4
Points
2
Location
Norwich
Hello, I have recently purchased a Panda 2011 1.2 Active which has been an eventful experience!! Just as I sort one problem out another seems to raise it's head!
Anyway, I have read that the driveshafts can be a bit stubborn to remove from the diff/gearbox end, probably requiring a pry bar. The Haynes manual recommends removing the 2 bolts holding the hub to the bottom of the suspension strut and also the tie rod ball joint. Then pivot the hub away to allow the driveshaft to be removed from the hub end. I have also seen a gentleman on You Tube (admittedly this was on a punto) just undo the pinch bolt on the lower ball joint and seperate the hub from the lower control arm (think it's called that). This also seemed to allow enough room for the driveshaft to be removed from the hub. Just wondering if any folk have undertaken this job and their preferred method. Thanks very much. Richard.
 
Model
1.2 active
Year
2011
Mileage
115000
Hard to tell in a photo but looks goosed to me


Screenshot_20240621-201459.png


New Vs old

Screenshot_20240621-202028.png
 
Look ridged and gouged, but it could be just the light
Certainly showing signs of wear, but no scoring, gouges or dimples that I could feel.

Annoyingly, just had to cycle off to our local motor factors in Co. Clare to get another set of boots - they gave me the wrong ones in Scarborough.

I was trying to be clever (and cheap) by stocking up on car bits when I was last in the UK.

Now 64 Euro lighter. Probably could've got a new pair of CV joints with boots for that in Blighty. Boo.

Anyway my YouTuber ASMR career looks promising.
 

Attachments

  • Panda CV.mp4
    70.6 MB
Last edited:
Certainly showing signs of wear, but no scoring, gouges or dimples that I could feel.

Annoyingly, just had to cycle off to our local motor factors in Co. Clare to get another set of boots - they gave me the wrong ones in Scarborough.

I was trying to be clever (and cheap) by stocking up on car bits when I was last in the UK.

Now 64 Euro lighter. Probably could've got a new pair of CV joints with boots for that in Blighty. Boo.

Anyway my YouTuber ASMR career looks promising.
Thanks for the video. Looking very closely indeed you can just see the very smallest evidence of where the balls have been running, nothing of any consequence whatsoever I'd say. the cage does look rather roughly machined but, in my experience, they often look like this. The cage isn't doing anything except stopping the balls falling out the end of the grooves anyway so doesn't need to be "mirror finished".

I'd very happily reassemble this and use it again.

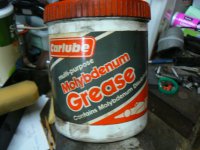
Regarding lubrication. Mostly new joints seem to come with a sachet of HMP Moly grease these days so, when reassembling a used joint I just use Moly grease out of my tub of HMP moly grease, which at this time just happens to be:

P1110852.JPG

P1110853.JPG


Sometimes when you open up a pretty old joint you'll find that the grease has semi solidified so is not really doing much to lubricate the balls. Often actually distributed around the outside of the joint by centrifugal force and, because it's now dried out, can't flow back into the balls and this is probably why it's worn out? Anyway, many years ago, I started putting a little squirt, a teaspoonful maybe? of gear oil in with the grease, just before tightening up the clip and I find that when one of these joints is dismantled the grease is in a lovely semi liquid, "gloopy" mess which is lubricating the joint beautifully! I've not known a joint lubed in this way to fail yet. My boy's Astra and my own 1.9 TDI Cordoba, both in the family for many many years and doing well into the 100,000 miles range are cases in point. Up to you whether you want to try this, and don't flood it with oil if you do, just enough to turn it nicely "gloopy" is enough.

By the way, never use moly grease in wheel bearings. The balls (or rollers) need to actually "roll" in their tracks and Moly grease is so "slippy" it encourages the balls, or rollers, to slip thus the possibility of introducing "flats" on the balls or rollers. Always use a proper HMP grease intended for wheel bearings when doing wheel bearings and on wheel assemblies on high performance or heavy cars you can buy a special extra high melting point grease which ensures the likelyhood of melting is virtually eliminated.
 
Last edited:
Thank you for your input, I'll put that CV back on for now.

The left hand side differential shaft however doesn't look so clever.

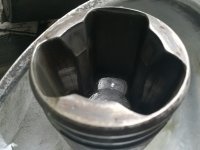
Hopefully you can make out the groove that's been worn.

The three slots have a groove in the same place.

Could this cause knocking at full lock? I wouldn't have thought the driveshaft would necessarily slide in or out at the diff end with steering lock?

And would there be any point switching it to the other side of the diff?

This joint had the worst split in the boot, but still plenty of gloopy grease in it. None of the four joints had dried up, grease was quite runny.

And thanks for your advice on grease, Jock. I have a couple of older cars, and a lot of your general musings have been a great education. Although now I'm thinking I need to strip out some wheel bearings and make sure I've used the right type of grease!
 

Attachments

  • 05.jpg
    05.jpg
    1.8 MB · Views: 238
Last edited:
Thanks for the video. Looking very closely indeed you can just see the very smallest evidence of where the balls have been running, nothing of any consequence whatsoever I'd say. the cage does look rather roughly machined but, in my experience, they often look like this. The cage isn't doing anything except stopping the balls falling out the end of the grooves anyway so doesn't need to be "mirror finished".

I'd very happily reassemble this and use it again.

Regarding lubrication. Mostly new joints seem to come with a sachet of HMP Moly grease these days so, when reassembling a used joint I just use Moly grease out of my tub of HMP moly grease, which at this time just happens to be:

View attachment 446897

View attachment 446898

Sometimes when you open up a pretty old joint you'll find that the grease has semi solidified so is not really doing much to lubricate the balls. Often actually distributed around the outside of the joint by centrifugal force and, because it's now dried out, can't flow back into the balls and this is probably why it's worn out? Anyway, many years ago, I started putting a little squirt, a teaspoonful maybe? of gear oil in with the grease, just before tightening up the clip and I find that when one of these joints is dismantled the grease is in a lovely semi liquid, "gloopy" mess which is lubricating the joint beautifully! I've not known a joint lubed in this way to fail yet. My boy's Astra and my own 1.9 TDI Cordoba, both in the family for many many years and doing well into the 100,000 miles range are cases in point. Up to you whether you want to try this, and don't flood it with oil if you do, just enough to turn it nicely "gloopy" is enough.

By the way, never use moly grease in wheel bearings. The balls (or rollers) need to actually "roll" in their tracks and Moly grease is so "slippy" it encourages the balls, or rollers, to slip thus the possibility of introducing "flats" on the balls or rollers. Always use a proper HMP grease intended for wheel bearings when doing wheel bearings and on wheel assemblies on high performance or heavy cars you can buy a special extra high melting point grease which ensures the likelyhood of melting is virtually eliminated.
Great points about the addition of a bit of gear oil. I'll go one step further. People who are handy and have the time (myself included) could open the gaiters especially the hub end and re grease from time to time which would prolong the life of the joint. A lot of us can remember when most steering joints eg top and bottom ball joints/track rod ends/prop shafts etc had grease nipples to top up (if that's the right term) every service. Eee the good old days. I watch a lot of vintage/classic car videos and some of the ball joints on the cars are donkeys' years old with no play in them. Preventive maintenance rather than chuck away and buy a new one.

Sorry about the rant. :giggle:
Don't see that as a rant at all. Trouble is with today's labour rate your service would cost a lot more if sealed for life (whatever that means?) units had never been developed. I remember king pins in particular benefiting from regular injections of grease and if you didn't do it they would rapidly develop wear and fail MOT - expensive job as usually involved reaming out bushes etc!
 
My driveshaft seals had failed as well, so the inner cv joints were getting the gear oil treatment:)

So now all four boots have a drop of gear oil added. Thanks for the tip!

Replacing the driveshaft seals is fiddly on the car. If the OP @RichyLJ69 hasn't taken the gearbox out yet, check for any oil leaks first. Much easier with the box off the car I imagine.
 
open the gaiters especially the hub end and re grease from time to time which would prolong the life of the joint.
I like that idea. Are there reusable clamps for the boots? Or would Jubilee clips fit on the outer cv joint? I know they don't fit on the transmission end. I understand some people just use cable ties?
A lot of us can remember when most steering joints eg top and bottom ball joints/track rod ends/prop shafts etc had grease nipples to top up
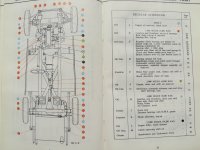
Oh gawd don't. Here's the 'regular attentions' for my old car. As in a car I have that's old, not as in a car I used to have.

20 grease nipples! Every 1000 miles!

Plus two bonus ones on the rod operated clutch shaft! But they're only every 12k miles so we don't worry about them.

Some vandal put sealed track rods on it at some point in the past, so I only have 16 to worry about :D
 

Attachments

  • 100 service schedule.jpg
    100 service schedule.jpg
    1.8 MB · Views: 64
I like that idea. Are there reusable clamps for the boots? Or would Jubilee clips fit on the outer cv joint? I know they don't fit on the transmission end. I understand some people just use cable ties?
Don't use jubilee clips, the screw is too heavy and will give a serious out of balance.
Usual fit is cable ties, as the head is light enough not to create an imbalance, not one you can feel anyway. Try to fit them so that in normal forward motion, if they get hit by debris, it does not try to undo them. Trim the free end as tight as possible. Get ties that are as wide as possible for the groove in the boot, it spreads the load and makes cutting into the boot less likely. Must not be wider than the groove though, or it'll not grip consistently, and may slip off.
 
I like that idea. Are there reusable clamps for the boots? Or would Jubilee clips fit on the outer cv joint? I know they don't fit on the transmission end. I understand some people just use cable ties?
In times past I'd have recommended cable ties and agree with all PB is saying above. However there seems to now be a different material being used by some manufacturers for the boots themselves which makes them much harder. I suspect they are not some sort of rubber compound like the ones which have been around for many years. It's very easy to feel the difference if you give them a squeeze as the rubber ones are quite "squishy" and these new ones are really quite difficult to distort. First time I came across these new ones I thought they wouldn't last long as I thought they would split due to being so relatively hard but quite the reverse, I've not actually come across a failed one yet!

So why am I going on about this? well, the older rubber type respond well to being secured with cable ties as they can exert enough force to securely "squeeze" the rubber into the groove on the CV. However these newer much harder type are a problem as the cable tie can't exert enough clamping effort to properly seat the boot into the groove in the CV joint so they tend to leak and, although I've not yet seen one actually come off, I have seen more than one displaced with grease squeezing out round the edges. You really do need the extra clamping effort that can be achieved with metal clips. I have this kit: https://www.amazon.co.uk/Alpha-Ride...da83f7c3a288982205c866150be&gad_source=1&th=1 which works very well and, considering it comes with clips to do 10 boots, is pretty good value.
Oh gawd don't. Here's the 'regular attentions' for my old car. As in a car I have that's old, not as in a car I used to have.

20 grease nipples! Every 1000 miles!

Plus two bonus ones on the rod operated clutch shaft! But they're only every 12k miles so we don't worry about them.

Some vandal put sealed track rods on it at some point in the past, so I only have 16 to worry about :D
That chassis looks very familiar - two 6 volt batteries behind the seats, lever arm front shocks, twin SU carbs (I think?) then I spotted the gear lever which doesn't look like one I recognize, so what's the car?
 
I suspect they are not some sort of rubber compound like the ones which have been around for many years. It's very easy to feel the difference if you give them a squeeze as the rubber ones are quite "squishy" and these new ones are really quite difficult to distort.
Well that's interesting. One of the boots that came off was very stiff. I thought the rubber had gone hard, but now I see it must be one of these harder types. Obviously been replaced previously, but yes, no cracking or sign of wear on it. Anyway now I've got four matching new old fashioned rubbery boots on.

That chassis looks very familiar - two 6 volt batteries behind the seats, lever arm front shocks, twin SU carbs (I think?) then I spotted the gear lever which doesn't look like one I recognize, so what's the car?
Nowt wrong with your eyes Jock! 1 1/2" H4 SUs. Yes, that gear lever is a bit odd. Because the casing was originally for a column change - on the Austin A90 Atlantic. But they only sold about seven of those. So they put a short lever in it under the passenger's knee in the Healey 100.

By the time of the 3000 they'd found a proper gearbox lying around at Austin so they lost that distinctive 'feature'.

It's also a bit odd in use, with an upside down gate, so 1st is right and down, 2nd left and up. And because 1st gear in the A90 was too low for the Healey they just blanked it off (although it's still rattling around in the 'box). So 3 is your lot, top being direct. Plus overdrive to knock about 500rpm off.

Thankfully plenty of torque from the long stroke 2.7 four lump, so you don't need to stir the box too much :)
 
Last edited:
Well that's interesting. One of the boots that came off was very stiff. I thought the rubber had gone hard, but now I see it must be one of these harder types. Obviously been replaced previously, but yes, no cracking or sign of wear on it. Anyway now I've got four matching new old fashioned rubbery boots on.


Nowt wrong with your eyes Jock! 1 1/2" H4 SUs. Yes, that gear lever is a bit odd. Because the casing was originally for a column change - on the Austin A90 Atlantic. But they only sold about seven of those. So they put a short lever in it under the passenger's knee in the Healey 100.

By the time of the 3000 they'd found a proper gearbox lying around at Austin so they lost that distinctive 'feature'.

It's also a bit odd in use, with an upside down gate, so 1st is right and down, 2nd left and up. And because 1st gear in the A90 was too low for the Healey they just blanked it off (although it's still rattling around in the 'box). So 3 is your lot, top being direct. Plus overdrive to knock about 500rpm off.

Thankfully plenty of torque from the long stroke 2.7 four lump, so you don't need to stir the box too much :)
Ah, didn't think of that one. I noticed it was a four cylinder and I tend to think of six cylinders where the "big Healeys" are concerned forgot about the 100/4. Had a ride in a 3000 once - much more exciting than in an E type! An MGB/Triumph TR and others did come to mind but there was just too much different for that and that gear change was just so "weird". Of course the illustration being only of the chassis doesn't give much clue but I was betting on a 2 seater when I saw the short prop shaft.

A very good friend of my mother once visited us when I was young driving an Austin Atlantic and I remember being impressed with it as it looked very streamlined and had a power hood and built in jacks. He showed me how it went up and down on it's own in our driveway - at around 10 years old I was ever so impressed and he gave me half a crown for opening the gate for him when he left - Half a crown was a lot of money for a wee lad in those days.

3 speed boxes? My old 1936 series one Morris 8 Tourer had one. That upside down gear pattern must have taken a bit of getting used to? Unless I'm thinking of something else, the Morris was left and forward for reverse. Left and back for first then right through the gate and forward for second and then straight back for direct drive top. Unless I'm greatly mistaken I think the 1930 Morris Minor I had before it (my first car bought from the scrap yard) actually had a 4 speed box? I remember the flexible rubber/canvas disc on the gearbox output shaft - instead of a universal - broke up quite often but then I was "ragging" it around the fields (I was only about 12/13/14 years old then) The engines in those days were nothing like as powerful but had much wider spread of torque so were quite driveable, steep hills were always a bit of a challenge though and with no water pumps circulation was by convection which meant overheating if you really made it work hard for long. Imagine one of these modern small turboed jobs with a 3 speed?
 
Last edited:
I cannot get my cars high enough to use a long pry bar to remove the inert CV joints from the gearbox. Tried and realised it’s just too dangerous with axle stands. Mine are heavy duty by the way.
Eventually I took a fork type ball joint separator, sliced it lengthwise and welded in a 5mm x 40mm steel strip. It’s now a wide forked separator.
Press it in to take up the slack and a firm thump easily separates the CV joint from gearbox.
 
Back
Top