Here is a guide of how to put a punto mk1 85 1242 16v into a 1994 Panda 1000 Fire. (See variations at end for others). This is based on my recolections which where spread over 6 months. It shoudn't take you that long, a fortnight of evenings and weekends should see the job done. There are more photos here
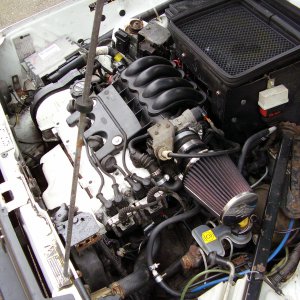
There are loads of variations between Pandas so its best to check and double check all the way
Parts to collect from the punto are
engine complete with alternator, engine loom, ecu, code box, ariel and key, throttle cable, fuel pump, exhaust manifold and down pipe.
FUEL PUMP
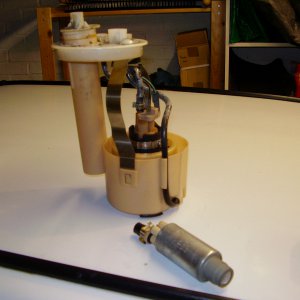
Remove the panda fuel pump unit (this is best done by removing the tank as its easier to get a good seal when putting it all back together but can be done in situ), it comes out easier if you remove the sender first (trust me). Replace the silver fuel pump with your 16v one in the panda pump unit. Put it all back.
PREPARING THE 16V
I would change the timing belt while the engine is out of the car as it’s a bit tight when it’s in. This is also the time to fit a new clutch (16v one to match the engine although you may have to use a Panda release bearing, I did).
And I'm sure you have already removed the power steering pump from the 16v.
PREPARING THE PANDA
Remove the old engine and gearbox from the panda as set out in Haynes/fiat/porter manual.
Just remove the engine loom from the Panda (the bit with the ecu on the end), leave the rest where it is. You can also junk the Pandas MAP sensor (the blue bit on the bracket on the suspension tower). Now is also the best time to fit a blanking plate over the bulkhead ecu wiring hole to stop dirt, noise and fumes entering the cabin when all is finished.
Remove the panda engine mount from the Panda block.
Fit the panda engine mount to the 16v block. Fit the panda gearbox to the 16v engine. If your 16v starter fits then fit it, min didn't as the 16v gearbox had different bolt spacing. Trial fit the panda starter, if it fits OK, if not you will have to shave some metal off the casing, I used an angle grinder and a cardboard template to determine where the metal had to be removed.
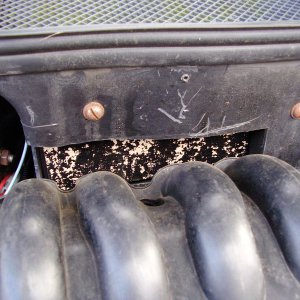
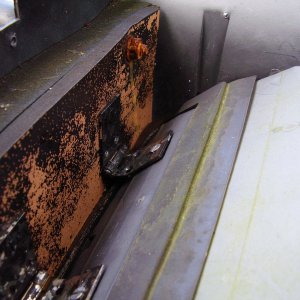
The heater box needs a cut out to clear the 16v inlet manifold. The dimensions for the cut out are approx 180mm wide by 70mm high by 20mm deep. The cut out removes one of the flap hinges. I made a new internal bulkhead out of two pieces of mdf and used some B&Q household hinges to remount the flap. I also cut out the front panel of the sound proofing, I cut the whole front panel covering the heater box out but you could be more artistic and just cut a smaller section.
Remove the panda throttle cable and fit the 16v one to the pedal via the bulkhead.
FITTING THE 16V
Before trying to fit the new engine its best to remove the radiator (if you haven’t already) and the 16v's inlet manifold, as it’s all a bit tight on the way in. The 16v exhaust manifold heat shield (if you fit it) will need a cut out to clear the radiator fan approx 70mm by 40mm.
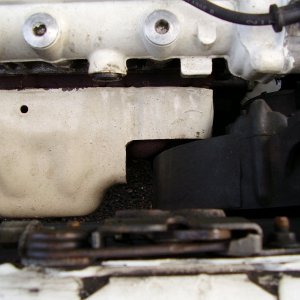
Fit your new engine and box combo
Refit the 16v inlet manifold and your radiator.
PLUMBING
Use the panda water hoses to plumb in the engine. You will need to plug the carb feed off the rad to heater hose. The heater to block hose is too short, just get a 1m length of 1/2 inch hose from a motor factor (or Halfords).
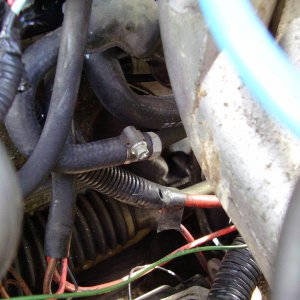
Plumb the top fuel rail hose to the Pandas wing mounted fuel filter.
Plumb the bottom fuel rail hose to the Pandas fuel return line.
I fitted a cheap aftermarket air filter (K&N mk1 Punto kit) but it may be possible to use and fit the standard Punto air box (I didn't have one to try)
EXHAUST
My exhaust system is the 16v manifold and down pipe, then a custom centre section, and then the panda back box. The custom centre section is made from a 16v flange, a piece of straight pipe, a Jetex box(not probably needed, I was guessing) and half of the original panda centre section.
I also fitted the exhaust support bracket from the Panda block to the 16v block and modified the lower clamp to support the exhaust. To get the best out of this conversion it is probably best to get something better made up exhaust wise!
ELECTRICS
Ah,the wiring, this is how mine worked but do double check with your own, there are always variations.
Start with none of the 16v wiring fitted.
Fit the panda oil pressure wire to the 16v.
Use the panda wiring for the starter and alternator (the connectors may need changing)
Fit the 16v engine loom. Ignore the 16v starter and alternator wires (tape up). The ecu sites itself on the wing and that’s where I fitted mine rather than trying to extend the loom to get it to the Panda ecu mount. There's even a couple of handy studs on the wing to mount a bracket to.
Using a piggy back connecter and a length of wire run from the water temp sensor on the gearbox end of the 16v head to the Panda water temp wire. This bit is optional a the 16v loom also has a feed for the temp gauge but needs a bit more fiddling to get to gauge. All your panda gauges and lights (apart from injection light) should now all be connected and running.
I bolted the 16v engine loom relay block to the heater box. The 16v engine loom connector block should now be resting on the spare wheel shelf.
If you have the rest of the punto wiring then it’s easy to cut out all the unwanted wires to leave you with the ones you may need (easier than it sounds once you have removed all the black tape, etc).
The important ones are
Red/Black - 30a Fused battery live - connect to panda loom live but you will need to add a fuse (nicked from remains of punto loom) (also has a spur to code box)
Orange - Live (ignition switch) - connect to panda loom near the battery (also has a spur to code box)
Brown/White - fuel pump feed - connect to panda loom by battery
Green/White and Pink/Yellow - canister solenoid - connect to panda canister solenoid
Black - to code box (earth I believe)
Grey/Green - to code box (ok signal)
With this lot fitted it should run (mine does)
The code box uses 5 wires (the fifth is the punto immobiliser dash light). If you don't have the code box wiring plug a can tell you which ones to connect to.
The other potential useful wires from the loom connector are
Blue - rev counter feed
Blue/Black - injector/ecu fault light (I didn't fit mine, if it runs I'm happy)
Grey/Yellow - Oil pressure warning light (redundant as you are using the panda loom version)
Grey/Black - Alternator warning light (redundant as you are using the panda loom version)
Grey - Water temp feed (redundant if you are using the panda loom version)
Wire in the code box, plug in the code box ariel, tape the blue key to the ariel, hide this lot and then turn your true ignition key!
VARIATIONS
92/93 Panda with bosch ecu
- It has slightly different wiring but at least there is a wiring diagram in the later Haynes manuals.
Non Injection Panda (i.e. carb models)
- You need to either fit a injection type fuel tank and pump or
- Fit a lower pressure electric fuel pump at the tank feeding into a swirl pot/feeder tank, a high pressure fuel pump from the swirl pot to the engine, a return line from the engine to swirl pot and a return from the swirl pot to your main tank.
- In either case all fuel lines MUST be upgraded to high pressure type.
Punto Gearbox
- There is a limited torque rating on the Panda gearbox and some like to upgrade to the donor Punto gearbox. This requires new mounts to be made along with modified gear linkages. I currently have no details on this mod.
Punto Mk2 16V engine
- This engine uses a different ecu and wiring. It is also fitted with a fly-by-wire throttle. Some people convert this by fitting a mk1 inlet manifold and ecu, others fit an alternative throttle body and use an aftermarket ecu. It can be made to work using the Punto throttle pedal and wiring. For more ideas see the cinq/sei section of FF
Punto/Stilo 1400 16V
- The remarks for the mk2 16v also apply for this engine. Also as it has more torque than the 1242 16v you really need to fit the Punto/Stilo gearbox.
Fuel Pump cut out switch
- Some Pandas are fitted with a resetable switch in the passenger’s foot well. This may affect the wiring. None of my Pandas have it fitted so it’s hard for me to advise.
4x4 Panda
- You may have more problem finding a spot for your ecu as they often have the radiator expansion bottle and headlight washer bottle fitted to the driver’s side wing.
903 engine Panda
- You will also have to find a fire gearbox and Panda Fire engine mounts.
There are loads of variations between Pandas so its best to check and double check all the way
Parts to collect from the punto are
engine complete with alternator, engine loom, ecu, code box, ariel and key, throttle cable, fuel pump, exhaust manifold and down pipe.
FUEL PUMP
Remove the panda fuel pump unit (this is best done by removing the tank as its easier to get a good seal when putting it all back together but can be done in situ), it comes out easier if you remove the sender first (trust me). Replace the silver fuel pump with your 16v one in the panda pump unit. Put it all back.
PREPARING THE 16V
I would change the timing belt while the engine is out of the car as it’s a bit tight when it’s in. This is also the time to fit a new clutch (16v one to match the engine although you may have to use a Panda release bearing, I did).
And I'm sure you have already removed the power steering pump from the 16v.
PREPARING THE PANDA
Remove the old engine and gearbox from the panda as set out in Haynes/fiat/porter manual.
Just remove the engine loom from the Panda (the bit with the ecu on the end), leave the rest where it is. You can also junk the Pandas MAP sensor (the blue bit on the bracket on the suspension tower). Now is also the best time to fit a blanking plate over the bulkhead ecu wiring hole to stop dirt, noise and fumes entering the cabin when all is finished.
Remove the panda engine mount from the Panda block.
Fit the panda engine mount to the 16v block. Fit the panda gearbox to the 16v engine. If your 16v starter fits then fit it, min didn't as the 16v gearbox had different bolt spacing. Trial fit the panda starter, if it fits OK, if not you will have to shave some metal off the casing, I used an angle grinder and a cardboard template to determine where the metal had to be removed.
The heater box needs a cut out to clear the 16v inlet manifold. The dimensions for the cut out are approx 180mm wide by 70mm high by 20mm deep. The cut out removes one of the flap hinges. I made a new internal bulkhead out of two pieces of mdf and used some B&Q household hinges to remount the flap. I also cut out the front panel of the sound proofing, I cut the whole front panel covering the heater box out but you could be more artistic and just cut a smaller section.
Remove the panda throttle cable and fit the 16v one to the pedal via the bulkhead.
FITTING THE 16V
Before trying to fit the new engine its best to remove the radiator (if you haven’t already) and the 16v's inlet manifold, as it’s all a bit tight on the way in. The 16v exhaust manifold heat shield (if you fit it) will need a cut out to clear the radiator fan approx 70mm by 40mm.
Fit your new engine and box combo
Refit the 16v inlet manifold and your radiator.
PLUMBING
Use the panda water hoses to plumb in the engine. You will need to plug the carb feed off the rad to heater hose. The heater to block hose is too short, just get a 1m length of 1/2 inch hose from a motor factor (or Halfords).
Plumb the top fuel rail hose to the Pandas wing mounted fuel filter.
Plumb the bottom fuel rail hose to the Pandas fuel return line.
I fitted a cheap aftermarket air filter (K&N mk1 Punto kit) but it may be possible to use and fit the standard Punto air box (I didn't have one to try)
EXHAUST
My exhaust system is the 16v manifold and down pipe, then a custom centre section, and then the panda back box. The custom centre section is made from a 16v flange, a piece of straight pipe, a Jetex box(not probably needed, I was guessing) and half of the original panda centre section.
I also fitted the exhaust support bracket from the Panda block to the 16v block and modified the lower clamp to support the exhaust. To get the best out of this conversion it is probably best to get something better made up exhaust wise!
ELECTRICS
Ah,the wiring, this is how mine worked but do double check with your own, there are always variations.
Start with none of the 16v wiring fitted.
Fit the panda oil pressure wire to the 16v.
Use the panda wiring for the starter and alternator (the connectors may need changing)
Fit the 16v engine loom. Ignore the 16v starter and alternator wires (tape up). The ecu sites itself on the wing and that’s where I fitted mine rather than trying to extend the loom to get it to the Panda ecu mount. There's even a couple of handy studs on the wing to mount a bracket to.
Using a piggy back connecter and a length of wire run from the water temp sensor on the gearbox end of the 16v head to the Panda water temp wire. This bit is optional a the 16v loom also has a feed for the temp gauge but needs a bit more fiddling to get to gauge. All your panda gauges and lights (apart from injection light) should now all be connected and running.
I bolted the 16v engine loom relay block to the heater box. The 16v engine loom connector block should now be resting on the spare wheel shelf.
If you have the rest of the punto wiring then it’s easy to cut out all the unwanted wires to leave you with the ones you may need (easier than it sounds once you have removed all the black tape, etc).
The important ones are
Red/Black - 30a Fused battery live - connect to panda loom live but you will need to add a fuse (nicked from remains of punto loom) (also has a spur to code box)
Orange - Live (ignition switch) - connect to panda loom near the battery (also has a spur to code box)
Brown/White - fuel pump feed - connect to panda loom by battery
Green/White and Pink/Yellow - canister solenoid - connect to panda canister solenoid
Black - to code box (earth I believe)
Grey/Green - to code box (ok signal)
With this lot fitted it should run (mine does)
The code box uses 5 wires (the fifth is the punto immobiliser dash light). If you don't have the code box wiring plug a can tell you which ones to connect to.
The other potential useful wires from the loom connector are
Blue - rev counter feed
Blue/Black - injector/ecu fault light (I didn't fit mine, if it runs I'm happy)
Grey/Yellow - Oil pressure warning light (redundant as you are using the panda loom version)
Grey/Black - Alternator warning light (redundant as you are using the panda loom version)
Grey - Water temp feed (redundant if you are using the panda loom version)
Wire in the code box, plug in the code box ariel, tape the blue key to the ariel, hide this lot and then turn your true ignition key!
VARIATIONS
92/93 Panda with bosch ecu
- It has slightly different wiring but at least there is a wiring diagram in the later Haynes manuals.
Non Injection Panda (i.e. carb models)
- You need to either fit a injection type fuel tank and pump or
- Fit a lower pressure electric fuel pump at the tank feeding into a swirl pot/feeder tank, a high pressure fuel pump from the swirl pot to the engine, a return line from the engine to swirl pot and a return from the swirl pot to your main tank.
- In either case all fuel lines MUST be upgraded to high pressure type.
Punto Gearbox
- There is a limited torque rating on the Panda gearbox and some like to upgrade to the donor Punto gearbox. This requires new mounts to be made along with modified gear linkages. I currently have no details on this mod.
Punto Mk2 16V engine
- This engine uses a different ecu and wiring. It is also fitted with a fly-by-wire throttle. Some people convert this by fitting a mk1 inlet manifold and ecu, others fit an alternative throttle body and use an aftermarket ecu. It can be made to work using the Punto throttle pedal and wiring. For more ideas see the cinq/sei section of FF
Punto/Stilo 1400 16V
- The remarks for the mk2 16v also apply for this engine. Also as it has more torque than the 1242 16v you really need to fit the Punto/Stilo gearbox.
Fuel Pump cut out switch
- Some Pandas are fitted with a resetable switch in the passenger’s foot well. This may affect the wiring. None of my Pandas have it fitted so it’s hard for me to advise.
4x4 Panda
- You may have more problem finding a spot for your ecu as they often have the radiator expansion bottle and headlight washer bottle fitted to the driver’s side wing.
903 engine Panda
- You will also have to find a fire gearbox and Panda Fire engine mounts.

