Ok, so the big push of painting is over, thats a weight off my shoulders, but the car is far from done and I'd really like to be able to use it and enjoy it this summer. So the big push now is to get it put together and to get driving!
With that in mind, there's going to be some compromises made on the restoration to get the car back together nice and quick! Mainly with trim and other small details, things that are easily fixed in the future. For example, I can put the old warped and dog eared door cards back in for now, and in the future I can spend the time/money to get a nice set together and its only a 1/2 hour job to swap them over. Those kind of compromises aren't really possible when dealing with the body shell metalwork or paint.
Speaking of paint, I did have a couple of details left to paint. I had hoped to hang my doors to paint them, but that didn't work out, so a week or so after painting the main shell I went back and painting the inner edge of the doors where I'd repaired them.
And then to avoid the risk of damage by having them about the shed, it made sense to get the doors and bonnet bolted on to the car.
They went on with all new seals and rubber pads and I'm pretty happy with the alignment. The drivers door isn't quite as good as passengers but I can fiddle and fine tune it in the future, it might help once the door seals have settled in a bit and aren't quite so big and fresh. Right now the doors need a hefty slam to get them to latch!
With the doors on, it made sense to get the glass in next. The plan is to make the car weather tight, then I can give the inside a proper deep clean and start to put bits back in.
The rear window and side windows all had a plastic film on the inside that was yellowed and hazy, the windscreen was fine though. I don't know if this film was standard or not? Either way with some careful razor blade, scouring pads and thinners work I was able to get it all off and can now see through the windows!
Much better! Rear window in first, and whilst it's never a super fun job getting windows back in, I have to say this went fairly smoothly. The small scale of the car definitely helped, as did the fact the the new window rubbers were quite soft and pliable. I used my usual technique. I put the rubber round the glass, wrapped some electrical wire (no strong to hand!) into the seal, lubricated the inner edge of the seal with a bit of washing up liquid and offered the window up to the car, then pulling on the wire while applying pressure from the outside was able to work the lip of the seal round the window frame and seat the window into the car.

With the windows in on their rubber seals, I then went round and squirted a bead of Arbomast both between the glass and the rubber and between the rubber and the frame. I did all 4 windows. It's a messy old job but it's well worth it to avoid any chance of leaks. Once it's dried a bit more I'll go round with a cloth and a bit of water and wash the last of the residue away.
The car came with lots of random stickers, on the windows, dashboard and bumpers. It seemed nice to keep one as a memory of its previous life, so I put the 'blood donors love life' cling sticker back in the front window, and with that the glass is done!
In terms of weather tightness, there's still a rather large hole in the roof, so I best do something about that.
The new sunroof fabric went over the old frame fairly easily. I didn't take many pictures as I was just getting on, but I did clean and paint the frame also. Most of the rear edge of the sunroof is held down with a bar that bolts through to the underside of the roof, but the two outer corners go into a closed section of the roof structure and as such the factory just used self tappers... I wish I had realised this before I did the bodywork! A previous owner had just filled the holes and painted over them. I put new screws in, which was fine on the drivers side but on the passengers side the hole in the roof was clearly enlarged and stripped. I put a bigger thread screw in which is holding for now, but I think I will need to revisit in the future, might be a job for a rivnut or something.
Anyway, for now it's basically weather tight, excellent. So I was going to start on cleaning the inside... but putting the sunroof on hadn't taken that long, the night was still young and I was fed up of tripping over the gearbox in the shed, so I thought I'd put that in next instead,
A combination of it's size and location in the back of the car, made this a rather easy job. Certainly it's a far cry from trying to get the big old automatic in from underneath the middle of the Daimler!
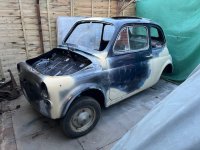
The next day I thought it would be rude to not offer the engine up now the gearbox was waiting for it. Again very straight forward, I got a jack under the sump and was able to just wheel the engine into the bay and jack it up into place while steadying it with the other hand. I did have 5 minutes of fun getting the input shaft to slide into the clutch splines... but it was nothing in the big scheme of these things of putting engines in to cars on my own!
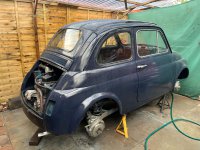
The first of the compromises... as you can see the back panel is currently just in satin black. It's not in great shape, with various dents and scrapes, and I'd kind of forgotten about it when I was painting the rest of the shell! So for now I've given it a quick blast of satin black, which think looks quite cool against the rest of the paint, and it will stay like this for a while
")
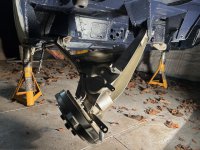
So engine in, thats another nice little milestone! Looking at the nice shiny car that's coming back together theres one big eye sore, the crusty old wheels and ancient tyres (two of which of remoulds... mmm safe).
While I had daylight and could run noisy tools I thought I'd get on and get the wheels off, to give them a quick wire wheel down, coat of paint and then I could put the new tyres on. But as I started to let the air out of one of the front wheels, I found the rim around the valve stem was really only being held together by the paint, damn!
The other wheels aren't holed but after I'd removed the tyres and bee over them with the wire wheel, I could see that they were all very heavily corroded and pitted around the valve stem opening.
I could put the new tyres on and you'd never know, but having seen the other wheel gone to holes, and seeing the depth of that pitting, I don't think I'd feel safe doing that. So that rather stopped me in my track. I best get on an order a new set of wheels
I'd really like to get some 10" wheels for this. From pictures online I think lowered on 10" wheels with some chunky tyres, they look great, much as Mini's do in the same style, but 10" wheel options are neither cheap or easily available, and it would look silly without the lowering and other mods. So for now, and to get me on the road to see if I actually enjoy driving her car before throwing more money at it, a set of standard replacement wheels will do.
Plenty to be getting on with while I wait for those to arrive...
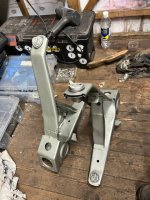
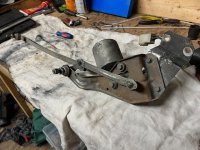
I was able to find a few minutes to bolt the rebuilt pedal box, steering column and speedo back in.
And made a start on one of the less exciting jobs, threading the loom back through. I don’t mind electrics and, as you’d expect, it’s a pretty simple system on the 500, but as I started with a stripped down car I don’t have many reference pictures for where the loom runs. There’s a fair bit of trial and error and studying of wiring diagrams to be done to work out where it all plugs in…
Having decided that wiring needed too much brain power for what I had left most nights by the time I get out to work on the car, I side tracked on to the control cables that run through the centre tunnel.
Which turned out to be a fairly time consuming job. I wasn't helped here by the fact that my car came to me already disassembled, so I was relying on pictures found online (and a few helpful forums posts!) to work out where all the different cables would run. There's also an order to which they need to go in, and some cables thread from front to back and others from back to front, it was quite the puzzle!
After that I had another look at the wiring, it continued ot be a challenge! I've worked out where most of it plugs in now, thanks to some late nights studying the wiring diagrams, but I'm suffering with an old loom with many connectors in poor condition. The fuse box is a prime example of this, lots of corrosion...
So I've stripped that down and cleaning it all up, and now some power is circulating in the car I can see that the ignition switch is only intermittently working, so I suspect the inside of it will also look like the fuse box did! I think I might have to take all the dashboard switches apart and clean up the contacts. Some more hours of wiring needed!
To build up the enthusiasm to tackle that, I wanted some nice quick wins, so I thought I'd start putting the interior back in. As previously mentioned, this is where I'm going to switch gears from 'full restoration' to 'just get me on the road this summer', so I will 'make do and mend' with what I have and can give the interior a full make over at some stage in the future.
So the first job was to give the bits I have a damn good clean. I tried out using magic eraser sponges, as I saw them recommended on another thread as good for vinyl, and I have to say they did a great job. Just water and the sponge brought these sun visors round with minimal effort.
The sun visors could now go in the car, along with more of the switch gear (which now needs to come back out...), new dash pads and new heater hoses.
When I had some daylight I gave the rest of the interior the same treatment, with mixed results. The sponges dealt with general dirt and mildew staining really well, but couldn't touch where there was under seal overspray on the seats and obviously the front seats are badly discoloured with what I presume is sun damage. I did try some more aggressive options, isopropyl alcohol got the majority of the under seal off, but nothing I tried could improve the sun damage. Seat covers are available and not especially expensive (well not compared to Daimler prices anyway!), so they will get swapped in due course. The door cards are badly warped and mildly discoloured, but again they will do for now.
It was at this point that I realised that as far as I can tell, my 'complete' car in pieces did not include any of the internal door hardware, so I will have to order new door handles and window winders! Not the end of the world, but all these little bits do add up!
Anyway, time to put some interior back in the car. I started by putting some fresh modern sound deadening in. I didn't go wild, 500s are not quiet at speed, and never will be, but it can't hurt to try to take the edge off it! haha
I followed this up with some closed cell foam to replace the original jute and then laid the original heavy sound deadening mat that forms the parcel shelf and rear seat back. For the floor I rescued the original rubber mats. My mats were torn and splitting in many places, and most would bin them and replace them with a new carpet set which is 1/3 of the price of new replacement mats, but I like the utilitarian aesthetic of the mats. After a hose down and clean up, I made patches from some pieces of the old inner tubes and glued them to the back of the mats to join the splits. It's far from perfect, but it's a great improvement from where I started. I still need to fit the sill covers.
And with that the seats could go in, for an almost completed interior.
My new wheels arrived a few days ago also, so I have been able to get them painted up and fitted a new set of tyres and tubes. I'm really placed with the black wheels, they do exactly what I wanted them to.
I stuck the bumpers on too while I was at it, and no I didn't stop to polish them up, I can see light at the end of the tunnel now and it's a mad dash to the finish and to a first chance to drive it!
There's quite a few 'finishing off' type jobs on the list still, but I'm hoping it will only be a handful of weeks now till I can go on that first test run. There's a classic car night at a local pub in a fortnight, maybe I'll even see if I can make it there!