Off with the old
First step is to pick a sunny day or a bright garage. Stick a brew on.
Drop both windows and bring seats forward.
At the back of the seats on the side of the second rib there are two steel wires, the grub screws need to be loosened and the wires pulled from the holes.
Just above them are two elasticated ribbons that need the pop rivets removed with a drill.
Undo both roof handles and flip the front part of the hood up.
the front and middle sections of the roof seals are either held in with rivets or screws, these must be removed from under the top lip from the outside.
Slide off all four seals.
Then lift the rear of the hood and lock in position with the two retaining hooks.
remove the rivets/screws from inside the lower window seals and slide the off in a downward motion. (these can be quite difficult)

Remove the rubber seal from the bottom of the hood.
Then remove all the screws that retain the two metal strips to the hood frame at front and back.
Slit the material that is glued to the two ribs then peel back all the roof material that is glued on to any framework.


The old hood should now peel off.
Drop both windows and bring seats forward.
At the back of the seats on the side of the second rib there are two steel wires, the grub screws need to be loosened and the wires pulled from the holes.
Just above them are two elasticated ribbons that need the pop rivets removed with a drill.
Undo both roof handles and flip the front part of the hood up.
the front and middle sections of the roof seals are either held in with rivets or screws, these must be removed from under the top lip from the outside.
Slide off all four seals.
Then lift the rear of the hood and lock in position with the two retaining hooks.
remove the rivets/screws from inside the lower window seals and slide the off in a downward motion. (these can be quite difficult)
Remove the rubber seal from the bottom of the hood.
Then remove all the screws that retain the two metal strips to the hood frame at front and back.
Slit the material that is glued to the two ribs then peel back all the roof material that is glued on to any framework.
The old hood should now peel off.
On with the new
First off make sure the frame is in good condition, with no rust and nothing seized or broken.
I re-riveted the two 40mm wide stays that run from the front cross member and join both ribs.
Cleaned of any rust and gave it a quick black gloss spray.


Place the new hood on the frame being careful not to damage the window and you must now slip the bottom corners over the frame which can be quite difficult.
Once they are on, slip the rest of the hood on and close it up. This way you can reposition the material before glueing.
Once you are happy with how it looks, you can reinsert the steel wire making sure not to cross the elasticated band.


The messy bit. You need dust sheets just in case.
I used evostick contact.


Now that everything touches in the right places on the ribs etc. you can commence glueing exactly where it was glued before.
You will need at least three 3/4 inch brushes because the Evo dries up so fast and don't leave the lid off, follow the instructions.
Once glued you can replace the metal plates using a punch to find the screw holes.
Glue the ribs taking extra care not to get glue on the headliner.
Fitting the six window seals is easier using a touch of silicone grease.
Before:

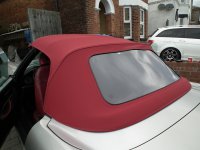
After:


I will write a guide on how to make adjustments to the frame so that all seals are good at a later date.
Thanks Dave Popps.
I re-riveted the two 40mm wide stays that run from the front cross member and join both ribs.
Cleaned of any rust and gave it a quick black gloss spray.
Place the new hood on the frame being careful not to damage the window and you must now slip the bottom corners over the frame which can be quite difficult.
Once they are on, slip the rest of the hood on and close it up. This way you can reposition the material before glueing.
Once you are happy with how it looks, you can reinsert the steel wire making sure not to cross the elasticated band.
The messy bit. You need dust sheets just in case.
I used evostick contact.
Now that everything touches in the right places on the ribs etc. you can commence glueing exactly where it was glued before.
You will need at least three 3/4 inch brushes because the Evo dries up so fast and don't leave the lid off, follow the instructions.
Once glued you can replace the metal plates using a punch to find the screw holes.
Glue the ribs taking extra care not to get glue on the headliner.
Fitting the six window seals is easier using a touch of silicone grease.
Before:
After:
I will write a guide on how to make adjustments to the frame so that all seals are good at a later date.
Thanks Dave Popps.