Hi All ") .
.
As I suggested on my MK1 thread, I have been working on the MK2 Turbo. Its been loosing coolant, even after paying a local garage to fix it. Due to the state they left my UT in after the last visit, I decided never to use them ever again (or go back to let them finish the job as they requested).
So, A colleague was kind enough to lend me his coolant pressure testing kit. It works by increasing the pressure on a cold system. In essence, it’s an air pump and a pressure gauge which attaches to the radiator expansion / header tank. You pump to increase the pressure of the air gap at the top of the coolant, thus increasing the pressure on the whole system.
This simulates what happens at full operating temperature. The difference is that water will be pushed out of any hole in liquid form, not steam, allowing you to locate the smallest of leakleaks when steam may not be visable (if its external).
Unfortunately, the borrowed tester is past its best. I couldn’t get it to seal. My colleague outlined that there is another way to do this, which I’ll share with you
.As I suggested on my MK1 thread, I have been working on the MK2 Turbo. Its been loosing coolant, even after paying a local garage to fix it
. Due to the state they left my UT in after the last visit, I decided never to use them ever again (or go back to let them finish the job as they requested).So, A colleague was kind enough to lend me his coolant pressure testing kit. It works by increasing the pressure on a cold system. In essence, it’s an air pump and a pressure gauge which attaches to the radiator expansion / header tank. You pump to increase the pressure of the air gap at the top of the coolant, thus increasing the pressure on the whole system.
This simulates what happens at full operating temperature. The difference is that water will be pushed out of any hole in liquid form, not steam, allowing you to locate the smallest of leakleaks when steam may not be visable (if its external).
Unfortunately, the borrowed tester is past its best. I couldn’t get it to seal. My colleague outlined that there is another way to do this, which I’ll share with you
Apparatus
Knowledge of the radiator cap’s rating (0.78 bar for the Uno, probably not for the Turbo though – dam Haynes).
1 foot pump (with pressure gauge).
1 inflatable ball or an inner tube (will be no good when your finished
).1 pump attachment to inflate the above.
1 Stanley knife or similar.
1 old rag.
1 pen.
1 Drip tray or mat.
Eye protection.
Optional
1 jubilee clip large enough to fit round the coolant filler neck.
1 tool to tighten the above.

Method
With the engine fully cooled, remove the coolant cap.
Place the driptray of mat under the engine.
Depressurise the ball.
Place the rad cap centrally over the ball’s valve, and draw around it. This helps cutting, and later location.
Cut the ball leaving lots of overrun. You can always take more off if needed
. 

It just happened the ball’s valve is the same size as the filler neck (arrowed)
.[I cut the ball in half first. Now I have a basketball cap :rollyeyes:]………..
this is the kit as I used it:-


Clean the filler off with a rag.
Just to clarify, the Uno Turbo’s filler neck is located differently to most other Unos.

Disconnect the battery negative lead, and cover the battery with something which won’t conduce electricity. We don’t want any fires / explosions now do we?
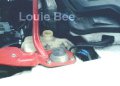
.Place the pump on top of the covered battery, taking care not to scratch your paint
.
I intended to use the jubilee clip to seal the ball’s valve to the filler neck. It turned out that the material is too thick. A tyre or ball inner tube may have been better. The pressure needed is low enough to hold in place by hand
.Moisten the ball’s valve underneath to aid sealing (I used spit
).
Fix or hold the contraption to the filler and get pumping (slowly). Take care not to over pressurise as you can easily do more damage. Listen for a hissing, indicating air loss. It took me a few goes to get it to seal. Would be easier to have an assistant pump or hold.

Check the drip tray / matt for leakage. I had some in two locations
. You might not see any. In this case, it could be the radiator cap at fault, or an internal leak (eg head gasket). I suppose you could have both an internal and external leak at the same time, especially if you have run the engine dry and warped your head.
If you see drips, get under the car with your eye protection on, and trace the drips. – sorted leak found Tad Darrrrrrrrrrr
.Conclusion
I would start with a clean engine – specifically underneath, as it helps to locate the leak.
After doing the test yesterday, I spent the rest of the day cleaning the underside
. I’ll soon have it sussed .I’m off to finish the job
.Regards All,
Louie Bee.