This guide is intended for cars using 257mm 12mm solid discs and drums. Set some time for the conversions and safety safety safety! 
I also recommend a handbrake upgrade, this one to be precise
New discs, pads, pipe (rear discs) and fluid is a must (dot 4)
You will need:
I also recommend a handbrake upgrade, this one to be precise
New discs, pads, pipe (rear discs) and fluid is a must (dot 4)
You will need:
- Impact socket set (half inch drive)
- Trolley jacks
- Professional bits set (allen/ torx bits etc)
- Ratchet socket set (3/8 and half inch sets)
- Various spanners + Screwdrivers + hammer + vice grips (4r and 10r)
- 3/4 ratchet and 30mm socket (rear disc conversion)
- Syphon (rear discs)
- Plus gas (for stubborn bolts and nuts)
- Flaring kit + cutter + pipe (rear discs)
- Bleeding kit
- Paint (optional)
- Time
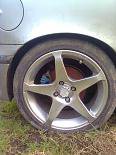
Front vented upgrade
Just like this

These discs use a bigger pad and are vented, so the possibility of fading is reduced

Simple this:
- Chock the wheels, loosen the bolts, jack and remove the wheel
- Remove the rattle clip with a screw driver
- Prise the covers behind on rubbers off for the caliper bolts then use a 7 hex to loosen
- Pull the caliper towards you and it should now be loose enough to take off. Dont disconnect the pipe yet
- Using a 17mm socket and breaker bar, remove the caliper carrier
- Use a 12mm spanner to remove the locating screws and remove the disc (hit it with a hammer if you have to)
- Now use a 14mm brake spanner to loosen the brake hose and withdraw the caliper.
Fitting the discs is the exact reverse of removal. Bear in mind that the vented discs are 257 x 20 so dont mix up the carriers and especially the calipers or it will just not fit (paint them a different colour if you have to). The pipes and hoses are the same so theres no need to worry about that. The calipers also fit under standard wheels so theres no need to worry about that either
Make sure you bleed the calipers thoroughly before use.Rear Disc Conversion Option 1
Theres 2 ways to do a conversion, with and without changing the axle. I'll describe how to do it without changing the axle first as it's a step involved in the conversion when changing the axle
Cars that interchange using 240mm discs:
Alfa Romeo 145/146 (the donor car I used in this conversion)
Fiat Bravo HGT
Fiat Coupé
Fiat Punto GT (mk1)
Fiat Tempra / Tipo
The front discs from a Cinq/Sei and Punto 8v are the same discs that are used for rear discs.
Now there are others that interchange that I've missed, if you want, leave a comment with the make and model that also fits if you know of another one that fits
Youll need:
- handbrake cables (2 long ones and the short one)
- calipers+carriers + clips
- discs+pads
- hub spacer
- dust guard
- appropiate pipes
Budget time for this one

- First, park up on a level dry surface and chock the front wheels
- Remove your wheels and drums
- Remove the exhaust and heat shield right to the front
- Disconnect all the springs in the drum, remove the shoes and handbrake cables totally
- Using the 30mm socket take off the hub and spacer
- Remove the wheel cylinder and plug the pipe up (no fluid leak)
- Remove the backing plate (allen bolts)
- Clean everything and prepare to put the discs on
At this stage, I recomend to make your own brake pipes with a flaring tool as the metal pipes are most likely half seized and ready to ring


- Start with the dust guard, hub and spacer (guard, spacer then hub)
- Fit the disc then carrier


- Then the calipers and pads
- Attach the brake hose and fix it in position
- Attach the pipe to the hose then remove the old pipe quickly and screw in the new pipe (for minimal loss of fluid)
- Attach the new handbrake cables, including the one that goes into the handbrake (adjuster) as it is slightly shorter
- Make sure all is tight and that there are no fluid leaks. Bleed the system thoroughly (the nipple takes a 11mm spanner )
- Refit wheels and enjoy
That wasn't too hard now was it?
Rear Disc Conversion Option 2
This is my preferred way of doing this conversion as you can do the axle up on the ground.
You need to drop the tank for this so either have a syphon ready or do it when the car is empty
Start by depressurising the fuel system
Same as before, chock wheels, remove wheels and handbrake cables
Working in the car, remove the fuel pump (under a metal cover in the boot held in with a big plastic ring and 2 pipes, one of which is bolted on)
Now go round to the fuel filler and remove the hidden metal ring. Once thats done, working under the car reach up and unbolt the bolt holding the filler in place. Make sure its nice and free

Under the car again, remove the 2 plastic trays on either side (theyre the black pieces infront of the rear wheels)

The tank is held on with 3x 13mm bolts and 6 plastic clips on 2 metal bands, remove these and lower the tank
Disconnect the breather on the top of the tank and the hose on the side of the tank, then withdraw the tank (1.2 16v. May differ on other models)


Working under the car again, disconnect the brake pipes and plug them up. I made up a set of pipes just for this job


Now the axle is held on with 4 bolts (either 19mm or 17mm depending on the year). The front bolts are shorter than the rear bolts. Lower on jacks carefully

Whip the axle out

And do it up on the ground. With mine i painted it up, sorted the springs, put new hoses and pipes. The conversion is the same as the previous page


Fitting is the exact reverse of removal. If the car is crusty underneath, dont be afraid to paint it with hammerite

Bit of time needed for this but all in all not too time consuming (I did that in a day)
Conclusion
I hope that helps out people who are looking at brake upgrades. If I've missed anything or you want to add something, please do so in the comments