

Changing the clutch hydraulic slave cylinder Panda 319, but applies to 169 as well though the ECU mountings are different
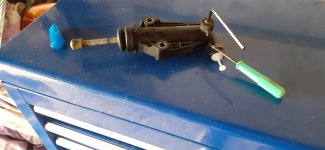
Tools
 Panda clutch hydraulics require maintenance. Stupidly Fiat don’t include any in the service schedule so the slave cylinder creaks and squeaks in use. This is loud and sounds to be inside the car, but is a failing slave cylinder.
The noises are accompanied by the clutch not operating smoothly meaning the car is jerky when taking off even though the whole system appears to be OK.
The squeaks can be temporarily quietened by spraying silicon lubricant into the the cylinder after slipping the dust cover, but access is awkward and really needs the battery to be out to do so. I kept ours going for 2 years doing this. It’s been fine for a while, but the clutch action is no longer smooth, but sticky. New slave cylinders are under £30 so immediate replacement when they squeak is economic and engineering common sense.
Sequence to remove.
Disconnect battery quick release on the black negative terminal
Remove the positive terminal cover. Lift vertically is held by a single push in peg. Using 10mm socket undo the nut on the live battery terminal and lift it clear.
Undo the battery retaining strap tensioning nut. I use a Locktite copper lube stick to add a little gel into the socket. This holds the nut in the socket once undone, so it can be lifted clear. Reduces the risk of dropping the nut. Lift the strap and remove the battery.
Remove the plastic battery drip tray and drain pipe. This is quite a tight fit but can be lifted out by hand. (No fixings). Look at how it fits on the rear right side and note the hole which the drain pipe sits in for refitting.
Now the hardest part. That is getting the wires unclipped from the battery tray and getting that out of the way too.

Photo shows fixings after the drip tray has been lifted out. The drip tray has no fixings to undo.
Remove the battery support tray. This is simply 3 x 13mm fixings two bolts and a lower nut see photo showing socket on the bottom nut.
The hardest bit is unclipping the things that are clipped to the metal tray. First and most importantly to prevent damage undo the ECU earth wire at the body end. See photo. Its held by a firmly done 10mm nut. The ECU stays attached to the battery support tray and comes out with its earth wire attached. Lift out the battery support tray.
DON’T DROP IT.
Clean the body earth point gently with wire brush or wet and dry, and the terminal if required.

Photo shows ECU earth point with connector over it
Remove the front wiring harness (fans wires I think) from the tray. This may be gently levered and twisted side to side to free it. There are three other fixings. I use the trim pry bar inserted between the plastic clips and the back battery box while squeezing the retaining lugs together from the front with fine nosed pliers.
Don’t just rip the cable fixings out or you will ruin them. They will fall out easily if you get this right.
Firmly but gently remove the two ECU wiring plugs. Lift the latches right open and this will ease the plugs put of the sockets. Take care to nurse these.
Don’t bash or bang them the pins are fragile. If you have an electrical contact cleaner spray it would do no harm to clean the pins while they are exposed.
Take care not to bend these pins.
Lastly the bonnet release wire is held underneath the tray by a white plastic clip which must be released from the tray. As you lift it out turn it 90 degrees and to release that clip. Don’t try and detach the cable from the clip or you may well break the clip.
Removing the slave cylinder is easy. The pipe is a push fit. It’s held in place by a spring clip see photo. Lever the clip upward. Push a very small screw driver vertically downwards by the clip and then lever the clip up and remove it.

This photo shows the screwdriver under the clip. But have it vertical and push down to get the clip moving to start with. That’s the Allen key in the bleed screw.
Undo the two 13 mm retaining bolts.
Pull the hydraulic pipe straight out of the cylinder. A small screw driver may assist in levering it out but
BE GENTLE the fitting could easily be damaged. If this occurs a new pipe would be required and this would not be a simple task!
Lift the old slave cylinder clear. Clean the area and all the aprts removed.
Replace the new slave cylinder. The pipe will have an O ring seal. Its not normally necessary to change this. Wipe the seal clean and then lubricate with a drop of brake fluid. Push the pipe firmly but gently straight into the cylinder until the metal end is flush with the cylinder body. As the new cylinder is empty of fluid its not necessary to open the bleed screw. Put the end of the pushrod into the release arm dimple and shove it firmly to close the piston against the spring. This will allow the bolts to be refitted and tightened.
Bleed the hydraulics. The fluid is common with the brakes and there is sufficient reservoir volume to bleed before topping up, Do keep an eye on the level to avoid any possibility of air entering brake lines. I have found that gravity seems to do 90% of the work but an assistant pumping the clutch 2 or three times will complete the process. If you have a non return brake bleed valve. Best to just soak up the fluid by padding the area around it with paper towel.
The bleed screw is fragile. Its screwed into plastic and only needs a gentle nip closed. It is opened with the Allen key. Don’t over tighten firm finger tight is adequate.
Apply lithium white grease along the length of the pushrod .
Try the pedal and observe the operation of the pushrod to check the clutch is working . You should see the pushrod extend when the pedal is depressed, then you know its working properly.
Re assemble the battery support tray. First the white cable clip underneath, twisting it and the tray to locate it again. Use grease to retain the nut in the socket so you don’t drop the nut, (as suggested above). You can add a couple of layers of foil or cling film it. ITS EASY TO DROP AND LOOSE THIS NUT!
Then refit the two bolts and the nut. Do up tightly, The nut needs less torque.
Replace the wire harness / clips in their relevant holes in the tray.
Route the ECU earth wire under the cables at the battery box, and refix it to the bulkhead earth.

This nut needs to be tight but don’t overdo it and damage the thread!! Support the terminal as you do it up and don’t stretch or strain this wire.
Replace the ECU plugs. Ensure the levers are fully opened. Offer the plug squarely to the socket and gently press down as you flip and close the lock lever. The lever pulls the socket into place and will click as it locks Repeat the second plug.

Lever half closed. Open it right towards you to start the refit.
Replace the battery drip tray and drain pipe. The pipe goes down the small dedicated hole, not by the lower fixing tray fixing nut hole. Carefully line up the rear right lip and wiggle it gently until its flat and fitted to the back corner.
In the photo below you see the two fixing bolts and if you look carefully the nut down the big hole which is the third fixing. Drain pipe goes down where you see the bonnet release cable cross the smaller hole in the battery tray
Replace the battery and refit the retaining strap. Don’t over tighten this and stretch or break it.
Refix the positive and negative terminals and do up the securing nut and lock lever on the quick release. Replace the battery terminal cove.
In the cars computer, reset the time and date. Use the buttons on the switch panel to do this. (see handbook)
Road test.
Try the brakes carefully in case of air ingress.
Check for fluid leaks.
Re check the brake master cylinder reservoir level and check the cap is screwed on correctly.
(Never overtighten this or it will be very hard to undo next time).

Tools
- Trim pry tool (In ideal world). Large flat blade screw driver in not available.
- Small flat blade screw driver
- 5mm Allen key
- 1/2” Socket drive with long and short extension bars
- ¼” Socket set 10mm socker and screw driver handle
- Brake bleed kit / non return hose.
- Brake cleaner spray
- Clean rag
- WD40
- Spray lithium Grease
- Small amount of DOT 4 brake fluid
Panda clutch hydraulics require maintenance. Stupidly Fiat don’t include any in the service schedule so the slave cylinder creaks and squeaks in use. This is loud and sounds to be inside the car, but is a failing slave cylinder.The noises are accompanied by the clutch not operating smoothly meaning the car is jerky when taking off even though the whole system appears to be OK.
The squeaks can be temporarily quietened by spraying silicon lubricant into the the cylinder after slipping the dust cover, but access is awkward and really needs the battery to be out to do so. I kept ours going for 2 years doing this. It’s been fine for a while, but the clutch action is no longer smooth, but sticky. New slave cylinders are under £30 so immediate replacement when they squeak is economic and engineering common sense.
Sequence to remove.
Disconnect battery quick release on the black negative terminal
Remove the positive terminal cover. Lift vertically is held by a single push in peg. Using 10mm socket undo the nut on the live battery terminal and lift it clear.
Undo the battery retaining strap tensioning nut. I use a Locktite copper lube stick to add a little gel into the socket. This holds the nut in the socket once undone, so it can be lifted clear. Reduces the risk of dropping the nut. Lift the strap and remove the battery.
Remove the plastic battery drip tray and drain pipe. This is quite a tight fit but can be lifted out by hand. (No fixings). Look at how it fits on the rear right side and note the hole which the drain pipe sits in for refitting.
Now the hardest part. That is getting the wires unclipped from the battery tray and getting that out of the way too.
Photo shows fixings after the drip tray has been lifted out. The drip tray has no fixings to undo.
Remove the battery support tray. This is simply 3 x 13mm fixings two bolts and a lower nut see photo showing socket on the bottom nut.
The hardest bit is unclipping the things that are clipped to the metal tray. First and most importantly to prevent damage undo the ECU earth wire at the body end. See photo. Its held by a firmly done 10mm nut. The ECU stays attached to the battery support tray and comes out with its earth wire attached. Lift out the battery support tray.
DON’T DROP IT.Clean the body earth point gently with wire brush or wet and dry, and the terminal if required.
Photo shows ECU earth point with connector over it
Remove the front wiring harness (fans wires I think) from the tray. This may be gently levered and twisted side to side to free it. There are three other fixings. I use the trim pry bar inserted between the plastic clips and the back battery box while squeezing the retaining lugs together from the front with fine nosed pliers.
Don’t just rip the cable fixings out or you will ruin them. They will fall out easily if you get this right.Firmly but gently remove the two ECU wiring plugs. Lift the latches right open and this will ease the plugs put of the sockets. Take care to nurse these.
Don’t bash or bang them the pins are fragile. If you have an electrical contact cleaner spray it would do no harm to clean the pins while they are exposed.Take care not to bend these pins.Lastly the bonnet release wire is held underneath the tray by a white plastic clip which must be released from the tray. As you lift it out turn it 90 degrees and to release that clip. Don’t try and detach the cable from the clip or you may well break the clip.
Removing the slave cylinder is easy. The pipe is a push fit. It’s held in place by a spring clip see photo. Lever the clip upward. Push a very small screw driver vertically downwards by the clip and then lever the clip up and remove it.
This photo shows the screwdriver under the clip. But have it vertical and push down to get the clip moving to start with. That’s the Allen key in the bleed screw.
Undo the two 13 mm retaining bolts.
Pull the hydraulic pipe straight out of the cylinder. A small screw driver may assist in levering it out but
BE GENTLE the fitting could easily be damaged. If this occurs a new pipe would be required and this would not be a simple task!Lift the old slave cylinder clear. Clean the area and all the aprts removed.
Replace the new slave cylinder. The pipe will have an O ring seal. Its not normally necessary to change this. Wipe the seal clean and then lubricate with a drop of brake fluid. Push the pipe firmly but gently straight into the cylinder until the metal end is flush with the cylinder body. As the new cylinder is empty of fluid its not necessary to open the bleed screw. Put the end of the pushrod into the release arm dimple and shove it firmly to close the piston against the spring. This will allow the bolts to be refitted and tightened.
Bleed the hydraulics. The fluid is common with the brakes and there is sufficient reservoir volume to bleed before topping up, Do keep an eye on the level to avoid any possibility of air entering brake lines. I have found that gravity seems to do 90% of the work but an assistant pumping the clutch 2 or three times will complete the process. If you have a non return brake bleed valve. Best to just soak up the fluid by padding the area around it with paper towel.
The bleed screw is fragile. Its screwed into plastic and only needs a gentle nip closed. It is opened with the Allen key. Don’t over tighten firm finger tight is adequate.Apply lithium white grease along the length of the pushrod .
Try the pedal and observe the operation of the pushrod to check the clutch is working . You should see the pushrod extend when the pedal is depressed, then you know its working properly.
Re assemble the battery support tray. First the white cable clip underneath, twisting it and the tray to locate it again. Use grease to retain the nut in the socket so you don’t drop the nut, (as suggested above). You can add a couple of layers of foil or cling film it. ITS EASY TO DROP AND LOOSE THIS NUT!
Then refit the two bolts and the nut. Do up tightly, The nut needs less torque.
Replace the wire harness / clips in their relevant holes in the tray.
Route the ECU earth wire under the cables at the battery box, and refix it to the bulkhead earth.
This nut needs to be tight but don’t overdo it and damage the thread!! Support the terminal as you do it up and don’t stretch or strain this wire.Replace the ECU plugs. Ensure the levers are fully opened. Offer the plug squarely to the socket and gently press down as you flip and close the lock lever. The lever pulls the socket into place and will click as it locks Repeat the second plug.
Lever half closed. Open it right towards you to start the refit.
Replace the battery drip tray and drain pipe. The pipe goes down the small dedicated hole, not by the lower fixing tray fixing nut hole. Carefully line up the rear right lip and wiggle it gently until its flat and fitted to the back corner.
In the photo below you see the two fixing bolts and if you look carefully the nut down the big hole which is the third fixing. Drain pipe goes down where you see the bonnet release cable cross the smaller hole in the battery tray
Replace the battery and refit the retaining strap. Don’t over tighten this and stretch or break it.
Refix the positive and negative terminals and do up the securing nut and lock lever on the quick release. Replace the battery terminal cove.
In the cars computer, reset the time and date. Use the buttons on the switch panel to do this. (see handbook)
Road test.
Try the brakes carefully in case of air ingress.Check for fluid leaks.
Re check the brake master cylinder reservoir level and check the cap is screwed on correctly.
(Never overtighten this or it will be very hard to undo next time).
