

Hello to all.
This last few months I’ve had some issues with my clutch pedal hitting the floor. Just for reference, the clutch pressure plate, friction plate and release bearing including fork and bushes were replaced a few years ago after a snapping cable and then a stuck release bearing. Gearbox oil was also fresh at the time (Tutela). This last month or two since Christmas, my pedal has hit the floor twice! On the first occasion, the joint on the long rod between the clutch cable quadrant and pedal mechanism snapped, on the second occasion, the smaller rod suffered the very same fate just a month later.
Turns out, the linkage had got stiff and the ball joints had got gummed up with crud and weren’t moving as free as they should. Consequently one weak link leads to another.
After contacting the highly recommended Ricambio up north, I managed to source the long rod that goes across the inner bulkhead, however the smaller push rod was no longer available from them or Fiat. Great. The long and short of it much? They both cost over £100 if available, but this should save you £75 in parts on the shorter linkage.
So this guide is going to tell you how to fit the bulkhead rod if you have the unfortunate task of having to replace it and more specifically, how to fabricate a new linkage to replace the smaller exhausted linkage from Fiat.
Bulkhead Clutch Rod Replacement:
Step 1 - if it hasn’t already snapped off, unbolt the 13mm nut from the end of the linkage behind the pedal.

Step 2 - Remove the passenger side trim panel near the passenger footwell, then fold the carpet back until you see an opening under the dash (most people will know this if they’ve replaced the clutch cable). You may need to move the power steering module aside for better access.

Step 3 - Un pop the cable quadrant, if it hasn’t popped off already, from the metal bracket attached to the bulkhead and then withdraw the quadrant, complete with the rod, from the driver’s side footwell. It will need to be removed if you are replacing the long rod as the rod is attached to the quadrant so that the split pin is facing the bulkhead.
There is a triangularish hole/gap in the bracket assembly (behind the brake booster). You will have to manipulate the rod first, then the pedals (the rod has a slight bend in it near the quadrant end) and it will eventually slide out in front of the pedals. This is extremely tedious but it will come out with some twisting. Be careful not to snag the pivot point of the cable quadrant on the bracket.

Step 4 - With the cable, quadrant and rod off of the car as one and on the bench or kitchen side etc, remove the old 2mm split pin from the rod and replace with new when refitting. Regrease the quadrant and pivot point, then put some plasters on your knuckles. This picture shows the bend in the rod that should assist with removal/refitting.

Step 5 - When refitting, slide the quadrant through the bracket from the drivers side to passenger side while slowly manipulating the rod back through the hole. Again, very tedious when you’re upside down, but it can be done, then pop the quadrant pivot point back on the bracket.
Step 6 - Manipulate the rod and the clutch pedal so that the ball joint end of the rod engages with the mechanism behind the clutch pedal and push through.
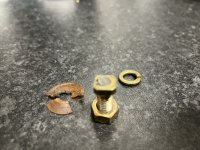
Step 7 - Tighten the 13mm nut with crush washer while manipulating the pedal so that you can get some torque on the nut.
Smaller Clutch Pedal Linkage:
Step 1 - Unbolt the rear (for me the broken part of the linkage) on the pivot behind the pedal. I had to squeeze an impact wrench into the footwell and remove the 13mm nut as it was just moving the mechanism with the rod attached.

Step 2 - Unbolt the linkage from the back of the pedal. A standard spanner did the job for me just be careful to catch the crush washer and the nut on removal. You’ll need to use your fingers to loosen the last of the nut.
Step 3 - Withdraw the linkage from the rear of the clutch pedal, with a wee bit of manipulation.

Step 4 - Step 4 is actually measuring the linkage, which I’ve done for you. The old linkage is 90mm in total but is 75mm from ball joint stud to stud, which is most important. I ordered some M8 motorcycle gear linkage for this and had to cut it down to size with a hacksaw. A good tip when cutting threaded bar is to use two nuts locked together where you want to cut and then saw away, keeping the blade up against the nut to keep your cut clean.
Step 5 - Assemble your ball joints onto the newly cut down bar and tighten down. Each joint should be at a right angle to each other just as the old linkage was. I had to reuse the crush washer and nut from the old linkage.

Step 6 - Refitting - Fit one end of the new linkage into the pedal and manipulate it so that the other end can fit top down into the pivot behind. Once in you will still need to keep moving the pedal slightly while you attempt to thread the washer and nut onto the balljoint through the pedal assembly. This, as before, is very tedious but there is a nook on the right hand side of the pedal that you can roll or slide the nut up. This is obviously easier with smaller hands.

Step 7 - If everything is in place and the nuts are on the linkage finger tight, use some pressure on the pedal to make sure you can tighten the nuts up to torque.

Step 8 - Work the pedal a few times with your foot. Providing your clutch is in good health, your pedal should be feather-lite. To me, after all of this, my clutch pedal has never felt better.
I hope this saves people some time, money and stress. This is my first guide made but not the first one read so I hope I can save someone else a headache like some of these guides have saved me.
All the best, Gav.
This last few months I’ve had some issues with my clutch pedal hitting the floor. Just for reference, the clutch pressure plate, friction plate and release bearing including fork and bushes were replaced a few years ago after a snapping cable and then a stuck release bearing. Gearbox oil was also fresh at the time (Tutela). This last month or two since Christmas, my pedal has hit the floor twice! On the first occasion, the joint on the long rod between the clutch cable quadrant and pedal mechanism snapped, on the second occasion, the smaller rod suffered the very same fate just a month later.
Turns out, the linkage had got stiff and the ball joints had got gummed up with crud and weren’t moving as free as they should. Consequently one weak link leads to another.
After contacting the highly recommended Ricambio up north, I managed to source the long rod that goes across the inner bulkhead, however the smaller push rod was no longer available from them or Fiat. Great. The long and short of it much? They both cost over £100 if available, but this should save you £75 in parts on the shorter linkage.
So this guide is going to tell you how to fit the bulkhead rod if you have the unfortunate task of having to replace it and more specifically, how to fabricate a new linkage to replace the smaller exhausted linkage from Fiat.
Bulkhead Clutch Rod Replacement:
Step 1 - if it hasn’t already snapped off, unbolt the 13mm nut from the end of the linkage behind the pedal.
Step 2 - Remove the passenger side trim panel near the passenger footwell, then fold the carpet back until you see an opening under the dash (most people will know this if they’ve replaced the clutch cable). You may need to move the power steering module aside for better access.
Step 3 - Un pop the cable quadrant, if it hasn’t popped off already, from the metal bracket attached to the bulkhead and then withdraw the quadrant, complete with the rod, from the driver’s side footwell. It will need to be removed if you are replacing the long rod as the rod is attached to the quadrant so that the split pin is facing the bulkhead.
There is a triangularish hole/gap in the bracket assembly (behind the brake booster). You will have to manipulate the rod first, then the pedals (the rod has a slight bend in it near the quadrant end) and it will eventually slide out in front of the pedals. This is extremely tedious but it will come out with some twisting. Be careful not to snag the pivot point of the cable quadrant on the bracket.
Step 4 - With the cable, quadrant and rod off of the car as one and on the bench or kitchen side etc, remove the old 2mm split pin from the rod and replace with new when refitting. Regrease the quadrant and pivot point, then put some plasters on your knuckles. This picture shows the bend in the rod that should assist with removal/refitting.
Step 5 - When refitting, slide the quadrant through the bracket from the drivers side to passenger side while slowly manipulating the rod back through the hole. Again, very tedious when you’re upside down, but it can be done, then pop the quadrant pivot point back on the bracket.
Step 6 - Manipulate the rod and the clutch pedal so that the ball joint end of the rod engages with the mechanism behind the clutch pedal and push through.
Step 7 - Tighten the 13mm nut with crush washer while manipulating the pedal so that you can get some torque on the nut.
Smaller Clutch Pedal Linkage:
Step 1 - Unbolt the rear (for me the broken part of the linkage) on the pivot behind the pedal. I had to squeeze an impact wrench into the footwell and remove the 13mm nut as it was just moving the mechanism with the rod attached.
Step 2 - Unbolt the linkage from the back of the pedal. A standard spanner did the job for me just be careful to catch the crush washer and the nut on removal. You’ll need to use your fingers to loosen the last of the nut.
Step 3 - Withdraw the linkage from the rear of the clutch pedal, with a wee bit of manipulation.
Step 4 - Step 4 is actually measuring the linkage, which I’ve done for you. The old linkage is 90mm in total but is 75mm from ball joint stud to stud, which is most important. I ordered some M8 motorcycle gear linkage for this and had to cut it down to size with a hacksaw. A good tip when cutting threaded bar is to use two nuts locked together where you want to cut and then saw away, keeping the blade up against the nut to keep your cut clean.
Step 5 - Assemble your ball joints onto the newly cut down bar and tighten down. Each joint should be at a right angle to each other just as the old linkage was. I had to reuse the crush washer and nut from the old linkage.
Step 6 - Refitting - Fit one end of the new linkage into the pedal and manipulate it so that the other end can fit top down into the pivot behind. Once in you will still need to keep moving the pedal slightly while you attempt to thread the washer and nut onto the balljoint through the pedal assembly. This, as before, is very tedious but there is a nook on the right hand side of the pedal that you can roll or slide the nut up. This is obviously easier with smaller hands.
Step 7 - If everything is in place and the nuts are on the linkage finger tight, use some pressure on the pedal to make sure you can tighten the nuts up to torque.
Step 8 - Work the pedal a few times with your foot. Providing your clutch is in good health, your pedal should be feather-lite. To me, after all of this, my clutch pedal has never felt better.
I hope this saves people some time, money and stress. This is my first guide made but not the first one read so I hope I can save someone else a headache like some of these guides have saved me.
All the best, Gav.
