Technical Rear Brakes and Wheel Bearings

Currently reading:
Technical Rear Brakes and Wheel Bearings

Joined
Oct 26, 2024
Messages
19
Points
55
Location
Winchester
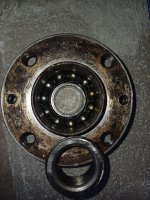
I am struggling with the rear brakes of my 60000 mile 2014 Panda 1.2 and decided to remove the rear hubs to make removal/installationof the shoes etc easier. However as the hub slid easily off the stub axle, the outer part of the wheel bearing fell out and cannot be reinstalled. When I removed the hub on the other side, the same would have happened had I not held it in place as the hub was withdrawn.
I take it this isn't normal! I haven't seen this happen on YouTube or any mention that the bearing has to be held in place as the hub is withdrawn. Others may wish to bear the possibility in mind before removing the hubs. Two new hubs and bearings ordered from S4P - should be here by Friday!
 
Model
Panda Easy 1.2
Year
2014
Mileage
60000
Last edited:
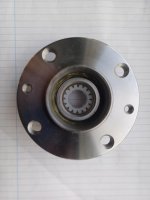
See attached photograph of hub/bearing which came apart as it was withdrawn from stub axle. New hubs/bearings made by SKF arrived from S4P. They have a plastic insert which is tightly fitted inside the bearing which presumably is there to prevent outer part of the bearing falling out in transit - see attached photo. It is vital that this is pushed out from the front to the back of the hub - if pushed from the back to the front the insert may well take the outer part of the bearing with it, rendering the new hub/bearing useless. When installing the new hub, be careful to hold the outer part of the bearing in postion with your thumbs to ensure that it isn't dislodged as it slides onto the stub axle.
If at the outset you hold the outer part of the bearing in position as you remove and reinstall the hub and are careful how you handle it when off the car, the chances are you won't need a new one.
 

Attachments

  • 20250119_144739.jpg
    20250119_144739.jpg
    770.4 KB · Views: 42
  • 20250120_105601.jpg
    20250120_105601.jpg
    156.9 KB · Views: 38
See attached photograph of hub/bearing which came apart as it was withdrawn from stub axle. New hubs/bearings made by SKF arrived from S4P. They have a plastic insert which is tightly fitted inside the bearing which presumably is there to prevent outer part of the bearing falling out in transit - see attached photo. It is vital that this is pushed out from the front to the back of the hub - if pushed from the back to the front the insert may well take the outer part of the bearing with it, rendering the new hub/bearing useless. When installing the new hub, be careful to hold the outer part of the bearing in postion with your thumbs to ensure that it isn't dislodged as it slides onto the stub axle.
If at the outset you hold the outer part of the bearing in position as you remove and reinstall the hub and are careful how you handle it when off the car, the chances are you won't need a new one.
All it is, is a two part bearing, a single outer containing both ball races and two inner races, generally if it happens and you grease the bearings and move the inner race around a little to locate, then a smart tap with a socket and copper mallet will reassemble into place, give it a little spin to check and usually no further problem.
Basically you are putting no more force on it , than it took to fall apart in the first place.;)
Yes. Sometimes bearings like this just fall back together and sometimes they seem to not want to. Assemble the balls back into the outer race using some grease to hold them in place. Then fit the inner race and wiggle and rock it slightly as you push it in. often it will reengage with almost no force needed but also sometimes, as Mike says above, a gentle tap is needed just to get it over the "lip". I've never damaged one by doing this. The balls seem to need to be in exactly the right place in the track for this to work, not too far in and not too far out. Get it just right and it may just pop back into place with finger pressure only. If it doesn't want to "go" then don't just hit it harder but rather wiggle it some more to realign the position of the balls.

I know this sounds like me being a "clever dick" but I was taught to grip the hub with my fingers and push both thumbs against the inner race of the bearing as you withdraw it from the stub axle. This keeps the inner race in place. I do the same with taper races, mostly because it stops the inner race and rollers falling out onto the dirty shop floor which will then require a thorough clean up before regreasing and putting back in place.
 
Last edited:
Yes. Sometimes bearings like this just fall back together and sometimes they seem to not want to. Assemble the balls back into the outer race using some grease to hold them in place. Then fit the inner race and wiggle and rock it slightly as you push it in. often it will reengage with almost no force needed but also sometimes, as Mike says above, a gentle tap is needed just to get it over the "lip". I've never damaged one by doing this. The balls seem to need to be in exactly the right place in the track for this to work, not too far in and not too far out. Get it just right and it may just pop back into place with finger pressure only. If it doesn't want to "go" then don't just hit it harder but rather wiggle it some more to realign the position of the balls.

I know this sounds like me being a "clever dick" but I was taught to grip the hub with my fingers and push both thumbs against the inner race of the bearing as you withdraw it from the stub axle. This keeps the inner race in place. I do the same with taper races, mostly because it stops the inner race and rollers falling out onto the dirty shop floor which will then require a thorough clean up before regreasing and putting back in place.
Was it BLMC 1100/1300s that used to leave the race behind, but the trick was to put a benelli exhaust clamp around the groove and then you could use a couple of levers to prise it off the shaft as a tight fit.
 
Was it BLMC 1100/1300s that used to leave the race behind, but the trick was to put a benelli exhaust clamp around the groove and then you could use a couple of levers to prise it off the shaft as a tight fit.
Can't remember Mike, but it wasn't unusual, on various different makes of vehicle, for the inner race of the inner bearing to get stuck on the stub axle which also left the seal behind when you drew the hub off Usually they weren't gripping very tight so could be levered off with a couple of long screwdrivers but sometimes a new seal would be needed. The ones that I always had most difficulty with was when the outer bearing would get left behind on the hub of a front wheel drive - like mini/1100/ etc. I wasted many hours on these until I was shown how to simply grind a slot in the race (to form a stress concentration point) and then crack it by hitting with a hammer and blunt chisel. Once cracked it would loose it's hold and simply drop off.

But I'll not be needing to tell you any of this eh? I do remember my first encounter with an "all in one" front wheel bearing rather than the mini type setup which used two bearing pressed in from either side. It was on a Maxi and, a young and inexperienced me spent quite a while trying to knock it out with a hammer and drift. Silly boy, not a chance! After watching me with some amusement, the foreman told me to take it down the street to the small engineering company which had works there and they pressed the old one out and the new one back in - Simples!
 
l I was shown how to simply grind a slot in the race (to form a stress concentration point) and then crack it by hitting with a hammer and blunt chisel. Once cracked it would loose it's hold and simply drop off.

But I'll not be needing to tell you any of this eh? I do remember my first encounter with an "all in one" front wheel bearing rather than the mini type setup which used two bearing pressed in from either side. It was on a Maxi and, a young and inexperienced me spent quite a while trying to knock it out with a hammer and drift. Silly boy, not a chance! After watching me with some amusement, the foreman told me to take it down the street to the small engineering company which had works there and they pressed the old one out and the new one back in - Simples!
Used to do that trick with Ford rear half shafts and Ladas too, then heat up the shrink ring collar to drop down in place to secure the new bearing.
I still have my hydraulic press to make life easier, but in the past on site I have fitted that type using a a 3/.4 drive socket and a large copper mallet with axle unit balanced on a couple of axle stands. Needs must when the devil drives eh!:)
 
Was it BLMC 1100/1300s that used to leave the race behind, but the trick was to put a benelli exhaust clamp around the groove and then you could use a couple of levers to prise it off the shaft as a tight fit.
I'm thinking back a long way now, but wasn't the 1100/1300 the first BL car to use a rear wheel bearing assembly without a spacer to control bearing loading? Up till then the front wheel drive stuff always had a spacer between the bearings on rear wheels so the two inner races couldn't be forced together too tightly. The retaining hut was supposed to be torque tightened but, in the interests of speed, which made a difference to bonus (money) it was very common practice to just do the nut up "nice 'n tight" and fit the split pin. When you were doing it every day you got the feel for how tight to do them. Then the 1100 came along with taper races and no spacer in the middle. They were adjusted as you would the front wheel bearings on something like the Cortina where you tightened the retaining nut until play just, and only just disappeared - so no preload on the bearings - and then fitted the "vernier" type slotted retainer over the nut with split pin. Another way to check the loading on the bearings was to see if you could easily move the big washer with a screwdriver blade after tightening the nut. If the washer was difficult to move the nut was too tight.

However, back to the 1100 bearing "problem". With the mini and others, which used a spacer between the inner races, it was not unusual to check that the nut was "nice 'n tight" simply by trying it with a power bar and socket. If at all loose it was just simply tightened up with the power bar. The spacer ensuring the preload on the bearings couldn't be excessive. The 1100, of course had no spacer so if you did this you would apply extreme loading forces on the bearing races. We were all aware of this being an appointed BMC/BL dealership (that was the wee country garage I worked in at the time) so it was never a problem However I remember very well, the boss coming out to speak to us one tea break while we were huddled round the Volcano fire trying to get warm. He told us he'd just received a bulletin from BL to the effect that all staff was to be alerted to the possibility of severe damage being caused to these bearings if over tightened. Apparently a small general garage - so not an appointed agency - somewhere in the midlands had been working on an 1100 and had over tightened one of these bearings. The owner had then collected the car and gone straight onto the motorway with it. After a number of miles the bearings failed - maybe got so hot they welded together? and the stub axle snapped off which, of course meant the wheel came off and brakes failed (no dual circuit brakes back then). The car ran, at speed, into a concrete bridge and the occupants were killed. I remember very clearly the feeling of shock, as a young man just starting out in the trade, standing in this rather dark and dingy workshop with the Volcano roaring away next to us and the boss solomnly telling us this story. I think, up until that moment, working on cars had just been "good fun" in my mind. This made me realize what a responsibility it is working on customer's, or anyone's vehicle and I grew up a lot that day.
 
Used to do that trick with Ford rear half shafts and Ladas too, then heat up the shrink ring collar to drop down in place to secure the new bearing.
I still have my hydraulic press to make life easier, but in the past on site I have fitted that type using a a 3/.4 drive socket and a large copper mallet with axle unit balanced on a couple of axle stands. Needs must when the devil drives eh!:)
I have a length of thick wall tube slightly longer than a half shaft and very slightly larger in bore diameter than the half shaft (made actually for Cortina shafts but works on many) with one end turned off in a lathe so it's square to the length of pipe. In use the bearing would be placed on the half shaft and the shaft, with bearing just resting against the part of the shaft it needs pressed onto slipped into the pipe. I had a big old lump of steel plate which I put on the floor and then I would lift the shaft, complete with bearing, inside the tube up to about shoulder height and let it drop vertically onto the steel plate. The plate, of course, stopped the pipe dead. The bearing's inner race was resting against the end of the pipe and the weight of the shaft would force the bearing onto the shaft. Usually took about half a dozen "dunts" any less than say three and the fit wasn't good enough. I liked to put a bit of bearing lock fluid on them too. Then the collar was fitted the same way but I always liked to heat that up before fitting because I reasoned that fitting without heating - which, of course expands the collar, might wear the inside surface of the collar and reduce it's grip on the shaft.

I actually made this tool so I could do half shaft bearings at home but soon found it was so quick to use - compared to using the garage press - that I took it into the workshop and used it there too. I found I could do half a dozen or so before the end of the pipe needed to be cleaned up. The pipe was just mild steel so was deformed by the bearing and locking collar. I also found that it could be adequately cleaned up with careful use of a file, sticking it in my friend's lathe was not necessary as it didn't need to be super accurately at right angles. A file used with an engineer's square did just fine.
 
I'm thinking back a long way now, but wasn't the 1100/1300 the first BL car to use a rear wheel bearing assembly without a spacer to control bearing loading? Up till then the front wheel drive stuff always had a spacer between the bearings on rear wheels so the two inner races couldn't be forced together too tightly. The retaining hut was supposed to be torque tightened but, in the interests of speed, which made a difference to bonus (money) it was very common practice to just do the nut up "nice 'n tight" and fit the split pin. When you were doing it every day you got the feel for how tight to do them. Then the 1100 came along with taper races and no spacer in the middle. They were adjusted as you would the front wheel bearings on something like the Cortina where you tightened the retaining nut until play just, and only just disappeared - so no preload on the bearings - and then fitted the "vernier" type slotted retainer over the nut with split pin. Another way to check the loading on the bearings was to see if you could easily move the big washer with a screwdriver blade after tightening the nut. If the washer was difficult to move the nut was too tight.

However, back to the 1100 bearing "problem". With the mini and others, which used a spacer between the inner races, it was not unusual to check that the nut was "nice 'n tight" simply by trying it with a power bar and socket. If at all loose it was just simply tightened up with the power bar. The spacer ensuring the preload on the bearings couldn't be excessive. The 1100, of course had no spacer so if you did this you would apply extreme loading forces on the bearing races. We were all aware of this being an appointed BMC/BL dealership (that was the wee country garage I worked in at the time) so it was never a problem However I remember very well, the boss coming out to speak to us one tea break while we were huddled round the Volcano fire trying to get warm. He told us he'd just received a bulletin from BL to the effect that all staff was to be alerted to the possibility of severe damage being caused to these bearings if over tightened. Apparently a small general garage - so not an appointed agency - somewhere in the midlands had been working on an 1100 and had over tightened one of these bearings. The owner had then collected the car and gone straight onto the motorway with it. After a number of miles the bearings failed - maybe got so hot they welded together? and the stub axle snapped off which, of course meant the wheel came off and brakes failed (no dual circuit brakes back then). The car ran, at speed, into a concrete bridge and the occupants were killed. I remember very clearly the feeling of shock, as a young man just starting out in the trade, standing in this rather dark and dingy workshop with the Volcano roaring away next to us and the boss solomnly telling us this story. I think, up until that moment, working on cars had just been "good fun" in my mind. This made me realize what a responsibility it is working on customer's, or anyone's vehicle and I grew up a lot that day.
As you say a lot of responsibility working on cars.
It is what always annoyed me the way some people would talk down to you as you were in dirty overalls forgetting that the dirt came from their vehicles and that our skill was all that kept them alive in some cases!
"Volcano roaring away". You had a heater in your workshop? Us soft Southerners had the doors wide open and a waste oil burner that if you put a pasty on it at 8:30 it may be warm enough to eat at 11am.:):):)
I'm afraid that "ever was it thus". Folk who get very dirty at their work have always been looked down on by the majority, not all though, of besuited clerical types. OOPS, now just watch the offended posts roll in!

The workshop at that garage was very old and draughty. It consisted of many rather corridor type work areas because of the many pillars which held the roof up. Workshop doors was never closed except after finish time because they really did nothing to stop the cold air blowing through. Our rest area was in a wee dead end bit of the shop where we had an old sofa and several car seats all arranged around the volcano. The volcano was a waste oil burner which used the waste engine oil and dirty paraffin from the parts washer. It had a large round base about twice the diameter of one of the old metal dustbins but was only a couple of feet tall. on top of this was a lid with a smaller hole of maybe a foot? in diameter into which fitted the "volcano" flue. This flue looked a bit like the funnel on an old type American train. Narrower at the base where it fitted into the oil reservoir and tapering out until, right at the top, which was a little above eye level when standing, it reduced again. all up the sides of the flue were air vents which encouraged it to draw in extra air when hot.

At the start of the day, with the funnel removed, the base would be filled to about half way with waste oil and paraffin - and whatever else had been serreptitiously tipped into the waste oil, like brake fluid etc. Then a lit rag would be dropped in through the hole and the funnel placed back on top. For a while there wouldn't be much to see, maybe just a flicker of flame from the rag glimpsed through the flutes on the funnel. Then, as it started to heat up, a noxious white smoke would come out of the funnel as the waste oil etc started to vapourise. As it continued to heat the vapour in the funnel stack would ignite and the whole thing really "took off" The stack would glow red hot and it made a noise like a ram jet (think V1 flying bomb rocket motor but a good bit quieter). There's no way it would have been allowed now a days! It produced a ferocious amount of very localized heat - our wee corner was really nice and cosy, but it's effects were not felt at all in the greater workshop area. Near it though? well! For example, on one occasion the apprentice, who did a lot of the degreasing and engine cleaning using a compressed air paraffin gun - so the vapour got engrained into his overalls - was standing with his back close to the stack to get a warm up before going back into the cold workshop. I remember seeing the steam, or what I took to be steam, rising from his overalls but thought nothing of it as I thought it was just because his overalls were wet. Suddenly the foreman jumped up, shouting at the poor chap to get away from the fire and roughly grabbed him and pulled him away. One of the older men shouted at him to leave the lad alone, thinking, I suppose, that he was just being rough with him for fun. However the foreman then explained that what we were seeing was not steam but paraffin vapour and it might have ignited at any moment turning the poor apprentice into a human torch in the process. Amazingly nothing was done about getting rid of the volcano and we were just advised to keep a good eye on each other when near it and no horse play near it either. Health and safety would have had a field day! Must say though, on a cold snowy winters day, or when you'd been out on a breakdown, that volcano was your best friend. I've only ever seen one other like it and that was in a scrappy's bothy - it was only about half the size of ours though.
 
Taking the hubs off not normal or required, for exactly this reason.
There are YouTube videos on line (for Fiat 500s rather than the Panda) which encourage removal of the hub to make installation of the shoes etc easier. However, they show removal as a simple unbolt, slide off, reassemble in reverse order operation (which appears to be the case on film) without any reference to the care needed to keep the wheel bearing in place.
Replacing the shoes without removing the hub is awkward (particularly getting the auto adjuster correctly in place) and it is undoubtedly easier if the hub is removed. The autoadjusters also seem to be quite fragile - better access may well reduce the chances of damage.
That said, I'm sure that many would not see the need to remove the hubs. Those, like me, who are struggling a bit (I last changed rear shoes on a 10 yr old Midget in 1978 - but am now looking after two 10 yr old Fiats for teenage daughters!) might, particularly if they have seen it done online, choose to remove them.
The purpose of the post was to draw attention what has to be done to avoid the "head in hands" moment I experienced!
 
I'm afraid that "ever was it thus". Folk who get very dirty at their work have always been looked down on by the majority, not all though, of besuited clerical types. OOPS, now just watch the offended posts roll in!

The workshop at that garage was very old and draughty. It consisted of many rather corridor type work areas because of the many pillars which held the roof up. Workshop doors was never closed except after finish time because they really did nothing to stop the cold air blowing through. Our rest area was in a wee dead end bit of the shop where we had an old sofa and several car seats all arranged around the volcano. The volcano was a waste oil burner which used the waste engine oil and dirty paraffin from the parts washer. It had a large round base about twice the diameter of one of the old metal dustbins but was only a couple of feet tall. on top of this was a lid with a smaller hole of maybe a foot? in diameter into which fitted the "volcano" flue. This flue looked a bit like the funnel on an old type American train. Narrower at the base where it fitted into the oil reservoir and tapering out until, right at the top, which was a little above eye level when standing, it reduced again. all up the sides of the flue were air vents which encouraged it to draw in extra air when hot.

At the start of the day, with the funnel removed, the base would be filled to about half way with waste oil and paraffin - and whatever else had been serreptitiously tipped into the waste oil, like brake fluid etc. Then a lit rag would be dropped in through the hole and the funnel placed back on top. For a while there wouldn't be much to see, maybe just a flicker of flame from the rag glimpsed through the flutes on the funnel. Then, as it started to heat up, a noxious white smoke would come out of the funnel as the waste oil etc started to vapourise. As it continued to heat the vapour in the funnel stack would ignite and the whole thing really "took off" The stack would glow red hot and it made a noise like a ram jet (think V1 flying bomb rocket motor but a good bit quieter). There's no way it would have been allowed now a days! It produced a ferocious amount of very localized heat - our wee corner was really nice and cosy, but it's effects were not felt at all in the greater workshop area. Near it though? well! For example, on one occasion the apprentice, who did a lot of the degreasing and engine cleaning using a compressed air paraffin gun - so the vapour got engrained into his overalls - was standing with his back close to the stack to get a warm up before going back into the cold workshop. I remember seeing the steam, or what I took to be steam, rising from his overalls but thought nothing of it as I thought it was just because his overalls were wet. Suddenly the foreman jumped up, shouting at the poor chap to get away from the fire and roughly grabbed him and pulled him away. One of the older men shouted at him to leave the lad alone, thinking, I suppose, that he was just being rough with him for fun. However the foreman then explained that what we were seeing was not steam but paraffin vapour and it might have ignited at any moment turning the poor apprentice into a human torch in the process. Amazingly nothing was done about getting rid of the volcano and we were just advised to keep a good eye on each other when near it and no horse play near it either. Health and safety would have had a field day! Must say though, on a cold snowy winters day, or when you'd been out on a breakdown, that volcano was your best friend. I've only ever seen one other like it and that was in a scrappy's bothy - it was only about half the size of ours though.
Good job your foreman was a responsible type.
At least your heater got hot, the only time ours did was if we nicked some paraffin from the tank for selling to customers, if the boss saw that he would moan like hell, until I pointed out he spent most of the day sat in the warm office with the secretary whilst we froze!:(
Aye Mike, our foreman was a nice chap who by and large had our interests at heart - except when it came to our yearly confrontation with the boss over whether we would get a wage rise or not. When it came to that subject he was very firmly on the boss's side and never helped to argue our case.
 
There are YouTube videos on line (for Fiat 500s rather than the Panda) which encourage removal of the hub to make installation of the shoes etc easier. However, they show removal as a simple unbolt, slide off, reassemble in reverse order operation (which appears to be the case on film) without any reference to the care needed to keep the wheel bearing in place.
Replacing the shoes without removing the hub is awkward (particularly getting the auto adjuster correctly in place) and it is undoubtedly easier if the hub is removed. The autoadjusters also seem to be quite fragile - better access may well reduce the chances of damage.
That said, I'm sure that many would not see the need to remove the hubs. Those, like me, who are struggling a bit (I last changed rear shoes on a 10 yr old Midget in 1978 - but am now looking after two 10 yr old Fiats for teenage daughters!) might, particularly if they have seen it done online, choose to remove them.
The purpose of the post was to draw attention what has to be done to avoid the "head in hands" moment I experienced!
For me, one of the greatest values in this forum are threads like this one. The more experienced among us will be familiar with taking a hub off to facilitate a job like this and, because we've done it many times, taking action to protect the bearing or knowing that the inner bearing may stay on the stub axle and the problems that may involve are just what's expected and, because you've dealt with it so many times, it's not often a problem. When you've never done something like this before and it goes "wrong" - as it did here - it can seem like the "end of the world". However posts like this with the original poster highlighting what happened and then other forum members chipping in with their experiences of dealing with it all helps less experienced forum members to tackle these jobs
 
Back
Top