Sad to say even the cheap ones sound expensive to me
")
As you have freed off all the adjuster side , it should be easy for the operator to adjust and if you mark the original position both sides you can easily see if only one side altered and by how much, so if you get to read it on his equipment, you should have sort of idea what he has actually done.
Hopefully most operators are very good and we only hear about the bad ones.
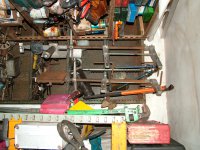
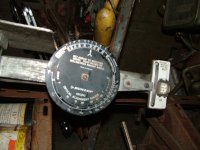
Here is a photo of my Dunlop gauge in a sorry state in my garage. The main advantage I found was it was easy to Zero so you knew it was accurate when checking each vehicle.
Yes Mike, ease of calibration, that was one of the great features of the Dunlop gauge. For those not in the know, any measuring equipment like this is only going to produce an accurate outcome if it's accurate. In the case of the Dunlop gauge you would put the ends of the measuring probes on one side of the guages against the ends of the probes on the other against and set the scale up to read zero. You were meant to do that every time you used it and doing so ensured the machine's readings were accurate. Modern versions have to be calibrated by a technician with specialist equipment so costs the workshop money. I wonder how many actually get calibrated as often as recommended?
D'you know? With all this talk of "tracking" (which really means checking toe in most instances - a full alignment check is another thing altogether!) it occurs to me that there's a very simple check anyone can do which will catch problems before they develop into something serious and save money on unnecessary and/or premature tyre replacement. This is quite simply to make a visual inspection your tyres on a regular basis. At it's simplest this will take only a few minutes and you won't even get your hands dirty.
So what should you do? Well, let's say we want to check the Near Side Front. Start by turning the steering full lock to the left. This will make it very easy to see the full width of the passenger side front wheel tyre tread. Ideally the tyre should be evenly worn over it's entire width. However we don't live in a perfect world so here's some of the things you may see:
The inside shoulder of the tyre more worn then the rest of the tread width. This is a very common wear pattern and in extreme cases can wear through to the casing itself even though the rest of the tyre may not even be half worn yet! It may well be due to there being too much static toe out due to either worn suspension parts or, simply, that someone has set it up wrong in the past. More subtle though, and more difficult to diagnose - so often missed - is when the inner rubber bushings on the suspension arm are worn. This may not be easy to see as they may be only slightly cracked but be suffering from a break down in the structure of the rubber itself. This lets the arm pull outwards under braking which introduces excess toe out so wearing the inner tread shoulder. When the vehicle is just standing the arm will return to more or less it's normal running position so it's difficult one to pick up on. One way to check is to have someone drive the car past you (somewhere like an empty supermarket car park works for me) and and get them to "dab" the brake pedal quite hard as they go past. You may see the wheel move back in the wheel arch if the bushes are worn (but check manually too as it may be something else too). Because all cars use rubber bushings these days for noise insulation it's usual to see a wheel move back slightly in relation to the wheel arch, but this will only be by a very small amount if ok.
Wear on the outside shoulder is nearly always too much toe in - Unless you're a completely mad driver who corners on the door handles all the time! but it just might be too much camber which is not going to be sorted out with a visit to the tyre store.
Tread lipping. When the tredas of the tyres are "scrubbed" one way or the other because the tyre is not rollong down the road in line with the chassis so effectively, the tread is being dragged sideways in relation to the road surface. If due to either too much toe in or out then both wheels will display the same "lipped" wear pattern with the lipping going one way on one tyre and the other on the one on the other side of the axle.
Over pressuring or, more commonly, under inflation if let to go too far - so greatly over inflated or under inflated produces distinctive wear patterns. In the case of over inflation the centre of the tyre will wear before the shoulders due to it being crowned out and under inflation lets the shoulders wear more rapidly as there is no pressure to support the centre of the tread.
The tyre on the other side is usually easy enough to see by just walking round and looking at it from the back, but you may want to turn the wheels full lock in the other direction and then you can look at it from the front as you'd just been doing with the one on the other side - vary from make of car to make of car as to which gives the best view. I do this check probably about once a month on my cars and, if it's dry I also kneel down and take a quick look for obvious inner sidewall damage. The outer sidewall you can, of course, check at any time but the inner sidewall will otherwise probably only be checked at service time and even then maybe only if it's a "big" service interval, so I like the security of doing my own visual inspection just for my peace of mind - Of course I do a more detailed examination at the annual service.
Rear tyres should be checked too but wear abnormalities are much less common and anyway, there's not usually any way of easily making adjustments - good idea to have a wee look from time to time though. Problems with wear on front tyres are far more common.
Of course there's a lot of other stuff you can check but this simple visual check is so quickly done and you don't get dirty so can be done anywhere. It's very likely you'll pick up on any tyre related problems long before they become too serious so saving you money and. maybe, problems with the "boys in blue" if stopped for a roadside check.