Opinions on this trolley jack?

Currently reading:
Opinions on this trolley jack?

I have one and the quality isn’t all that bad, mine came with a calibration cert and 3 sockets in common sizes for wheel nuts as well as a 3/4 extension. So there are a few bits inside that can easily fall out if opened, plus being sealed keeps the certificate with the tool as well as preventing someone messing with it before it’s bought
I think the certificate would make a difference, i.e. it would have the right torque and the worst case scenario is that it broke before a mid-range £50 one. I've just seen someone re-selling their lidl torque wrench on ebay for £25.

I really should buy a torque wrench because I overtighten most things. I want to make sure they don't come loose and sometimes end up having a fight to loosen something I overtightened not long ago. The vice looks good too.
 
I've tried to use stud extractors of various sorts over the years, almost always unsuccessful. If the bolt is seized in there tight enough to shear the head off, an extractor is unlikely to win.
And then when you snap the extractor it's game over.

A pillar drill is a better option than a vice. Keep ing the drill straight is the key, and you'll never get it properly drilling by hand.

Personally I''d have gone on ebay and got another, or fiat if you're feeling rich
 
Here's a pic and short video

Not the best quality as hard to video while doing a job


But compared the Lidl wrench to a old alko branded ones that not been calibrated since 2012

Both click about the same point of the wheels so I'd say they have roughly the same sort of reading of 98nm

Not very scientific I know
I losened the bolt before tightening again for both wrenchs all-through not shown clears on the videos

Now I wouldn't trust either enough for something like a head gasket

But for less critical applications like suspension or wheels I'd be more then

confident enough in there abilities
 

Attachments

  • IMG_20240805_130416.jpg
    IMG_20240805_130416.jpg
    1.9 MB · Views: 85
Last edited:
Here's a pic and short video

Not the best quality as hard to video while doing a job


But compared the Lidl wrench to a old alko branded ones that not been calibrated since 2012

Both click about the same point of the wheels so I'd say they have roughly the same sort of reading of 98nm

Not very scientific I know
I losened the bolt before tightening again for both wrenchs all-through not shown clears on the videos

Now I wouldn't trust either enough for something like a head gasket

But for less critical applications like suspension or wheels I'd be more then

confident enough in there abilities

I'm currently in Lidl to buy one, yes really! And there are no torque wrenches left, nor vices. If I were to hunt around other lidls then the saving would disappear in lost time and petrol. Oh well, they flew off the shelves and onto eBay probably.
 
I'm currently in Lidl to buy one, yes really! And there are no torque wrenches left, nor vices. If I were to hunt around other lidls then the saving would disappear in lost time and petrol. Oh well, they flew off the shelves and onto eBay probably.
Both Lidl and Aldi have apps that tell you all the special buys coming up, I usually take a look once a week, and see what they are getting in and if there is anything interesting I might give it a look.
 
I spent an hour using a drill to try to get the bolt out but was getting nowhere fast so i then resorted to an angle grinder, which took 5 minutes...

IMG_20240805_122719.jpg


I can no longer use the welded-on thread but a nut will suffice. One thing I'm not sure about is the use of washers, I'll need some because the surface is now very rough, but is it getter to use more than one washer? I might use this config...big - small - big

IMG_20240805_122644.jpg


I can get the steering rack and sway bar onto the new subframe tonight, so progress :)

Oh and I dug out the workbench, made life a lot easier!
 
Given the state of the bracket, what's the rubber bush like?
The bushes are OK, i bought more but i've been roughing the old ones up by standing on the sway bar etc and i'm going to send the bushes back. I thought there were splits in it, but those came with it from new, some kind of design feature.

I'll give the sway bar a 5 minute spray paint job, i got the surface rust off yesterday so I should cover up the bare metal.
 
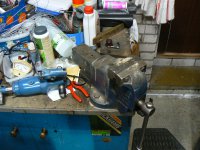
This is the vice not sure what size it would be in old money, it’s not massive but perfect for my needs, just one thing bothers me is a little notch as you get need closed that I need to investigate.

View attachment 449604
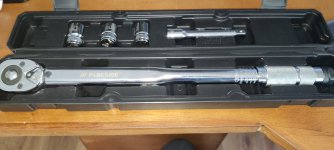
Todays shopping trip resulted in my buying a bench grinder
3 year guarantee and only £25.
View attachment 449605
I bought a Parkside grinder with 6 inch wheels quite a long time ago and it's been a good buy:

P1110918.JPG


Pr3etty robust and still running great. A friend thought it would be funny to put the "R" (rough) and "S" (smooth) on it - I still don't really see what's so funny about it?

Their vices look the same as many you see on the internet so probably a generic rebranded product. They look Ok to me but I would be wary about using the hammer block (the flat bit) too violently as cheap castings are prone to fracture.

I was extremely fortunate to be on the spot when a previous employer was renewing all the vices in the engineering trades departments. Most of the old ones were pretty nackered but I found one in the scrap metal skip which was not too bad. I've had it for maybe 40 years and it's still going strong:

P1110920.JPG


It's a Record 84 with 4.5 inch wide jaws and it also has the quick release (see the wee lever half hidden behind the end of the forcing screw on the front in the above image) which lets you position the jaws quickly without winding the handle except to finally tighten it up - a great feature which considerably speeds up some jobs.

The capacity, how much it can be opened, is 6 inches and I've found there's seldom anything I'm working on which it can't accommodate:

P1110922.JPG


You'll have noticed it's mounted at 45 degrees on the corner of my workbench? That's because my garage is a single car size with the workbench across the width of the garage against the back wall. Had I mounted the vice more conventionally square on to the bench I wouldn't have been able to get anything like such long pieces of metal - angle iron etc - in it because there's only 5 feet to the side wall of the building. Putting it at 45 degrees like this at least doubles the length it can accommodate. Although I didn't think about it at the time, it can also be useful not to have the bench top in the way to either side of the vice, especially if you're working with something with a rt angle. Mounting it in this way has much to commend it.

It does have a nice flat face behind the back jaw and I have used it to hammer stuff on - straightening stuff etc:

P1110921.JPG


- but that flat face is also part of the guide face for the outer jaw so I also have a large bit of flat metal I found on the foreshore:

P1110919.JPG


which just makes such a good surface for hammering stuff on that I tend to use that instead of the vice. I can batter away on it as much as I like without worrying about ruining it.

If anyone is thinking about buying a vice then I think this size is very suitable. I've sometimes wondered if one mounted on a swivel base might be a good idea but then I've never had a situation where it might have made a job easier and, maybe, it would make the vice less robust?
 

Attachments

  • P1110929.JPG
    P1110929.JPG
    785.5 KB · Views: 18
The new subframe is ready to go on, hopefully tomorrow.

The biggest trouble I've had is removing rusted nuts. The best thing I did was get parts off the car and then cut the nuts with an angle grinder. If i'd done this from the outset i'd have saved myself a lot of time - hours.


IMG_20240806_123101.jpg


I gave the rusted parts of the sway bar some paint and put on some new nuts/bolts. Cleaned up the thread on the steering so it'll align ok. I found another alignment pin, so now have two old ones to use, not sure about their usefulness though (they're in the bottom left and right corners).

Any thought on getting this back on the car safely and accurately?
 
The new subframe is ready to go on, hopefully tomorrow.

The biggest trouble I've had is removing rusted nuts. The best thing I did was get parts off the car and then cut the nuts with an angle grinder. If i'd done this from the outset i'd have saved myself a lot of time - hours.


View attachment 449712


I gave the rusted parts of the sway bar some paint and put on some new nuts/bolts. Cleaned up the thread on the steering so it'll align ok. I found another alignment pin, so now have two old ones to use, not sure about their usefulness though (they're in the bottom left and right corners).

Any thought on getting this back on the car safely and accurately?
use a trolley jack to lift it into place

I did mine recently by hand bit then I had the advantage of being able to assemble everything on the car. if you can get a second person to help as having someone to help steady the weight while you wiggle it into place is going to be very useful.

The whole subframe is square and has ?6 mounting points to the car so you shouldn't be able to get the alignment out by more than a mm or two. its not like the car will crab down the road. and if needed can be adjusted later as part of a 4 wheel alignment.

Its not like the Rover SD1 that was so badly designed one side of the car was an inch longer than the other.
Righto, sounds good. I have someone to help get it on, and my new shiney trolley jack, which reminds me, did you buy a new one?
 
Righto, sounds good. I have someone to help get it on, and my new shiney trolley jack, which reminds me, did you buy a new one?
going to have a look at the one I have, I think it will be fine with a good clean up and replace some seals, maybe whack some new oil in it. but worst case I think I will buy one like yours.
 
I'd have bought the torque wrench on the spot if I could have opened the box and checked quality, but they'd been cable tied shut inexplicably. Probably still worth a punt.
I would at that price if its an adjustable one. Worth a gamble. I have not yet bought anything that I felt was rubbish.
 
The subframe has gone back on. Yay! There weren't any major issues and nothing else has broken - so far!! It took two of us and two jacks to get it back on. The control arms, wheels, exhaust etc. aren't back on yet. It won't all get done today.

Its currently raining so I'll sit that out.

How much would it cost for me to get a new Grande Punto front subframe put on at a garage do you think?
 
The subframe has gone back on. Yay! There weren't any major issues and nothing else has broken - so far!! It took two of us and two jacks to get it back on. The control arms, wheels, exhaust etc. aren't back on yet. It won't all get done today.
Well done!
Its currently raining so I'll sit that out.
A man after my own heart!
How much would it cost for me to get a new Grande Punto front subframe put on at a garage do you think?
Don't know but Kenny's wee FIAT specialist garage - where I go for my MOTs and all general knowledge - has quoted me "in the £600 region" to put a new rear axle in Becky, as long as nothing goes "dramatically" wrong.
 
Back
Top