IMG_0864.jpeg

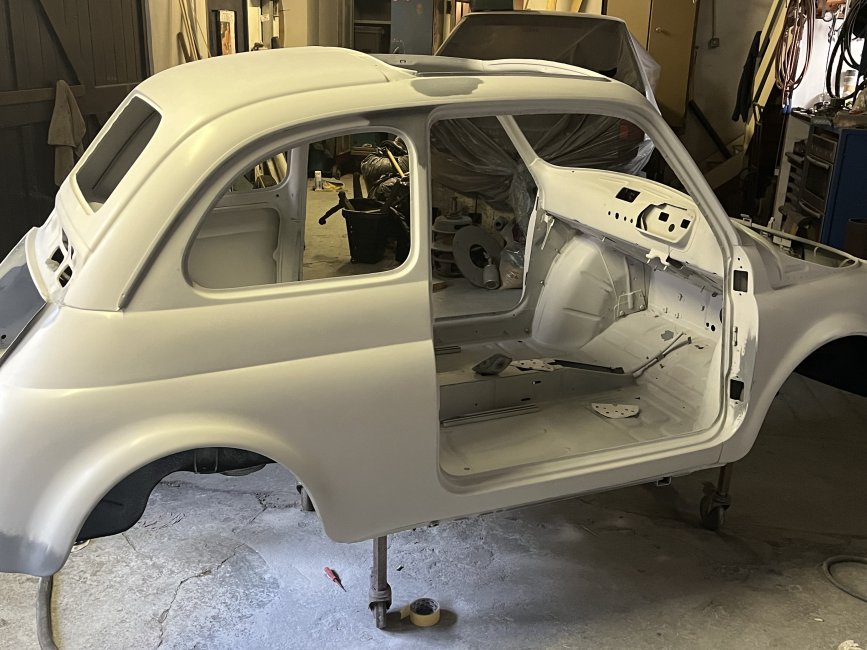
500 (Classic) Long time coming!

Introduction

Having dug out my 500 recently after a very long time dormant (20 years since I did the panel work) I’m feeling motivated. I’ve painted the bolt on panels and today started applying some to the shell so am starting to get some thoughts towards building it up. There’s a couple of problems on this front, firstly the huge gap since I took it apart and the unfortunate fact that a lot of the parts were lost in a fire where they were stored some years ago. I’ve sourced some of the more crucial parts over the years and have spent a fair wedge recently on new stuff. I think I’m dialled in on what needs bought but its tricky knowing every small bit I'm might or might not be missing, I have tried sourcing a parts book but as yet had no luck, out of stock seems to be the theme. Does anyone know where I might buy one? or maybe an online link? I’d much prefer a paper copy.

IMG_0864.jpeg
IMG_0873.jpeg
IMG_0877.jpeg
I’ve not been much good regarding updates to this thread so i’ll make an effort to catch up.
The interior I’m very pleased with, standard original to the car and in good condition. At some stage I’d like to refurbish the seat frames as they do have surface rust but for now I’ve just made do. I’m especially pleased that I seem to have a full set or original fasteners throughout the cockpit. I did jinx myself saying the tunnel cables/pipes were done, I’ve been back in there twice since I wrote that! I hadn’t realised I’d need a 500R starter cable as I’ve fitted a 650 engine so that had to be changed. It’s all been together and working for a while now but try as I might I couldn’t get a nice throttle movement so stripped out again for a new accelerator cable, it did the job thankfully and the throttle is now as it should be. The little fella loves it you can see 😊
IMG_1008.jpeg
IMG_1010.jpeg
IMG_1015.jpeg
IMG_1105.jpeg
 
The fuel tank appears to be ok so was rubbed down and some paint applied, the straps too which I’m glad I have as they are to suit the RHD. I luckily found the rubber trim for the luggage area, I’d bought a new replacement which is a poor item when compared to the original. I don’t have many pictures of the luggage area it seems but the one below shows the bike pump used to prime the fuel, a tip I read on here by I think Tom (aka The Hobbler). It worked a treat 👍 I used the rubber bush that the engine fuel pipe bracket has to help seal onto the cap. I’ve since refurbished the jack and it’s looking pretty tidy now. Unfortunately I’m failing miserably with wiper assembly, I’m damned if I can get a LHD part to work on my RHD. It’s pretty much the last task but as yet no solution.
IMG_1112.jpeg
 
The donor engine and gearbox were pretty grubby but I sensed they were in decent health. It took a bit of cleaning the gearbox as in its previous life it’d received a thick undersealing. I changed its gaskets, oil seals and o rings whilst swapping the driveshafts to 500 ones. A satisfying job I felt though I think as some stage I’d like to renew the gears as they are a bit “worn in”! Unfortunately not many pictures and none of it finished but something to show there’s no substitute for elbow grease.
IMG_1006.jpeg
 
Last edited:
The engine I really didn’t want to tear apart completely but some jobs just had to be done before it was worthy of being fitted. A right good cleaning obviously and cosmetic work to the tin wear. I changed the oil seals either end on the crank and fitted a new chain. I repaired an exhaust mounting thread and took care with assembly of new gaskets. I treated the engine to a new sump and valve cover. The sump is the only issue I have as the drain plug drips despite being given a bit of pain when tightening but at some stage soon I’ll drop the new oil and look to see if I can address this. The mounting was refurnished which once I had the longer studs makes it look quite correct. I obsessively fettled original fasteners for the engine and engine bay, I think I’m about 98% correct, even found the little clinch nuts for the coil mounting. I kept the regulator housing minus internal so that’s where I’ve done the changes to alternator wiring, as a complete numpty when it comes to wiring I was pleased 😌 managed this part of the build (couldn’t of done it without reference to this forums past postings). The alternator was sent for overhauling so that should be good for a while now. Rebuilt the carb and spent more time than I should admit polishing it! The head stayed where it was as I took the chance it was ok. Once I had the distributor stripped and overhauled I did wonder what was going to scupper my progress! I shouldn’t of worried as it fired and ran first pull of the lever, chuffed is an understatement! Everything seems good, the only problem was it started to run progressively worse after a few week. I did wonder about the tank and thought I’d start with the carb, a quick removal and clean through and I’m back to good behaviour, obviously a bit of choke to cold start but it’s not long at all before it’ll idle without choke. A couple of pictures, before and after.
IMG_1061.jpeg

 
Last edited:
The donor engine and gearbox were pretty grubby but I sensed they were in decent health. It took a bit of cleaning the gearbox as in its previous life it’d received a thick undersealing. I changed its gaskets, oilers and o rings whilst swapping the driveshafts to 500 ones. A satisfying job I felt though I think as some stage I’d like to renew the gears as they are a bit “worn in”! Unfortunately not many pictures and none of it finished but something to show there’s no substitute for elbow grease.View attachment 455228
The whole restoration is brilliant; I particularly like the retention of original fixings....literally, important details that some people overlook.
 
Thank you for the compliments.

The correct fasteners matter to me, it’s the kind of detail I look for on cars, devils in the detail.
Absolutely first class restoration---the engine has come up VERY well. Delighted to see that you haven't been tempted to fit a fuel filter by the fuel pump---to fit one there is, in my humble opinion, a very unwise move, and one of my pets 'bugs'. I noticed that you have a "twin-outlet" coil---have you retained the 'points' or fitted an electonic ignition. I ask this because ALL the electronic ignitions, irrespective of their cost, have a "wilt" point (spelt D.I.E.) of 100C---and the hot "engine cooling" air being blown over the distributor can exceed 100C after a 'brisk' run, especially on a hot day if you have retained the original sump (4.5pints---2.6 litres). It is possible to purchase 'un-labelled' 3-1/2 litre alloy sumps,and the greater oil capacity does help with regard to engine temperature.
 
Thanks for the kind words.

I’m with you on the heat blasting at the distributor and coil. It’s running on points currently though I am eyeing up the 123 ignition that fits the twin coil. Maybe at the very least one of the Swiftune condensers to help relocation. In truth I’m resting expenditures, I’ve waxed a few quid recently on this car. A low/no cost task might be to unpick the loom and move the coil, I’ll have to be feeling in the mood for that task.
The location of the coil (up on the side of the engine bay) should cause you no problems, nor should the retention of 'points'. The actual 'points' themselves do not seem to be affected by the heat, unlike the bulk of modern condensers which are very poorly made. If you want to keep the condenser in its original position (on the side of the distributor), try one of the condensers from "The Distributor Dr". With bit of a tweak of the mounting bracket, his condenser no;--"484249--con 246 with the 'long' bracket" fits well.These condensers are made to a very high standard, with just about twice as much wire-length in them as most of the 'pattern' condensers. Be very careful with regard to the "123" systems---they are no longer made in "The Netherlands", and I have it on good authority that the quality of them has fallen--far fewer suppliers now list them. If your car is running well with the twin-outlet coil (just for interest, which coil are you using?) and 'points', my advice would be to follow Porsche's advice---"if it ain't broke, don't repair it"
 
I think the coil I bought was a Mobiletron by make, cheap I seem to remember so I’ll see how long it takes before I have to dig out the original rusty cased one 😂
I didn’t know that about the 123 stuff, better tell Santa quick 😂
 
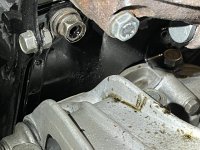
Is that not maybe a simple rocker cover gasket failure, for it to drip down onto there ?
With oil on the INSIDE of the hollow vent-screw, sadly, I think that there is a fair chance that it is a blown (or leaking) head-gasket.
 
With oil on the INSIDE of the hollow vent-screw, sadly, I think that there is a fair chance that it is a blown (or leaking) head-gasket.
That's where your experience with these engines pays dividends.: I just followed the run line up to an origin point that looked as though it had been dripped onto, and thought "isn't the rocker cover up above there ? "
You looked at the hollow vent screw, which flew clean under my radar.!
 
Back
Top