Technical Heater fan control switch replacement?

Currently reading:
Technical Heater fan control switch replacement?

Coopersale

Member
Joined
Apr 10, 2017
Messages
33
Points
62
2010 Ducato with air con.
My fan switch is only blowing on 2, it’s been intermittent sometimes blowing on zero but never working on 4.
I’ve changed the blower motor resistor, but next step looks like getting the rotary switch out.
any thoughts or guides, it looks like half the dash needs removing.
 
Thanks, yes I’d seen that video, that’s what put me off.
I think you can remove the switch control from the rear but hoping someone would confirm.
 
I’ve just removed the switch without stripping the dash, you can get to it by removing the radio housing. Not sure how simple it will be to refit, I’ll update when the new switch arrives.
 
Hi

Glad you have managed to get access.

The heater fan takes quite a lot of current, so any connections must be in tip-top condition. Make sure the mating connector for the switch is bright and tight, especially if there is any discoloration or even melting from excess heat (it shouldn't get hot if working properly). If things look in a bad state, a new or reclaimed connector can be used, with soldered and heatshrunk joints to the existing wiring.
 
68107071-D751-4633-9BEA-B7BA09B8C920.jpeg
798BDA22-9671-4285-97FE-B129F2CB9D96.jpeg
 
Hi

That picture tells a tale. Once you get a bad contact, it heats up which causes more corrosion and an even worse contact. Then even more heat etc etc. I can't tell if the heat has been generated in the switch contacts and travelled out to the connector pins, or the other way round.
 
Hi

That picture tells a tale. Once you get a bad contact, it heats up which causes more corrosion and an even worse contact. Then even more heat etc etc. I can't tell if the heat has been generated in the switch contacts and travelled out to the connector pins, or the other way round.
I have been following this thread with interest. I would like to add that the above statement echoes my own interpretation of the photos.
 
Just for info should anyone have the same problem, you can remove the switch without taking the dash apart, it’s held in with 2 screws, they are a bit fiddly to get back in, I used a bit of tape until they were in.
The pic above is with the switch removed.
My dash has a double din radio so good access when removed. I also replaced the fan resistor at the same time.
 
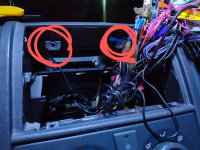
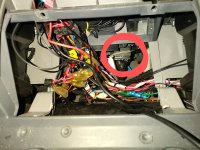
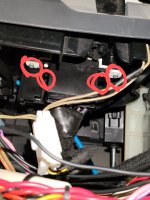
大変参考になりましたので、交換方法は残しておきます。ネジ6つでアクセスできました。パネルをはずす必要はありまけん。
1.ラジオパネルを外します。
2.写真1枚目の2箇所のネジを外します。
3.ラジオ上の蓋のような部分を外して、写真2枚目の内容を確認します。
4.写真3枚目の4箇所のネジを柄の短いプラスドライバーで外します。
→あとは手前に引っ張るだけ。

It was very helpful, so I'll keep the exchange method. It was accessible with 6 screws. There is no need to remove the panel.
1.Remove the radio panel.
2. Remove the two screws in the first photo.
3.Remove the lid-like part on the radio and check the contents in the second photo.
4. Remove the four screws in the third photo using a short-handled Phillips screwdriver.
→ All you have to do is pull it towards you.

IMG20230911203133~2.jpgIMG20230911203157~2.jpgIMG20230911203412~2.jpg
 
Last edited by a moderator:
  • Like
Reactions: ben
Back
Top