General Damaged cable loom

Currently reading:
General Damaged cable loom

Lukas83

New member
Joined
Mar 22, 2025
Messages
7
Points
1
Location
Bretagne
Hello,

I'm taking the liberty of contacting you, hoping to find some good advice regarding a problem I'm having with my Fiat Ducato 130 Multijet 2.3 D (2015).

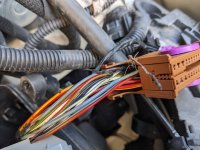
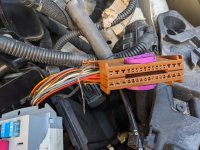
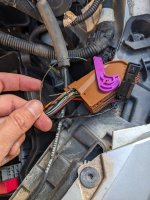
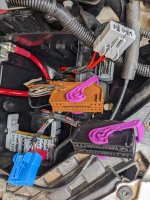
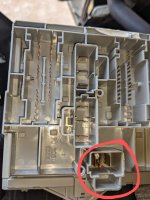
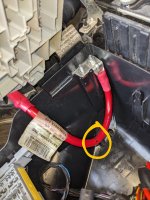
It has been parked in my garden since November. This week, I was unpleasantly surprised to find that wires had been burnt in one of the connectors (beige) on the fuse box under the bonnet. One of the wires was also completely oxidised and ended up being cut.

In view of the visible damage, do I need to replace the whole wiring loom and fuse box, or do I just need to rewire the affected wires properly ?

If the whole wiring loom has to be rewired, I've seen that a complete wiring loom is offered on the augusting-group website, but it's listed for Ducato produced between 2006 and 2014. However, I couldn't find a reference for a Ducato made after 2014. And I haven't found the appropriate label (normally referred to as "SOFIM") on my vehicle. So, do you know if the wiring loom indicated (no. 1360372080) would be suitable for a 2015 Ducato ? I'm asking because I've found a cheap second-hand one.

In other hand, looking at the photos above, do you think the fuse box (no. 1376610080) should also be changed ? Here again, it seems possible to find a second-hand one, but would a simple exchange of the box be appropriate ?

Thank you in advance for your help.

Best regards,

Lukas
 
Model
Fiat Ducato 130 Multijet 2.3 D
Year
2015
Mileage
50000

Attachments

  • 1.jpg
    1.jpg
    1.1 MB · Views: 34
  • 2.jpg
    2.jpg
    1.4 MB · Views: 25
  • 3.jpg
    3.jpg
    1.3 MB · Views: 26
  • 5.jpg
    5.jpg
    1.5 MB · Views: 26
  • 7.jpg
    7.jpg
    937.6 KB · Views: 24
  • 6.jpg
    6.jpg
    1.1 MB · Views: 23
Hello,

Looking at the mileage I assume your Ducato is a kind of motorhome. Is it an x250 based model, or the x290? They changed the model in 2014, so in theory it should be the x290, but if 2015 is first registration date, you'll never know. If you're not sure, please post a photo of the front of the vehicle (unless it's a fully intergrated motorhome...). The VIN will start with ZFA250 in both cases...

There is a chance the x250 loom you linked to would suit the x290 model. As there might not changed it since the 2011 facelifting. However there are too many 'ifs' / 'mights' to invest 1700 EUR.

The loom might be repaired, of course.

The most important is to FIRST eliminate the cause of the burns.

And being it the x250 model, the most probable cause would be the standard water ingress into the engine bay from the scuttle tray.
 
Good evening,

Thank you very much for your feedback.

It is indeed a motorhome. Enclosed is a photo of the front when I bought it. Is it an X250 or X290 ? How do you see it, please ?

I was also thinking about water ingress, as I found the area under the bonnet quite damp. Once I've changed the wiring loom, what would be the solution to stop it falling victim to rainwater ?

Best regards.
 

Attachments

  • IMG_20210424_170833.jpg
    IMG_20210424_170833.jpg
    830.4 KB · Views: 6
Looking at the photo, it's the x290.

1742678870686.png


The x250 was produced since 2006, in 2011 they made a facelifting which didn't change anything on the outside as far as I know. However they changed the electronic system, including the BCM. Then in 2014 they made some changes overall, including the front, and changed the coded name to x290. But kept the VIN beginning being ZFA250 :D

Other modifications were done in 2018 / 2020 / 2022, but in general the body / construction is still the same. Sometimes this model is reffered to as the x295. But due to all those small and most of the times invisible changes it's hard to confirm if a part will definitely fit without knowing a part number and VIN. And a sure system. Like the FIAT dealership for example.

We have the forum ePER, which is the FIAT spare parts catalogue which helps us a lot (link on the bottom of the forum banner, search window top left of the screen), but it is limited to 2014/2015 only. However might be helpful to check the part number of the wiring loom of your van.

For the water ingress, search the forum, there are several threads on it. Not only here, also all other motorhome / Ducato / Boxer / Jumper ones. They improved the water evacuation system on the x290, but not definitely. In the x250 water was sometimes getting in the power steering fluid reservoir...
 
Last edited:
I know someone who had to replace their X2/90 Ducato wiring loom due to an under-bonnet fire.
It was a massive job - engine out - and a lot more - and that was only a van without the motorhome additions
So if its just a bad connector on the fuse box the only viable option is patching up the existing loom.
 
Last edited:
Hello,

Thanks for the clarification @the green vanper.

@Reg 65 : yes, I would at least have to replace the harness relating to the brown connector. And I think, then, that my vehicle would be repaired.

My only question is whether the reference 1360372080 for the complete cable loom (given for a Ducato built between 2006 and 2014) is compatible with my 2015 vehicle. On the face of it, the connectors look identical, but there is some doubt.

I notice that all the labels associated with components that I could see under the bonnet start with 136 or 137 and end with 080, and that the Model indiqué is 250. Perhaps this is a good sign that the X250 cable harness is still compatible with my X290 vehicle.
 
According to ePER:

1742725289628.png

There's no mention it was used in the 2014+ model (available in the ePER's menu).


CABLE HARNESS (CC2.3+KW88,CC2.3+KW93,CMBDS+KW103)+!((012,392,407,4UF,5LJ,733))
  • D11925
01

This loom is dedicated for the 2.3 diesel engine in the 120 / 130 / 140 HP variants. Not compatible with Servotronic (012), VDC (392), Comfortmatic (407), Volountary service (?) (4UF), Ambulance command plates (5LJ), specific catalytic converter (733).

The D11925 at the end informs about it being compatible with the 'new' 38 pins ABS module, which was introduced on March 15th, 2008.

The specific catalytic converter might be an element of the EUR5 norm... Or special market regulations.

Does your van has ASR? Comfortmatic robotized gearbox?

I got to the same category for the 2014+ model, but it does not list the part at all, so I assume for this particular category ePER limit has been reached :(

1742725740715.png


One more thing: apparently the same 130 HP MultiJet 2 engine was installed since 2006 until 2020.

But in fact it doesn't prove anything.
 
Last edited:
@the green vanper : Thank you for your research.

I don't have any ASR (or even ESC) buttons on the vehicle. Just the Traction plus button.

I don't have a robotised gearbox, no.

Like you, I couldn't find any reference on the web (or under the bonnet of my vehicle) about the cable loom for Ducato from 2014.
 
@Reg 65 : yes, I would at least have to replace the harness relating to the brown connector.
But can you get a brown connector with the wires coming out, and are the pins into the fuse box good enough? Its not ideal and some won't approve, but I would consider breaking apart the brown connector enough to splice new wires in, or bypass the connector with the replaced wires direct to the wires in the fuse box it connects to. Then weatherproof it as best I could.
 
I don't think it's possible to find this brown connector anywhere else. All the cables are “moulded” inside, so I think it's better to restart cleanly with a ready-made loom.

Even if it's a bit marked underneath (photo 7 of my first message), where the big red cable arrives above, I hope my fuse box is still functional. If necessary, I can also find it second-hand.

Despite my damage, the vehicle still starts.
 
As usual there is more than one way of doing the job.
If it was mine I would break it apart and join the connections as best I can. I have done it with others, looks untidy but it works, takes a while because I take my time so as to get it right, but not as long as replacing the loom, and it costs next to nothing.
If I was still doing it commercially I would probably replace all the parts because it looks neater, more professional, and you can charge more for it. You are setting yourself up for easy criticism if you send it out looking a mess - even if it all works perfectly.
 
Hi Lukas.

I have looked at your photographs of the damage. I think that it is possible that the initial damage has been caused by rodents or other animals gnawing the plastic insulation of the cables. The exposed cores can then short circuit, and if it is a wire which still carries 12 volts when the vehicle is parked then high current will flow. This current may cause overheating (brown colour to plastic due to high temperature). It is also possible for a small "leakage" current to flow if there is water present, and this small current causes accelerated electrolytic corrosion (black colour due to oxides of copper, and copper eaten away).

The detachable connector is there to make factory assembly easy, and to allow for servicing. It is not essential for electrical operation. If faced with this repair, I would bypass the connector with new wires of the correct cross section and the same or a similar colour. Joints should be made by soldering plus insulation by heatshrink sleeving. Good solder joints are reliable in vehicles if the looms are strapped to prevent vibration.

Replacing the whole loom is a very large and expensive job, I would only recommend this if an insurance company was paying 100% of the bill !
 
@Anthony489 : Thank you very much for your comprehensive feedback, I'll make a note of it.

Whether with or without the brown connector, a connection must be made to the existing wires in the wiring loom.

Does this connection also have to be soldered ? And where should this connection be made ? Should the wires be cut a little below where the burn marks can be seen, or should they be cut much lower ?

Thanks for your help.
Take a sample conductor and cut a few centimetres beyond any visible damage. Remove short length of insulation and check for clean conductor. If not good cut a bit more off the wire. As an alternative to soldering you could use butt crimps, of the correct size for the conductor. These are available with heatshrink sleeves. You would need quality crimping tools, soldering is more adaptable to different conductor sizes. Try to stagger the connections so that you do not finish with a large bump in the form.
 
Back
Top