General Crazed and milky headlights

Currently reading:
General Crazed and milky headlights

olistad

New member
Joined
Apr 25, 2012
Messages
5
Points
1
Location
Muddiford, Devon
Hello,
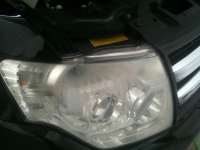
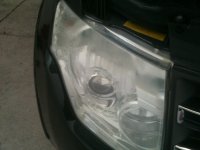
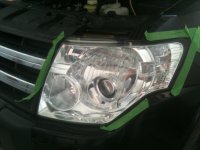
Does anyone know the best way to remove the slight crazing and slight milkiness on the headlight lenses.
I have just uncovered my (03) after only a few weeks since using it and they have just started to go.
Thanks in advance.
 
Hi there,
All lights can be cleaned up to a like new surface but the process in cleaning them depends on just how bad they are to begin with.

If there just slightly hazed, with little scratching get yourself some compound polish on a microfiber cloth and rub away to reveal the new cleaned surface.

If this doesn't get them looking clean enough then some 2000/2500 and even 3000 grade wet sanding is needed first.
This will remove the oxidization and any scratches and leave an evenly sanded surface ready for polishing, Now if using just elbow grease then this can take some time but you will get there.

Professionals will use a small air or electric polisher with a small pad to do this and takes no time at all..


Good luck, here's some before/after pics of some slightly hazed lights I did recently. (y)
 

Attachments

  • IMG_1679.JPG
    IMG_1679.JPG
    1.1 MB · Views: 91
  • IMG_1681.JPG
    IMG_1681.JPG
    1 MB · Views: 90
  • IMG_1683.JPG
    IMG_1683.JPG
    1.1 MB · Views: 87
  • IMG_1684.JPG
    IMG_1684.JPG
    1.1 MB · Views: 94
Thanks KC3 for the reply.
I will get on to it strait away and hopefully the finished result will be as good as yours.
Do you know what causes it? I ask because my barchetta was always garaged and we have just recently moved and until the garage is built it is going to have to remain just covered up.
It has been quite warm recently, so could it be that coupled with maybe the car sweating under a cover albeit a breathable one?
 
Yes,

As Peter mentioned, UV rays, exposure to the elements and certain light bulbs can cause this, and anyone using traffic film remover in there washes will certainly strip any protection from the vehicles surface paint and lights too.

Certain brands of vehicle like the Japanese are more prone to this than others but most will discolor over time if left to the elements..

You can use wax over the lenz to help combat the Uv exposure or alternately there are some long life nano sealants that can be used although they can be expensive and have a slight learning curve to use.

There is a lot of spray waxes and spray sealants on the market but one of my favorites for ease of use and durability is from OPT (optimum polymer technologies)

http://www.optimumcarcare.com/

hope this helps!
 
Last edited:
I used some T-cut metal polish and some kitchen roll and very gently lightly polished. Only needed one go.
Any gentle compound would work, even toothpaste.

Generally slowly and gently is the secret
 
I tried to polish my headlight with a Meguiar's kit today - that's sanding with a wet 1000, then wet 3000 and finally with a polish paste + drill pad.
The result was poor - I only realised that the headlight had a coating film once I started sanding :/ Now it's smooth but dim/frosty.
So the question is, how did you guys remove the film, or did your pastes work that well on it?
 
Hiya!

Sorry! Forgot that the B lights have a protective film, this can be removed by sanding, high pressure steam or water.

If you have managed to remove it and have a smooth sanded finish, you now need to polish until the light becomes clear.
Like I said, if doing this by hand it will take some time but can be done.
Using a machine or the drill pad adapter will speed things up, Just keep at it until the desired finish is obtained.
 
Last edited:
Thanks for all the advice.

I have spent the best part of a whole day sanding with fine grit wet and dry using water then using a cutting compound and finally a good polish and one of the headlights has come up great but the other is not so great as the crazing will not come out although the lens is nice and clear!

Any more ideas?
 
Hello! Try going down to a heavier grit paper 800/1000 that will remove the crazing and then back up to the 2500'3000 or 4000 paper. this then allows for a nice even surface ready for the final polish. Should come out like new.
 
Back
Top