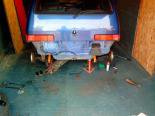
okay so you can probably do this job with the cinq on the ground but most likely its easier to jack it up and place it on axle stands(do not work under the car with just the jack supporting it!)
now in this guide we will cover the removal of the bumper and removing/replacing the bumper mounts as they tend to corrode quite badly.something to remeber as the towing eye is part of the N/S mount.
So for reference in sept 2005 the brackets were £5.90 for the O/S one and £8.50 for the N/S. The N/S is more expensive because it has the rear exhaust hanger attached to it.
now most of the bolts here will be corroded.
theres various methods of removal from a good soaking in pentrating oil,
heating with a blow torch and the angle grinder!
be aware if using the angle grinder or blow torch to take care considering how near you are to the fuel tank/lines.
also dont forget eye protection if grinding.
what you need:
- underseal
- new brackets(if replacing)
- nuts and bolts to attach which will most likely be needed even with the old brackets
- underseal
- sockets 13mm ,maybe others depending on bolt head condition
- eye protection
- wire brush
- wd40
- grinder
- blowtorch these last 3 depend on corrosion etc
removing the bumper
there are three 13mm bolts inside the boot, left and right under the rubber grommets and middle exposed. Turn the other bolt heads in the arches right underneath to release the edges of the bumper and carefully disconnect the number plate light wiring.
and you should see this

colours may vary
")
if your removing the bumper for another job then skip to the end for refitting but its fairly simple as its the reverse of removal.
the brackets!
if your brackets are bad they could look like this


so you need to remove the bolts.if you lucky the will unbolt with a little wd40.if not it may require heat and/or the grinder.
see the original thread for more info on this
once you have the brackets removed(probably more work than that statement makes it seem!)
now if you followed the thread i linked to you will see the trouble liam had and that he drilled new holes to mount the brackets.

now heres the new brackets and bolts
you will see this in the pictures on reassembly.
obviously it depends on how the job goes as to whether you do this or not.
now while you have the back end stripped its a good time to wire brush the underside & underseal

other brands are available
and give it all a good undersealing

now here you see the brackets mounted with liams screws in place


So then you have a bolt which goes through the bracket from the rear and one from the bumper mount through the bracket, do the first one then re attach the bumper, take care with the outer mounts, they can be tricky but with patience you'll get there and before sticking it on don't forget to plug in the number plate lights again. Do up you three bolts inside the boot then move onto the lower bumper mounts.


you see liam used new bolts all round to make the job easier and save problems with corroded bolts.
in the 2nd picture you see where he used coppaslip to ease removal at a later date
*NOTE: for some aftermarket exhausts you will need to remove the towing eye,this is easiest done with an angle grinder*

thanks to liam for the pics plus blood sweat & tears