Items required;
Mirror casings off the car
12v LED Strip x 2, (6 lights per strip) available from Maplins
1mm and 5mm hss drill bits
Cordless drill
Soldering Iron
Solder wire
3 meters of wiring, available from Maplins
Araldite rapid steel and ceramic and glass crystal clear adhesive
Masking tape
Sharp pencil
Steel rule
Small flashlight
Small long screwdriver
Small HEX head screwdriver
Starting off
Remove the mirrors from the car, in this case for a Mk2 Punto I followed this guide by flexywozere
Step One (taking off the mirror for Mk2)
You need to take off the little rubber cover that is covering the mirror adjuster. You then need to unscrew the metal ring attached to this.
This rubber cover simply pulls off, lift the base of the cover off the metal ring and then pull it off.

Unscrew the metal ring at the base. There is a little cover in the bottom corner of the attachment which holds a screw, unscrew this. The inside mirror is then held on by two clips so becareful when pulling it off.
Step Two (taking off the mirror for Mk2)
You are now left with the whole attachment hanging on by the mini speaker wiring, just ignore this, it isn't neccessary to unattach this.
As you can see, inside the hole, there is a black ring and if you look closly it has little 'L' shaped holes. You need to unscrew the black ring. This is holding on the wing mirror. What i used is to use a chizzle in the 'L' shaped holes and hammer them round. It unscrews anti-clockwise.

Now you can just pull the mirror out with the metal attachments with it. The rubber sleeve just pulls off.
Carefully remove the mirror glass from the housing, go extremly slowly when doing this, as trying to rush it will result in the glass snaping.
Dont try to take it out without the backing plate or pushing a screwdriver between backing plate and adhesive backing.
Instead, push the mirror to one corner so you can see behind it, use a small light to spot the clips. Use a small screwdriver to unclip these, taking your time on each one. There are 4 in total.
When you get the glass out, store it carefully until mirrors are back on car.
Prep work
Now that you have your mirrors off and the glass out its time to start marking out where you need the holes.
Roughly find the center of the mirror and mark the center of the circular end with a pencil.
Run a strip of masking tape along the edge of the style line keeping it tight and line it up with the pencil mark.
Check how it looks, if its not good enough just lift it and edge it up or down until it looks okay.
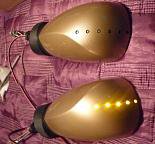
Make a mark about 10mm in from the edge of the mirror, this will be where you want your lightstrip to start.
Measure the distance between LED's on the strip, in my case they where 17mm apart.

Use another strip of masking tape, lay it out flat on a clean surface and use a steel rule to make a mark every 17mm. Make sure your pencil is sharp, as a blut mark may throw the next one off by 1mm, then by the time your at the last one your off by 5mm!
Lift the strip off the surface and transfer it to the mirror, lining up the 1st mark with the mark on the masking tape on mirror.

Drilling
Using your small drill bit, slowly drill pilot holes at each mark.
Tilt the mirror casing to try and drill at the correct angle for each hole.

When all pilot holes are drilled, move onto the bigger 5mm bit and drill, again making sure to drill at the correct angle. The bigger bit should follow the pilot hole by itself, so just keep checking your drilling angle.
Soldering
Examine the markings on the LED strip, noting which side is + and which is -.
Heat up the soldering iron, use a heatproof mat and something heavy to hold the strip in place.
Strip the wire down about 5 mm, separate the 2 strands for about 1 inch on down. Twist the stripped wire tightly.
When iron is hot, add solder to the wire ends, then add some to each side of the strip (+/-).
Offer up the wire to the strip and place the iron it it until the 2 pieces of solder have joined together, this should only take 1 second. Hold it in place until it sets, and repeat with the other wire.
Test the solder connection by touching the other end of the wire on a 9v battery.
Mounting
Now that the strip is wired, its time to mount them into the mirror casing.
Remove the circular plate by undoing the 3 hex screws. This might pop up with the tension on the adjuster wires.
Test the LED's to make sure they line up with your holes. You can adjust them slightly by crimping the area between - this will pull the lights tigher.
They should fit snuggly into the 5mm holes.
Mix up your araldite 50-50, and add a blob between each hole. Add an extra blob before the 1st hole and after the last hole too.
Slowly offer up the strip to the holes, making sure they all line up, then press it into the glue. Keep pressure on it while checking you can see the LEDs through each hole. If you cant, take it off and try again, dont leave it too long or the glue will set.
If there all lined up and look ok, continue to hold them in place for 5 minutes.
Any glue that has got on the LEDs can be removed using a cotton bud before it sets.
When it has set, mix up another batch, this time your going to add it over the strip and onto the inner face of the casing. This will help create a good seal and make it weather tight. It will also stop the light shining through the back of the mirror.
Keep adding glue until it covers it all evenly.
By the time you have the other mirror done, the 1st one should be set.
Running wire
Your now going to run the wire inline with the adjuster cables. These cables dont move so theres no need to worry about wires getting stripped.
Remove the rubber sleeve so you can see where there wire is going, feed it into the hole, then pull it through, then fed it through the 2nd hole and pull it.

Keep pulling it until you have just enough left to take the wire up and across the support structure. Add more glue to keep the wire in place, then reattach the circular plate with 3 hex screws. Reattach the rubber sleeve.

Sealing
Now that both the mirrors have set, its time to seal the holes up.
For this I decided to use araldite crystal clear adhesive.
Mix it up in the standard 50-50 ratio, then start adding it to each hole.
Dont worry too much about being messy at this point.
When all the holes are filled, go back around with the applicator and mop up any excess, keep cleaning the excess off the applicator or you end up just pushing it from 1 side to the other. Let it dry some more and clean up a bit more.
As it dries, it will sink inwards, so let it completely dry then add another layer to take it up to the correct level. You make need another layer on the deeper holes.
Wiring
You can now remount the mirrors onto the car, remembering to feed your power supply wire in too!
The simplist way to get the wire to the loom is to loosen out the door card on the inner most side, pushing the wire in. When your inline with the main door connector flexible rubber you can go directly to it. Loosen off both ends of the flexi piece, making a small hole in the top of it.
Remove the plastic trim at the door opening - 2 long cross head screws.
Pull it up to unclip it, then push it in towards interior to get a bit extra room.
Untape the loom, and look for
Drivers side - Pink Wire + / Black wire -
Passenger side - Pink&White wire + / Black wire -
The 2 wires are the same guage and are the smallest guage wires in the loom. There are several black wires of the same size, so I dont think it matters which one you use.
Note - there is a thick black wire on passenger side, I dont know what this is for so dont use that.
Use the soldering iron to melt about 1cm of the PVC insulation on each wire, but make sure you do them about 5cm apart. Temporarily attach the red wire of the strip to the pink wire, and black to black.
Press the hazard warning button on the dash as check that the mirror LED's are working.
Remove the clip and pull back the carpet until you can see the gromet that you can feed the wires through. Drill a 5mm hole in the seal.
Use a metal hanger to help feed the wires down the flexible seal on the door, then throught the inner gromet. Pull them tight and fix them in place along the door using a good quality duct tape.
Feed the wires down along the loom until they reach where you have remove the isualation.
Use a small screwdriver to make a hole in the wire, and feed the new wire into it, twisting it around and join soildly in place by soldering. Repeat for the other wire when reseal with PVC electrical tape.
Put the gromet and flexi seal back in to each hole, use a blunt screwdriver to help ease it into the slot.
Tape up all the wires using more tape and push them back into place just behind the carpet.
Reattach the carpet clip, then pull the door seal strip over the edge of it. Reattach the plastic trim with the 2 screws, push down to click it all back into place. Put the tweeter back in and reattach trim and adjuster nut.
Replace mirror glass by clicking the clips into place.
Thats it...
Roughly took me between 6 and 8 hours to do this, but it was worth it!