Hello all.
After getting a lot of help on this forum on how to fit parking sensor (my original post), i decided to write a guide after doing mine. Unfortunatly my digital camera packed up so i had to use my iphone camera which is not very good at all . So i appologise for the quality of the photos
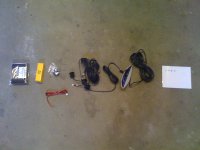
This guide shows how to fit an 4 sensor with LED display type of kit. I picked one up from ebay for £25 with postage. The kit was of the sort shown here
Step 1 Prep:
For this job you will need
I was told you dont have to do this, but for the best access and to use the marks fiat provide, i advise it.
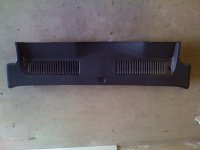
Firstly remove the carpet in the boot. Then remove the plastic cover just above the bumper inside the boot. There is 1 stardrive torque screw on the top and 2 phillips screw inside the boot. Once out, dont be shy, give it a big tug and all the clips should come free:
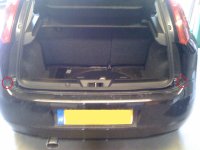
Now remove the 2 top screws under the boot lid, shown below. These are stardrive torque screws.
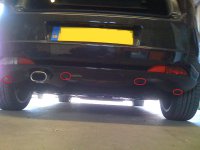
Next remove the 4 screws at the bottom of the bumper on the underside of the car. 2 are stardrive torque screws and 2 are phillips:
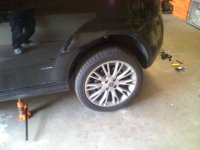
Next step is to remove the 4 screws in each wheel arch. I was told this could be done without removing the wheels but i couldnt get to them, maybe you can ( if you dont have 17"s then give it a go with it jacked up before removing the wheels) but here goes. Jack up the car:
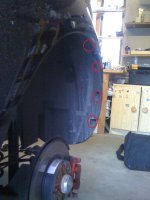
Then get that wheel off and remove the 4 screws. Start from the bottom and work your way up. The bottom 3 are phillips at the top one is a stardrive torque screw.For the top one you will have to bend the plastic a bit to get to it, its well hidden up there. (When putting this back later put the top screw back first) Also you may find it difficult on a few of these screw as mine were solid with mud!
If you have axel stands get them under now and remove the other wheel and do that side. I didnt have axel stands so i had to put the wheel back on to do the otherside. What a ball ache!
Once you have removed all 14 screws (count them and don't lose them, try to remember where they go) persuade the bumper off, it should come easily BUT be careful, make sure you put towels down to rest it on so you dont hurt your paint and you will have wires to remove before you can put it down. 2 people are good here but i managed it on my own. Once free you will see 2 number plate lights that just twist out, as well as the reverse light on the left and fog on the right (if in UK). All of them twist out.
Now put it down carefully on somethjing soft (i used the boot carpet)
The bumper is off so go to the next page!
After getting a lot of help on this forum on how to fit parking sensor (my original post), i decided to write a guide after doing mine. Unfortunatly my digital camera packed up so i had to use my iphone camera which is not very good at all
This guide shows how to fit an 4 sensor with LED display type of kit. I picked one up from ebay for £25 with postage. The kit was of the sort shown here

Step 1 Prep:
For this job you will need
- A parking sensor kit (obviously)
- a wireless electric drill
- a screwdriver
- stardrive bit
- phillips bit
- wire strippers
- stanley knife
- hole saw bit (usually provided with kit)
- Jack ( axel stands would be useful)
- wheel brace
- 1-3 hours of time
I was told you dont have to do this, but for the best access and to use the marks fiat provide, i advise it.
Firstly remove the carpet in the boot. Then remove the plastic cover just above the bumper inside the boot. There is 1 stardrive torque screw on the top and 2 phillips screw inside the boot. Once out, dont be shy, give it a big tug and all the clips should come free:

Now remove the 2 top screws under the boot lid, shown below. These are stardrive torque screws.

Next remove the 4 screws at the bottom of the bumper on the underside of the car. 2 are stardrive torque screws and 2 are phillips:

Next step is to remove the 4 screws in each wheel arch. I was told this could be done without removing the wheels but i couldnt get to them, maybe you can ( if you dont have 17"s then give it a go with it jacked up before removing the wheels) but here goes. Jack up the car:

Then get that wheel off and remove the 4 screws. Start from the bottom and work your way up. The bottom 3 are phillips at the top one is a stardrive torque screw.For the top one you will have to bend the plastic a bit to get to it, its well hidden up there. (When putting this back later put the top screw back first) Also you may find it difficult on a few of these screw as mine were solid with mud!

If you have axel stands get them under now and remove the other wheel and do that side. I didnt have axel stands so i had to put the wheel back on to do the otherside. What a ball ache!
Once you have removed all 14 screws (count them and don't lose them, try to remember where they go) persuade the bumper off, it should come easily BUT be careful, make sure you put towels down to rest it on so you dont hurt your paint and you will have wires to remove before you can put it down. 2 people are good here but i managed it on my own. Once free you will see 2 number plate lights that just twist out, as well as the reverse light on the left and fog on the right (if in UK). All of them twist out.
Now put it down carefully on somethjing soft (i used the boot carpet)
The bumper is off so go to the next page!

