Ducato Rapido Motorhome, Electrics

Currently reading:
Ducato Rapido Motorhome, Electrics

Lord Peter Toone

New member
Joined
Apr 20, 2021
Messages
5
Points
1
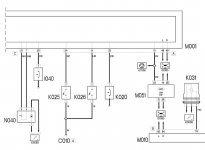
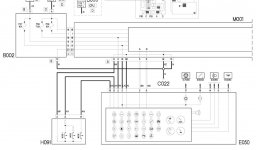
Hi all, quite new to these Forums, as i`ve always thought that people in here were aliens, and how wrong thinking that. You see threads and wonder if they really work, Well, here`s a braintester for those into electrics and where they are. I`m quite machanically minded with most vehicals, having repaired many myself, but this is going to be a game changer for me, and i`m investigating this one, as i like to see it right, like everyone. I have a 2008 Rapido motorhome, and i`ve worked and saved to get this, like we do before we retire, anyway, it has a slight problem, and i`m sure someone could help. The fuel gauge has stopped working. When i turn on ther ignition, the yellow low warning light comes on, and it goes out with the rest, so i know there is power getting to it, as i know it worked the last time i drove it, as i put fuel in it, as it told me to. It just passed it`s Mot, so while standing for a few months, i`m trying to locate the A653 unit under the dash, but where is it? Black 6 wires, held in place with 1 bolt, as i have traced it to be the culprit. I`ve pulled out the block stop with the 2 positive wires to reset, but with no pleasing me. Inside is a pcb that common fault is dry soldering, and i`m in the mood to get it fixed. Any help will be great, and i`m here to help others.
 
Hi

If your motorhome is 2008 it's most likely to be based on the X250 Ducato, which was introduced in 2006. The chassis number will start with something like ZFA250.

The module you mention was used in earlier models but it wasn't carried over to the X250. Can you confirm which model you have, then we can maybe help you further.
 
Thank Anthony for replying so quick, it`s the Rapido 9048df, and i`ve been looking under both side under the dash, even partially taking it off in places to find it, a black unit with the 6 wires, and i thought all Fiats have them. It passed the Mot recently with the examiner having to adjust the offside headlamp that he said was too low. The vehical had only done 800 miles from the last Mot, and i`m doing an investigation on this too. I`m pretty sure the fuel gauge worked the last time i drove it , to put fuel in, as it was showing low, but not empty, maybe a wire come loose doing the extra work, unintentional, but my mind boggles.
 
Hi again Lord Peter.

Looks like your vehicle is based on the Fiat X250 chassis (hard to tell immediately with an A class !). Rapido will have added their own electrics for the habitation part, but are unlikely to have modified much if anything of the engine electrics etc so that will all be pure Fiat.

The X250 fuel gauge works as follows, see the 2 attached schematics: There is a combined level sensor and low pressure lift pump N040 in the top of the fuel tank. This is normally accessed by a small flap between the two front seats, hopefully Rapido will have put an access panel in their floor, The level sensor is a variable resistor, and connects via pins 3 and 4 of its 4 way connector via Grey/Brown and Grey/Black wires to the Body Control Module (BCM) M001.

The BCM works out the fuel level, then sends this information digitally via a 2 wire data link (Bus) to the Instrument cluster E050. The wire colours are White/Pink and Black/Pink. The instrument cluster (lump with 4 dials on top of the dash) contains the fuel gauge, which has a needle driven by effectively a miniature motor.

You may have a problem with the wiring from sender to BCM, but since this also drives the Low Fuel warning lamp it seems unlikely. You may have a problem with the data link from BCM to Cluster, but this would be unlikely to only affect the fuel gauge. That leaves a problem with the Cluster and the Gauge/Pointer itself.

Its not unknown for instruments to get sticky or seize during long periods laid up. This post a few weeks ago by Ducatiman may help:

"Just stripped out the instrument panel, gave all four analogue gauge needles a good working backwards and forwards and hey presto! All working again!!

I wonder just how many people have been ripped off for a new ECU when they have had this issue??

Simple to access, just 4 screws to take out using a 25 size Torx driver, the first two aren't that obvious, one up under the upper corner of each side of the panel cover.

Once they are removed lift the grey panel from the back (2 spring clips there so you need to pull on it a bit)

That leaves the instrument cluster held in by 2 more screws at the rear of the panel vertically positioned into the mounting plate. Take those out then disconnect the multi way connector.

You now need to carefully pry apart the snap fittings around the edge of the instrument cover the when the covers are in two pieces lift out the centre piece.

The needles are now accessible so gently give them a wiggle through the normal operating range, leaving them roughly where they should be with ignition switched off.

Plug it back in and give it a try before putting it all back together in reverse order to the dismantling process."


If you fight shy of this level of dismantling, you could try just turning the ignition on and off in the hope that the needle will eventually be nudged into action. This might be assisted with a thump on the top of the Cluster. Let us know how you get on.
 

Attachments

  • X250 Fuel Sender.jpg
    X250 Fuel Sender.jpg
    72.2 KB · Views: 158
  • X250 Instruments.jpg
    X250 Instruments.jpg
    119.5 KB · Views: 198
Anthony, it`s back to normal now, and i really can`t thank you enough for making me work hard to get to the wiggle. Standing for quite a few months and trying everything that i thought could had been the problem, and the thought of Adams M putting it through something needlessly, to drain my pocket, as to say, and telling me that the finding were a long and winding road. You are a star and a great service to this forum. Something silly i thought, and i will toast your good health Anthony. Now to cancel that garage appointment. :worship::):)
 
I`d like to add further on this issue, as it can be problematic. Apparently, the instrument clusters are built for Fiat, from what i had also found out, and they use the tiny motors built by the Chinese, and they can dry out if not used for long periods. Some vehicals have the European motors, so we dont know which is which, but there is a company, called Cartronix who rebuild the whole lot with new motors, with a lifetime warranty, as long as you own the vehical, but now we know.
 
It passed the Mot recently with the examiner having to adjust the offside headlamp that he said was too low. The vehical had only done 800 miles from the last Mot, and i`m doing an investigation on this too.

It would be interesting to see (by checking here)....

https://www.gov.uk/check-mot-history

....whether the vehicle was failed, and then passed after "adjustment" and retest, without too much concern for the customer.

A couple of years ago my lad's Fiesta passed its MOT, and we were handed the (pass) documentation. It was only after checking online we found that it had been initially failed on headlamp aim, "adjusted" (I swear no-one had been near the adjustment screws) re-tested and passed.

It is (allegedly) a way of keeping the MOT failure rate up to DVSA statistical standards.

(Though, having said that, I had a Rapido passed at the same station after adjusting the headlight - though at that time, I didn't do a back-check).
 
Hi Lord Peter.
Having found your item on fuel gauge not working and having all the symptoms/results you described on our 08 plated Ducato/ Timberland Destiny. I thought it was worth a try at freeing the gauge needle. Your instruction were spot on and turned out to be a very simple operation. With many thanks to you for a that post.
I like the fact that @Cabbage Head has taken the time to report on his success and give thanks, even if such thanks were incorrectly directed. In my opinion any thanks should have been directed to @Anthony489 who supplied the comprehensive instructions in post #5.
 
I like the fact that @Cabbage Head has taken the time to report on his success and give thanks, even if such thanks were incorrectly directed. In my opinion any thanks should have been directed to @Anthony489 who supplied the comprehensive instructions in post #5.
Hi Communicator.
My apologies, you are correct and Anthony489 should have been the recipient. My only excuse is I was so pleased with the outcome and had I paid as much attention to the the writer as I did to the instructions I would have not found myself in this posstion. So to set the record straight from me, a massive thank you to Anthony who helped save me money and his solution was spot on.
No problem, as I said to a prominent member very recently, "He who makes no mistakes makes (does) nothing.".
 
Back
Top