We have different timing belts on our two Puntos (Mk2b 2004 and 2006, both 1.2 8v 60hp). Older one has 15mm belt with tensioner, that needs Fiat special tool to get right tension. Newer one has wider 22mm belt, where tensioner has these two forks, that has to be aligned, so no special tools needed.
Is it possible to use this newer tensioner with older 15mm timing belt?
What really is difference between 15mm and 22mm belts, except width and different tensioner? Are crankshaft and camshaft sprockets different? Different waterpump?
I have never replaced timing belt on my own because I have always thought that I need that special Fiat-tool for right tension, but now I would really like to do it on my own for both cars. It is quite expensive here in Finland, 300eur+ and interval is 3 years/ 60 000km. Timing belt set with waterpump costs 50-70eur so it would be huge saving.
I think I "get" your point here. It's all about the automatic, spring loaded, tensioner? I much prefer the spring loaded jobbie as it maintains a constant tension on the belt throughout it's life time. It would be nice to be able to substitute it on the earlier, manually tensioned, setup but I would advise against doing this and it probably wouldn't fit anyway. Just buy a complete kit to the correct specification for the vehicle.
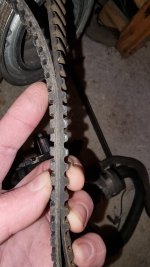
There's lots of wise advice being given above so I thought I'd add my ha'penny worth here. First off the 15mm belt has a completely different tooth pitch to the 20mm as you can see here:

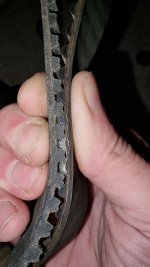
Sorry for the poor focus, I think something just went wrong with my camera. However you might be able to see that the top two belts are the ones I removed from my own 1.2 Panda (2010) and my boy's 1.4 8valve Punto (2012) The belt third down from the top is a 15mm from my old MK1 Panda - the one in my avatar picture - and you can see the tooth pitch is much courser - fewer teeth per inch. So all the pulleys on the 15mm engine will be of a different tooth pitch when compared to the 20mm. If you're sharp eyed you'll be able to see the 15mm belt has a groove along the peak of each tooth and the 20mm one above it has the same groove, although my lousy pictures make this a little less easy to see. The top belt however has a rounded tooth profile - remember both belts came from similar engines (in fact the same belt kit is specified for both engines) I was very puzzled by this when I bought the kits and rang the manufacturer's technical department (Gates, who are, and have been for many years, my preferred brand - I've never known one of theirs to fail). We had a very interesting conversation which I can shorten by saying that they told me it's the tooth pitch that's the important factor as the forces are transmitted through the base of the teeth, one of the reasons why belt tension is important because a slack belt will allow the teeth to ride up from the correct engagement to where forces are being transmitted on the side of the teeth which will shorten belt life and may cause a tooth to shear. I asked about the groove along the top (peak if you like) of the teeth to which their reply was that it's all about quiet running and patent ownership of tooth profiles - apparently they own the rights to the rounded profile - The shape of the top of the tooth profile is almost irrelevant to the function and/or strength of the belt, it's all about the root of the tooth where it meets the belt and, when inspecting an older belt, that's a particularly important area to look for any cracking.
You'll be thinking, "so what's the bottom, white, belt all about then?" Well, it's just to show that different manufacturers try different materials. This is a Dayco belt and they use a different material for the belt face which just happens to be this off white colour. This belt is actually from my Ibiza.
So, what's to learn here? The simple answer is, just buy the specified kit for your vehicle from a trusted source (dare I promote Shop4parts again? or your local motor trade factor, or whoever. But buy a "big name" product like Gates, Conti, SKF, Dayco, etc,etc. If you're not familiar with "names" a reputable local factor supplying the local garages, or, maybe Halfords even, will give you reliable advice.
As to water pumps and tensioners. You probably realize it's the shoulder flanges on the water pumps on the FIRE engines which control the run of the belt so it's very important to use the correct one which will match the belt and have the correct pitch of teeth- another reason to but a kit - So you'll just have to live with the tensioner which comes with it, more on that in a wee minute.
Then we might consider fitting of the belt? Well, on the earlier engines this is pretty simple - I'm assuming you're reasonably competent with the spanners? If you've never done a belt before then get someone "who knows" to "hold your hand" for the first time. On the older engines they are non interference so if a belt breaks, or you time it up wrong, you should be Ok, probably? These earlier engines had marks on the crank and cam pulley which were lined up with marks on the cylinder head and oil pump casing you fit the belt, tension it, and then rotate the crank two turns - to check for valve fouling in case you got it wrong (Ok, shouldn't be a possibility on the earlier engines but I've always believed in a "belt and braces" approach). This all falls apart with the later engines which have no mark on the cam pulley! Although our old Felicity, see avatar picture, was timed up in this way, both my Panda and my boy's Punto are the type which have no mark on the cam pulley.
The earlier engine - I would guess your's is this type? is therefore easy to time up and fit the belt too but then the question of tensioning the belt arises. In the workshop we had a couple of belt tensioning tools for use on these type of setups. the one I favoured was a sort of forked arrangement which fitted to the longest run of the belt and checked it's deflection against a scale. There was also a more high tech "harmonic" one bought after I moved away from the shop floor, but I never used it - I believe it was quite difficult to use as it was very sensitive. However, working at home, I didn't have the luxury of these so I, at first, used to use the "quarter turn" method, where you twist the longest run of the belt and if you can turn it through a quarter turn with reasonable force, then the tension is approximately right. It's interesting to ponder though that an engine expands when hot, as do most things, which, if you think about it, means the crankshaft centreline moves away from the camshaft centreline slightly! If you have an automatic, spring loaded, tensioner then this matters not one jot as the spring loading compensates (it's interesting to look at the pointers on an automatic tensioner when the engine is cold and then compare them when it's hot. The difference is very noticeable!) So I've long pondered about how best to adjust a "fixed" tensioner and I've evolved this method: With engine cold timing marks aligned and new belt, water pump, idlers and tensioner all fitted - leave the tensioner slightly loose. Now introduce just a very little slack into the longest run of the belt and use your forefinger and thumb on either side of the belt (one on the toothed side and the other on the smooth side) to move the belt back and forwards. Then gently tighten the belt until it's "bow string" tight, which will take the slack out of the belt all round and you may see pulleys move slightly as the slack is taken up. Now loosen the tensioner very slowly and gently until just a hint of slackness can be felt in the belt and lock up the securing nut. If you get this right the belt will have no slack in it but also no tension. You'll find that when the engine is hot the belt will now be tight with no play at all. I've adjusted many belts on different engines over the years using this method and never had a problem with either belts or component bearings.
I don't think we are talking about the later engines, without a timing mark on the cam pulley, in this thread are we? But, just to round this out, I'd say that unless you play about with these engines a lot and get really very familiar with them, you're safest course of action is to buy the timing tool kit - it's not excessively expensive for a generic set off ebay (I bought the Neilsen branded one CT3395 and it works fine) and use it to set up the pulleys. The "problem" with these later engines is that the cam pulley is not keyed to it's shaft - as are many now a days - so if someone slackens the cam pulley retaining bolt the pulley will move relative to the shaft itself and timing will be lost. Equally, if someone has previously wrongly positioned the pulley before tightening the bolt than timing will be incorrect so you'll need the timing tools to correctly set it up. If no-one has messed about with this bolt (ie if it's a first belt change or you know for sure that the pulley/shaft relationship is correct) then you can actually do these belts by the "tippex" method very successfully. but that's maybe a conversation for another day as I know there are mixed opinions on this.
Think I'll shut up now and await the rest of you all commenting on this? I have to say though, that in my opinion, these belts are very robust indeed and it's rarely the belt itself which is the cause of a failure. Much more common to find a tensioner, idler, or especially water pump with bearing failure which causes the belt to either jump teeth or come off altogether or in some other way cause damage to the belt.
A last wee consideration, and I know you more experienced folk will know this, is that, on the later engines, especially if you've slackened the cam pulley bolt, you may find the check engine light comes on after you've driven around for a while after renewing this belt. If you look at the codes you'll often find it's flagged up a miss fire code but you'll not have noticed any symptoms of missfire. What's actually happened is that the relationship between the cam and crank pulleys has changed very slightly due to the new belt/slackening and retightening of cam pulley. and the ECU, which doesn't know a new belt is fitted and/or the pulley has been repositioned, is trying to tell you something is not quite as it was before and the nearest code it can find is a missfire code. I've seen posts where folk have spent quite a bit of money replacing spark plugs, coils, HT leads, etc, etc trying to sort it out without success when what is actually needed is a "Phonic Wheel relearn" and you need either the dealer tool or
multiecuscan to do this (many forum members have this tool - there's even a thread for people willing to help).
Sorry if I've been a wee bit "rambly" here but maybe it's brought up a few pointers others might find interesting and hopefully it's been of interest to you The OP.