

You are using an out of date browser. It may not display this or other websites correctly.
You should upgrade or use an alternative browser.
You should upgrade or use an alternative browser.
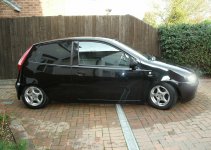
My first real photoshop
- Thread starter jip0
- Start date
Currently reading:
My first real photoshop
Dont forget when doing colours like the handles to make a new layer add a layer mask and use the brush tool to rub out and put in the bits you wants. Also when cloning look for a direction of travel. It looks like you have selected a point on the fence and pulled the brush in a straight line from the top to the bottom of the Aerial. If i were doing it i would pick a spot with a solid vertical line (hold down alt a click) like the edge of plank and then clone up and down like the grain.
OP
OP
Dont forget when doing colours like the handles to make a new layer add a layer mask and use the brush tool to rub out and put in the bits you wants. Also when cloning look for a direction of travel. It looks like you have selected a point on the fence and pulled the brush in a straight line from the top to the bottom of the Aerial. If i were doing it i would pick a spot with a solid vertical line (hold down alt a click) like the edge of plank and then clone up and down like the grain.
ah cheers ill keep that in mind
")
this is like my first attempt so any tips suggestions and that i really want
i got a sudden desperate urge to get good at photoshop lol
It can be addictive lol. But yeah i love picking peoples photoshopping apart i dont know why but i do so you come to the right place lol.
OP
OP
It can be addictive lol. But yeah i love picking peoples photoshopping apart i dont know why but i do so you come to the right place lol.
addictive is one word for it im not gonna get any work done in college now :doh:
ill probably end up posting more for you to pick at
Not bad that for a first attempt.
Although when you are selecting your objects with the polygonal lasso, zoom right in and do small clicks rather than just doing a few to get the general shape; it makes it alot smoother and curvier and better
Although when you are selecting your objects with the polygonal lasso, zoom right in and do small clicks rather than just doing a few to get the general shape; it makes it alot smoother and curvier and better
My eyes were drawn to the rear arch....Use either the circle selction tool or just as karbine says, lots of smaller accurate lasso clicks, and then trim away the excess black to give a smooth edge....
Then on the layer with the body, I'd add a drop-shadow to give some shading to the wheels and the ground....
You might have to duplicate and edit the body layer and give it 0% fill opacity to get a different amount of shadow on the ground / wheels....
Then on the layer with the body, I'd add a drop-shadow to give some shading to the wheels and the ground....
You might have to duplicate and edit the body layer and give it 0% fill opacity to get a different amount of shadow on the ground / wheels....
Looking good for a first attempt. As said try and zoom in and do smaller selections as you go round the car.
Ive spent an hour doing one once just going round the aoutside as i wanted it perfect. Takes some dedication. Havent realy done much as of lately though.
Have you tried DigiMods for any hints and tips? excellent site to start off at.
Ive spent an hour doing one once just going round the aoutside as i wanted it perfect. Takes some dedication. Havent realy done much as of lately though.
Have you tried DigiMods for any hints and tips? excellent site to start off at.
My eyes were drawn to the rear arch....Use either the circle selction tool or just as karbine says, lots of smaller accurate lasso clicks, and then trim away the excess black to give a smooth edge....
Then on the layer with the body, I'd add a drop-shadow to give some shading to the wheels and the ground....
You might have to duplicate and edit the body layer and give it 0% fill opacity to get a different amount of shadow on the ground / wheels....
Thats why i use masks and brush tool when cutting out. You can hold down the shift key and do lots of small straight lines with your brush to get an accurate shape. Also that way you can see exactly what you are doing as you go, so if you mess up a click or 2 you can just go back through your history.
Also its very easy to paint white over your actual image by accidentally forgeting to click on the mask. If you create a bright solid colour layer under the layer you are working on then you will see that colour as you mask out the layer above.
Did that make any sense?
Yeah but your an experienced Pro, you probably know every trick in the book. I bet your photoshop skills are pretty good too.
I don't do much photo-work with it for work though....
Just for touching up your Barely legal pron at home then yeah Sorry its friday.
Sorry its friday.
OP
OP
cheers for the tips guys haven't found much time to be doing anymore but will do soon
Ok i got a bit bored lol so i thought i would do a little guide. It may not be needed but hey ho.
I thought i would show you how to cut out a full product but the same basic principle will apply for anything that you want to over lay.
Step one
Choose your photo (In this case a rather boring train)
I have then added a solid pink layer underneath.

Step 2
Add vector mask to your photo. (3rd Icon in from the left at the bottom of your layers pallet)

Press x to bring black to front if it isnt already.
Select the brush tool (in this instance i am using a brush size of 15 and hardness of 25%.)
Start to cut out the parts that you dont want i.e background. I click my first position and then go round the product holding the shift key. That way when you click on another position it will follow the click before in a straight line.
You will end up with something like below. Notice that you can see the colour of the layer beneath. Then if you forget to brush on your layer mask it will be a different colour.

Once you have gone round the whole of your object alt click your layer mask and it will black and white out your image. It is important that the black line is closed for the next stage.

Select the white areas that you want to delete with your magic wand tool. Then go Select > Modify > Expand. Type in a number around half of the brush stoke. Then press Alt and delete to get rid of the unwanted white leaving you with something like this.

To get back to normal view just click on any true layer in the layers pallet.
Simples
Ok so you dont like the colour of your train (because everybody hates the colour of their train)
So Create a duplicate of the train layer with its layer mask. (Hold Shift and drag train layer upwards)
Then hold down the alt key and select, selective colour from the create fill or adjustment layer button (4th button from right at bottom of layers pallet)
Click use previous layer as clipping mask.
Press ok.
Then click colourize
And play with the Hue, saturation and lightness.

Select the whole artboard with the rectangular marquee tool and delete out (turn black) the whole of your new colour layer.
Then use the white brush tool on your adjustment layer to put the colour over the top

Oh no's i here you say i have gone over the edge.
Have no fear this is easy to sort.
Apple (or whatever the hell apple is on a PC) Click the layer mask on your original layer. This will create a selection.
Click on your colour adjustment layer, layer mask. Go Select > Feather > 0.5 pixels
Apple + Shift + i to inverse selection then Delete or alt delete depending on what colour you have in front in the colour pallet.

Obviously i have way too much contrast on my colour adjustment layer. If anybody wants me to do a guide on how to accurately colour adjust and match then i can.
I thought i would show you how to cut out a full product but the same basic principle will apply for anything that you want to over lay.
Step one
Choose your photo (In this case a rather boring train)
I have then added a solid pink layer underneath.
Step 2
Add vector mask to your photo. (3rd Icon in from the left at the bottom of your layers pallet)
Press x to bring black to front if it isnt already.
Select the brush tool (in this instance i am using a brush size of 15 and hardness of 25%.)
Start to cut out the parts that you dont want i.e background. I click my first position and then go round the product holding the shift key. That way when you click on another position it will follow the click before in a straight line.
You will end up with something like below. Notice that you can see the colour of the layer beneath. Then if you forget to brush on your layer mask it will be a different colour.
Once you have gone round the whole of your object alt click your layer mask and it will black and white out your image. It is important that the black line is closed for the next stage.
Select the white areas that you want to delete with your magic wand tool. Then go Select > Modify > Expand. Type in a number around half of the brush stoke. Then press Alt and delete to get rid of the unwanted white leaving you with something like this.
To get back to normal view just click on any true layer in the layers pallet.
Simples
Ok so you dont like the colour of your train (because everybody hates the colour of their train
)So Create a duplicate of the train layer with its layer mask. (Hold Shift and drag train layer upwards)
Then hold down the alt key and select, selective colour from the create fill or adjustment layer button (4th button from right at bottom of layers pallet)
Click use previous layer as clipping mask.
Press ok.
Then click colourize
And play with the Hue, saturation and lightness.
Select the whole artboard with the rectangular marquee tool and delete out (turn black) the whole of your new colour layer.
Then use the white brush tool on your adjustment layer to put the colour over the top
Oh no's i here you say i have gone over the edge.
Have no fear this is easy to sort.
Apple (or whatever the hell apple is on a PC) Click the layer mask on your original layer. This will create a selection.
Click on your colour adjustment layer, layer mask. Go Select > Feather > 0.5 pixels
Apple + Shift + i to inverse selection then Delete or alt delete depending on what colour you have in front in the colour pallet.
Obviously i have way too much contrast on my colour adjustment layer. If anybody wants me to do a guide on how to accurately colour adjust and match then i can.
OP
OP
ah that's awesome ill defiantly be using that next time i get some decent time on photoshop
been doing some digital tattoos recently lol not very good at it though
been doing some digital tattoos recently lol not very good at it though
Apple key is the equivalent of the Ctrl key I think.....
Well I know Ctrl clicking the layer loads it so i'm assuming it is!
Well I know Ctrl clicking the layer loads it so i'm assuming it is!
Breaking the mac code knowing that TBP, im very disappointed. I thought the ctrl key was for right click
Haven't used a Mac since my LCIII way back when....I have no Apple code....