

beemerdave
New member
MAF Cleaning on a Stilo Multiwagen
Never heard of a MAF until I came onto this forum!
The Stilo is my second Fiat. My first being a Fiat Ritmo when I was in the forces based in Germany, er...cough..a few years ago.
After some extensive reading of posts on here, I came to the conclusion that my newly aquired Stilo Multiwagen needed it's Mass Air Filter Sensor cleaning. This came about because when I picked up the stilo, the MAF connection was disconnected, and when I connected it, the car was gutless below 3000 revs, and when disconnected it run fine.
It took be the best part of a day (following instructions on this forum) to remove the battery, attempt to remove the battery tray (unsuccessfully), and then disconnect the air filter box, adapt the hinge on the box cover to allow me to remove the cover and filter past the very secure (rusted) battery tray to get at the MAF sensor.
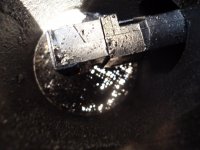
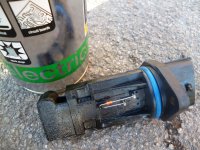
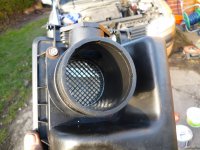
To my shock and horror I discovered that the mesh inside the box was almost completly covered with a greasy mess and so set about its cleaning. As advised I used electrical cleaning spray on the sensor itself and a mix of a paint brush, WD40 and an air gun to remove all the gunk out of the mesh.
The air filter was a bit dirty too, and the air box had a hole in the top where the bracket that should hold the box had broke off.
The sensor itself was secured by two 5 pin star screws, which eventually were removed with a pair of pliers, after I had unsuccessfully attempted to unscrew using newly purchased Halfords 6 pin tool set....doh!
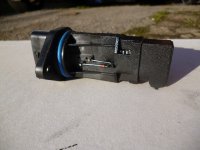
After cleaning, repairing the hole in the box and ensuring everything was dry I refitted the sensor with two pozidrive screws (easier to remove next time) and replaced battery and did a test drive.
Everything seems to be running ok, after a few restarts the warning lights switched themselves off until I am left with just a preheat fault and engine management light on (I expected this).
My next project is to concentrate on the Preheat fault (with the help of this forum).
Thanks to all who have posted the instructions, no doubt you have saved me many pounds already.
Reposted, because I think I posted in the wrong thread initially.
Dave
Never heard of a MAF until I came onto this forum!
The Stilo is my second Fiat. My first being a Fiat Ritmo when I was in the forces based in Germany, er...cough..a few years ago.
After some extensive reading of posts on here, I came to the conclusion that my newly aquired Stilo Multiwagen needed it's Mass Air Filter Sensor cleaning. This came about because when I picked up the stilo, the MAF connection was disconnected, and when I connected it, the car was gutless below 3000 revs, and when disconnected it run fine.
It took be the best part of a day (following instructions on this forum) to remove the battery, attempt to remove the battery tray (unsuccessfully), and then disconnect the air filter box, adapt the hinge on the box cover to allow me to remove the cover and filter past the very secure (rusted) battery tray to get at the MAF sensor.
To my shock and horror I discovered that the mesh inside the box was almost completly covered with a greasy mess and so set about its cleaning. As advised I used electrical cleaning spray on the sensor itself and a mix of a paint brush, WD40 and an air gun to remove all the gunk out of the mesh.
The air filter was a bit dirty too, and the air box had a hole in the top where the bracket that should hold the box had broke off.
The sensor itself was secured by two 5 pin star screws, which eventually were removed with a pair of pliers, after I had unsuccessfully attempted to unscrew using newly purchased Halfords 6 pin tool set....doh!
After cleaning, repairing the hole in the box and ensuring everything was dry I refitted the sensor with two pozidrive screws (easier to remove next time) and replaced battery and did a test drive.
Everything seems to be running ok, after a few restarts the warning lights switched themselves off until I am left with just a preheat fault and engine management light on (I expected this).
My next project is to concentrate on the Preheat fault (with the help of this forum).
Thanks to all who have posted the instructions, no doubt you have saved me many pounds already.
Reposted, because I think I posted in the wrong thread initially.
Dave

")