This may be in wrong area, so please edit if required.
Recently I needed to change the gearbox on my 2014 Vauxhall Combo D 1.3 mj as syncros worn grating the gears, now before you shout me down, swap the badges and apart from MES not recognising the ECU and Vin. number. etc. basically the same model, so clutch and gearbox job details are relevant.
So with vehicle on level concrete, slacken wheel nuts and also hub nuts (this is a 33mm in my case and required the edges ground off a socket to fit recess, I have read of others with similar issue), battery and support base removed, slacken but leave nuts on just enough on n/s gearbox support for now, remove bolts that cover clutch slave cylinder so you can access and remove clutch cylinder, hanging it to one side so no need to bleed. I then sprayed the gear linkage with WD40 and prised the ball joints off, then where the outers are supported you pull the large spring loaded ends towards the middle of car to release the cables from the bracket, next you may want to remove that bracket and base underneath completely to give more access (I didn’t and had no problem , however the S/H replacement gearbox had those brackets broken so your choice),it is a good idea to release the two DPF pressure pipes to the sensor on the bulkhead so they don’t strain.
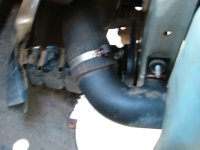
Next the turbo pipe where it goes into the inlet manifold needs undoing the two 10mm bolts and pull it free, next top bell housing bolts need to be removed (one supports the turbo pipe) , remove reverse light switch plug and the earth strap to gearbox. You may now want to undo the plastic bumper/front panel top bolts where they are screwed to slam panel between headlights.
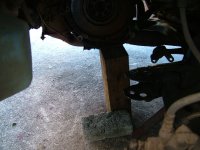
Now jack vehicle up with a decent garage style trolley jack and position two good axle stand under chassis giving you enough working height under vehicle. Make sure stands well secure and handbrake firmly on.
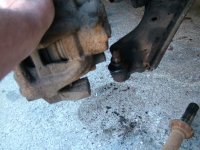
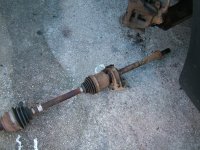
Remove both front wheels and drive shaft hub nuts, next undo bottom ball joint pinch bolts and prise lower wishbones down and away, at the same time move the steering to allow the drive shaft ends to come away from the front hubs. Under middle of gearbox is a small allen screw to drain the gear oil , once drained and screw refitted firmly, the O/S drive shaft has a centre mounting on the engine block, undo the three 13mm? bolts ease the shaft away from engine and remove drive shaft complete with mounting. Incidentally a good time to check that bearing as can whine with road speed like a wheel bearing.
The N/S is held in the gearbox with a circlip similar to outer CV joints so should come out with a bit of leverage and a tap with a hammer (mine wouldn’t until gearbox was on the floor!) next remove engine/gearbox stabiliser and bracket. Next disconnect exhaust at bottom of DPF to allow more engine movement forward,(mine did want to come apart so I dropped entire exhaust and supported it to allow engine movement) next remove remaining bell housing bolts including the large nut below the starter (starter stays on engine so no need to undo electrics).
On N/S remove inner wheel arch cover and release front bumper/front panel to allow it to unhook from around headlights plus the four screws holding that panel below radiator and move away enough to access the front four bolts that along with the back two bolts that hold the short section of chassis forward of the inner wishbone to allow a path for the gearbox to come out, you may need to release the turbo pipe there also by washer bottle.
Now with your garage jack and a suitable rubber pad positioned under the engine sump as near to flywheel end as possible,. Take the load gently then undo the already loosened gearbox mount from chassis and lower carefully the engine, this should expose the three mounting bolts on the gearbox bracket where held on gearbox, so remove them and bracket. Now very carefully lower jack a bit further and as exhaust is disconnected it should be possible to move the engine forward enough for the gearbox to come out where the chassis section was unbolted, remember all the bell housing bolts are out, so someone needs to be in place to catch the gearbox before it smashes into the ground.")
Note on the return journey I needed to use a car scissor jack positioned between subframe and bottom of engine block to hold the engine forward enough to help slide the gearbox back.
Note good control is important on the jack so as not to drop it to far and strain any hoses or fittings.
Also if possible to undo the long bottom starter stud it gives more clearance to refit gearbox.
This job should be possible for a competent DIY with a reasonable set of tools and common sense.
A garage would have the use of a ramp, a hydraulic gearbox support and power tools and have finished the job whilst you are still reading this, at 71 outside my house it took a little longer.
I think I have listed most of the salient points but feel free to correct me.
Recently I needed to change the gearbox on my 2014 Vauxhall Combo D 1.3 mj as syncros worn grating the gears, now before you shout me down, swap the badges and apart from MES not recognising the ECU and Vin. number. etc. basically the same model, so clutch and gearbox job details are relevant.
So with vehicle on level concrete, slacken wheel nuts and also hub nuts (this is a 33mm in my case and required the edges ground off a socket to fit recess, I have read of others with similar issue), battery and support base removed, slacken but leave nuts on just enough on n/s gearbox support for now, remove bolts that cover clutch slave cylinder so you can access and remove clutch cylinder, hanging it to one side so no need to bleed. I then sprayed the gear linkage with WD40 and prised the ball joints off, then where the outers are supported you pull the large spring loaded ends towards the middle of car to release the cables from the bracket, next you may want to remove that bracket and base underneath completely to give more access (I didn’t and had no problem , however the S/H replacement gearbox had those brackets broken so your choice),it is a good idea to release the two DPF pressure pipes to the sensor on the bulkhead so they don’t strain.
Next the turbo pipe where it goes into the inlet manifold needs undoing the two 10mm bolts and pull it free, next top bell housing bolts need to be removed (one supports the turbo pipe) , remove reverse light switch plug and the earth strap to gearbox. You may now want to undo the plastic bumper/front panel top bolts where they are screwed to slam panel between headlights.
Now jack vehicle up with a decent garage style trolley jack and position two good axle stand under chassis giving you enough working height under vehicle. Make sure stands well secure and handbrake firmly on.
Remove both front wheels and drive shaft hub nuts, next undo bottom ball joint pinch bolts and prise lower wishbones down and away, at the same time move the steering to allow the drive shaft ends to come away from the front hubs. Under middle of gearbox is a small allen screw to drain the gear oil , once drained and screw refitted firmly, the O/S drive shaft has a centre mounting on the engine block, undo the three 13mm? bolts ease the shaft away from engine and remove drive shaft complete with mounting. Incidentally a good time to check that bearing as can whine with road speed like a wheel bearing.
The N/S is held in the gearbox with a circlip similar to outer CV joints so should come out with a bit of leverage and a tap with a hammer (mine wouldn’t until gearbox was on the floor!) next remove engine/gearbox stabiliser and bracket. Next disconnect exhaust at bottom of DPF to allow more engine movement forward,(mine did want to come apart so I dropped entire exhaust and supported it to allow engine movement) next remove remaining bell housing bolts including the large nut below the starter (starter stays on engine so no need to undo electrics).
On N/S remove inner wheel arch cover and release front bumper/front panel to allow it to unhook from around headlights plus the four screws holding that panel below radiator and move away enough to access the front four bolts that along with the back two bolts that hold the short section of chassis forward of the inner wishbone to allow a path for the gearbox to come out, you may need to release the turbo pipe there also by washer bottle.
Now with your garage jack and a suitable rubber pad positioned under the engine sump as near to flywheel end as possible,. Take the load gently then undo the already loosened gearbox mount from chassis and lower carefully the engine, this should expose the three mounting bolts on the gearbox bracket where held on gearbox, so remove them and bracket. Now very carefully lower jack a bit further and as exhaust is disconnected it should be possible to move the engine forward enough for the gearbox to come out where the chassis section was unbolted, remember all the bell housing bolts are out, so someone needs to be in place to catch the gearbox before it smashes into the ground.
Note on the return journey I needed to use a car scissor jack positioned between subframe and bottom of engine block to hold the engine forward enough to help slide the gearbox back.
Note good control is important on the jack so as not to drop it to far and strain any hoses or fittings.
Also if possible to undo the long bottom starter stud it gives more clearance to refit gearbox.
This job should be possible for a competent DIY with a reasonable set of tools and common sense.
A garage would have the use of a ramp, a hydraulic gearbox support and power tools and have finished the job whilst you are still reading this, at 71 outside my house it took a little longer.
I think I have listed most of the salient points but feel free to correct me.