

Ducato X250 (2006 to 2014) - Instrument “Sticky Needle” Repair
After a van has not been driven for a long while, you may find one or more of the instrument needles not working properly. They may stick at zero, may move up but not down and get stuck at some random value, or may acquire an offset from the correct reading. Thumping the top of the dashboard has no beneficial effect !

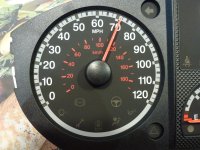
Speedo stuck at 70 MPH
All four needles are driven by the same Chinese miniature geared stepper motors. My suspicion is that the inbuilt lubricant gradually gets thicker over time, and the drag eventually becomes more than the torque the motor can provide. This problem is worse in cold weather so if very lucky you might find that driving around with the heater on will bring things back to normal.


Stepper motors at rear of instrument Printed Circuit Board
Fortunately there appears to be a cure. If the needle can be worked up and down a few times, this frees off the motor and it will work properly again, especially if the van is then used regularly e.g. once a month. If this technique fails, the more adventurous can fit a new motor (about £25) or have the cluster professionally repaired (about £150).
Here is how to do the “needle work” cure. With ignition key removed from the steering lock, keep the passenger door unlocked and open. Remove the grey plastic “hood” dashboard section over the top of the instrument cluster, it’s held by a T25 torx screw each side at the front under the “brow”, and a couple of spring clips at the back. With screws removed, insert fingers or a plastic wedge under the gap at the back and pull upwards to detach.

Hood fixing screw (2)

Hood spring clip (2)
Now remove the cluster, it’s held by a T25 torx screw at each side. Lift up a few inches then remove the multi-way connector by swinging the red retaining latch after depressing the small black barb.

Cluster fixing screw (2)

Multiway connector
On the bench, the black plastic rear cover moulding must be removed from the cluster. Carefully pry open the plastic barb fixings all the way round.

Cluster cover barb fixing
The rear cover and the clear plastic front cover can now easily be pulled off, exposing the needles. Using a small artist’s paintbrush, gently and slowly move the affected needle(s) up and down their scales a few times to free off the stepper motors. Leave them at the zero point of their travel.

Speedo reset to zero
If the panel is cold, it may be an idea to first gently warm the motor body (at the rear of the PCB) with a hairdryer but don’t go too mad ! I have not tried it, but the exposed rear tip of the spindle in the motor body could also be given a tiny dot of thin lubricant.
Reassembly is the reverse of the above. After the multiway connector has been replaced and power is applied, you will need to reset the clock.
If this technique is unsuccessful, you may need to replace the motor. This requires access to the PCB and involves a greater degree of skill so it is not covered in detail here. All four needles have to be pulled off their spindles so that the legended panel can be removed. From then on, normal PCB solder repair and anti-static precautions apply.
After a van has not been driven for a long while, you may find one or more of the instrument needles not working properly. They may stick at zero, may move up but not down and get stuck at some random value, or may acquire an offset from the correct reading. Thumping the top of the dashboard has no beneficial effect !
Speedo stuck at 70 MPH
All four needles are driven by the same Chinese miniature geared stepper motors. My suspicion is that the inbuilt lubricant gradually gets thicker over time, and the drag eventually becomes more than the torque the motor can provide. This problem is worse in cold weather so if very lucky you might find that driving around with the heater on will bring things back to normal.
Stepper motors at rear of instrument Printed Circuit Board
Fortunately there appears to be a cure. If the needle can be worked up and down a few times, this frees off the motor and it will work properly again, especially if the van is then used regularly e.g. once a month. If this technique fails, the more adventurous can fit a new motor (about £25) or have the cluster professionally repaired (about £150).
Here is how to do the “needle work” cure. With ignition key removed from the steering lock, keep the passenger door unlocked and open. Remove the grey plastic “hood” dashboard section over the top of the instrument cluster, it’s held by a T25 torx screw each side at the front under the “brow”, and a couple of spring clips at the back. With screws removed, insert fingers or a plastic wedge under the gap at the back and pull upwards to detach.
Hood fixing screw (2)
Hood spring clip (2)
Now remove the cluster, it’s held by a T25 torx screw at each side. Lift up a few inches then remove the multi-way connector by swinging the red retaining latch after depressing the small black barb.
Cluster fixing screw (2)
Multiway connector
On the bench, the black plastic rear cover moulding must be removed from the cluster. Carefully pry open the plastic barb fixings all the way round.
Cluster cover barb fixing
The rear cover and the clear plastic front cover can now easily be pulled off, exposing the needles. Using a small artist’s paintbrush, gently and slowly move the affected needle(s) up and down their scales a few times to free off the stepper motors. Leave them at the zero point of their travel.
Speedo reset to zero
If the panel is cold, it may be an idea to first gently warm the motor body (at the rear of the PCB) with a hairdryer but don’t go too mad ! I have not tried it, but the exposed rear tip of the spindle in the motor body could also be given a tiny dot of thin lubricant.
Reassembly is the reverse of the above. After the multiway connector has been replaced and power is applied, you will need to reset the clock.
If this technique is unsuccessful, you may need to replace the motor. This requires access to the PCB and involves a greater degree of skill so it is not covered in detail here. All four needles have to be pulled off their spindles so that the legended panel can be removed. From then on, normal PCB solder repair and anti-static precautions apply.
